To see a video demonstration, watch: https://youtu.be/VnCrHaQKHXE
1) Right click the Databases folder and select new database
2) Enter testDB for the database name and click OK
To see a video demonstration, watch: https://youtu.be/XyVXPSXzyvs
1) Expand the testDB database and right click on the Tables folder. Select New Table
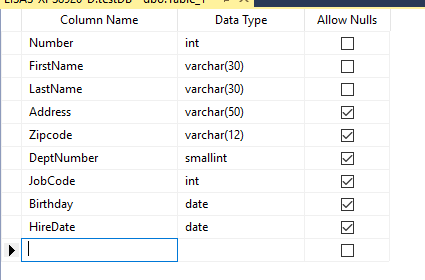
2) Add the following columns, data types and null settings:
3) Set the Number column as the primary key (right click the selector box to the left of Number and select Set Primary Key)
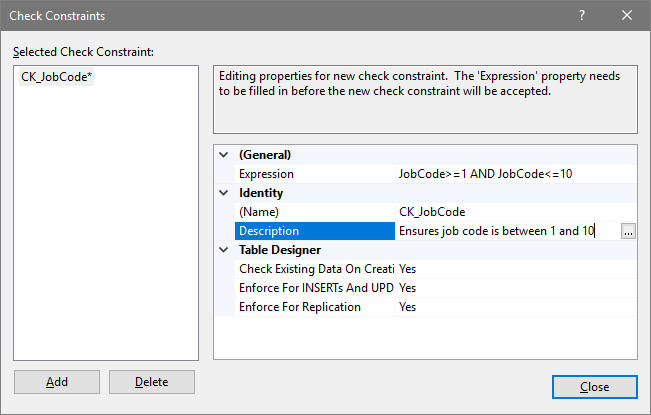
4) Right click JobCode and add a constraint so JobCode is between 1 and 10 (enter the name CK_JobCode as a name for the constraint). Click Close when you are done.
5) Click the Save button on the toolbar and save the table as Employee
6) Keep the table open and create another table for departments using the columns, data types and null settings shown below:
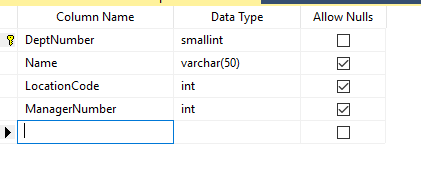
7) Set DeptNumber as the primary key
8) Save the table and name it Departments
9) Open the Employee table in the table designer, right click DeptNumber and select Relationships.
a) Click the ADD button.
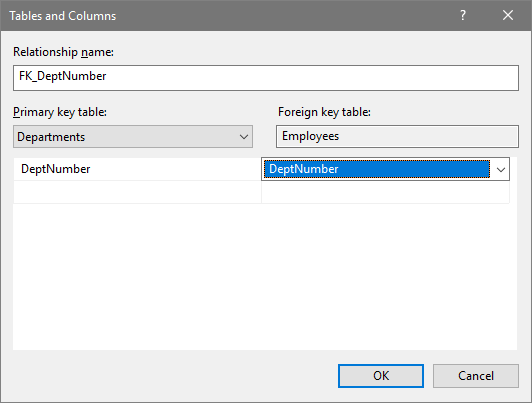
b) Change the Name to
FK_DeptNumber
c) Click on Tables and Columns Specific, then
click the button with the ... on the right side
d) In the
Tables and Columns dialog, select Departments for the Primary key table
and Employee for the foreign key table.
e) Click the
row below Departments to get a list arrow and click the list arrow and
select DeptNumber
f) Click the row below Employee to get the
list arrow and select DeptNumber
g)
Click OK to return to the Foreign Key relationship dialog and then click
Close
10) Click Save and answer yes at the prompt about saving both tables.
To see a video demonstration, watch: https://youtu.be/jnFaEe-nh_Q
1) Close the tables
2) Right click testDB, select Tasks, select Generate Scripts
3) Select Choose Objects
4) Leave Script entire database and all database objects selected and click Next
5) For scripting options, select Open in new query window. Then, click Next.
6) You should see a summary of what is being scripted - click Next and then click Finish
7) You should see the script display in a new query window. If you scroll down, you will see the SQL code for creating the tables and adding the constraints.
8) Save the SQL file as testDB-SQL-Code.sql
9) Upload the file to the Chapter 12 dropbox
To see a video demonstration, watch: https://youtu.be/M5Gqu95yEuE
1) Right click on New_AP, select tasks, select Backup, choose a full backup
2) By default,backups go to Program Files\ Microsoft SQL
Server\MSSQL15.MSSQLServer\MSSQL\Backup\NewAP.bak
NOTE: You may see MSSQL13 or MSSQL14 instead of MSSQL15 if you are not using the most current version. When you view the Backup Up Database window, you can see the location the file will be saved to next to the ADD button.
3) Click OK to create the backup
4) Follow the same steps for Test_AP and testDB
5) Launch the windows explorer and open the C drive followed by the following folders: Program Files\ Microsoft SQL Server\MSSQL15.MSSQLServer\MSSQL\Backup\
6) Upload the three backup files to the Chapter 12 dropbox