
3. Run the query
To see a video demonstration, view: https://youtu.be/9GBN8eKWqiw
1. Launch SSMS and use the New Query command. At the top of the query window, type /* Your Name, press the enter key and type Task #1 */
2. The Invoices table includes InvoiceNumber and VendorID. VendorID is the foreign key that connects Invoices to Vendors. We will use that connection to retrieve the VendorName from the Vendors table. Both tables are in the AP database.
A few things to note:
a. Since InvoiceNumber is only in the Invoices table and VendorName is only in the Vendors table, we don't need to prefix them with the table names.
b. To retrieve data from two tables requires a join. Since we only want vendors that are on a specific invoice, we are doing an inner join.
c. The column that we are joining on is VendorID. This column is in both tables. It is the primary key in the Vendors table and the foreign key in the Invoices table. Because the column name is the same in both tables, we DO have to prefix it with the name of the table.
d. To ensure that we only display vendors that have a balance greater than zero we will need to insert a where clause with the balance due calculation. The columns in the calculation (InvoiceTotal, PaymentTotal and CreditTotal) are unique to the Invoices table and do not require the table prefix
Enter the query shown below:
USE AP;
SELECT InvoiceNumber, VendorName
FROM Vendors
JOIN Invoices ON Vendors.VendorID = Invoices.VendorID
WHERE InvoiceTotal-PaymentTotal-CreditTotal>0;
3. Execute the query
4. Save the query as: chapter4-textbook-assignment.sql
5. Move the closing comment, */, to the end of the query
To see a video demonstration, view: https://youtu.be/9A8vzWTLOvQ
1. Below the closing comment enter the heading, Task #2, and move the closing comment after the heading.
2. We need to create a select statement that does the following:
a) Use the AP database
b) Select the following columns:
c) To make the query easier to read and understand, we are going to prefix the column names with the table names. Because the InvoiceLineItems table name is so long, we are going to give both tables aliases. We are going to give the Invoices table an alias of the letter i. We are going to give InvoiceLineItems an alias of the letters li (short for line items)
d) The data should be filtered by AccountNo=540 (AccountNo is in the InvoiceLineItems table)
e) The data should be sorted by InvoiceDate (which is in the Invoices table)
Example:
3. Run the query
4. Move the closing comment to the end of the query
5. Save your changes.
To see a video demonstration, view: https://youtu.be/D9RW582bTwY
1. Enter the heading Task #3 and move the closing comment after it.
2. We need to create a left join using the Departments table and Employees table from the Examples database. We will give Departments an alias of d and Employees an alias of e
3. We need to make sure we include the following in our select statement:
a) Query the tables for:
b) Join the tables on:
When you are done, your query should look like the example shown below:
USE Examples;
SELECT d.DeptName, e.LastName
FROM Departments AS d
LEFT JOIN Employees AS e
ON d.DeptNo = e.DeptNo;
4. Run the query. The LEFT JOIN includes everything from table 1 (Departments) regardless if there is a matching row in Employees. If a department doesn't have any employees, it will display NULL for the LastName.
5. Move the closing comment to the end of the query.
To see a video demonstration, view: https://youtu.be/793Rw5geDgU
1. Enter Task #4 below the existing query and move the closing comment, */, to the end of the heading
2. Copy/paste the query you just completed and change the LEFT JOIN to RIGHT JOIN.
3. Run the query. The RIGHT JOIN includes everthing from table 2 (Employees) regardless if there is a matching row in Departments. If a department doesn't exist for an employee, you will see NULL displayed.
4. Move the closing comment to the end of the query
5. Save your changes.
To see a video demonstration, view: https://youtu.be/pnUu1pdhQZ0
1. Enter Task #5 below the existing query and move the closing comment, */, to the end of the line
2. Copy/paste the right join query we just did and change the RIGHT JOIN to FULL JOIN
3. Run the query. You will notice that all employees are listed even if they haven’t been assigned a department AND departments are listed even though they don’t have employees assigned to them
4. Move the closing comment ot the end of the query
5. Save your changes.
1. Copy/paste the full join query and change the FULL JOIN to just JOIN (or INNER JOIN)
NOTE: The FULL JOIN is the least restrictive and the INNER JOIN is the most restrictive.
2. Run the query. You should notice that ONLY values that match in both tables are displayed (so all the NULL references are gone).
3. Move the closing comment ot the end of the query
4. Save your changes.
To see a video demonstration, view: https://youtu.be/vYZxpSzI5Ro
1. Enter Task #6 and move the closing comment to the end of the heading
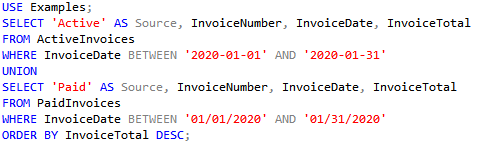
2. We need to retrieve the same data from two different tables in the Examples database: ActiveInvoices and PaidInvoices.
a) We will need 2 select statements and we will combine the result sets with the UNION operator. Each select statement should include the following columns:
b) We will need to add a column indicating whether the data comes from the paid invoices or active invoices table. We will manually create this column (it will not come from any of the tables)
c) We need to include a WHERE clause that ensures the InvoiceDate is between '2020-01-01' AND '2020-01-31'
d) We need to sort everything by the invoice total
Enter the following Select statement to retrieve data from the ActiveInvoices table.

3. Run the query to see what the result set is.
4. Add the following Select statement below the current one (we will run both of them and get 2 result sets).

5. To combine the 2 result sets into a single result set, remove the semicolon at the end of the first select and add the UNION clause between the two selects. Then, add the ORDER BY clause to sort the result-set by the InvoiceTotal column as shown below:
6. Run the query. You should notice the two result sets have been combined into one result set and everything is now sorted by Invoice Total
7. Move the closing comment to the end of the query
8. Save your changes.
To see a video demonstration, view: https://youtu.be/6gHgsYVhwKg
1. Enter Task #7 and move the closing comment to the end of the heading
2. We will be using the Examples database with the Customers and Employees tables. We will display the first and lastname of each employee and of each customer and then we will use the INTERSECT command to see which ones overlap.
USE Examples;
SELECT CustomerFirst, CustomerLast FROM Customers;
SELECT FirstName, LastName FROM Employees;
3. Run the query - you should see two result sets (one for customers, one for employees). If we only want to see customers who are also employees, we can use INTERSECT to display rows that overlap.
4. Modify the query to by removing the semicolon after FROM Customers and adding INTERSECT to the line between FROM Customers and SELECT FirstName, LastName
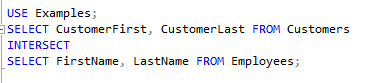
5. Run the query. You should see one result set with a row indicating which employee is also a customer.
6. Move the closing comment after the query.
1. Copy the INTERSECT query and paste it below the closing comment.
2. Change the query to an EXCEPT query
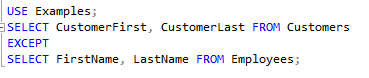
3. Run the query. You should note that it will show all customers and remove employee “customers” from the list.
4. Move the closing comment to the end of the query.
5. Save your changes.
To see a video demonstration, view: https://youtu.be/boPQcyHhqDA
1. Enter Task #8 and move the closing comment to the end of the heading
2. The request sounds very simple; however, the data we need to display is in 3 different tables in the Examples database:
3. We will need to create a query that joins 3 tables. The easiest way to accomplish this is to break the task down into smaller pieces. We are going to do the first join, run the query and then add in the second join.
a) For the first join, we want all the employees included in the Employees table. The employees table is table1. We want related project numbers from the Projects table which is table2. If a project number doesn't exist for an employee, NULL will automatically be displayed if we use a LEFT JOIN.
b) We need to query the tables for:
c) We need to join the tables on:
The query should look like the example below:

d) Run the query and save your changes.
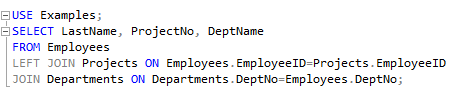
4. We want to know the name of the department each employee belongs to. That information is in the Departments table. We will need to modify our query to add another column AND to add another join statement.
a) We need to query the tables for:
b) We need to join the tables on:
Example:
5. Run the query and save your changes
6. Move the closing comment to the end of the query.
7. Save your changes.
8. Upload the file to the dropbox in Moodle.