
Create two horizontal navigation bars
Create an icon navigation bars
You will be converting your assignment page into a page that displays 2 menu navigation bars: 1 for the textbook assignments and 1 for the lab assignments.
You will also be adding at least 4 navigation icons to the footer section of your page.
The example below is similar to what you will be doing.
To see a video that shows you how to make changes to the html and css, watch: https://youtu.be/Oilt0WpEYV4
1. To begin, copy/paste assignments.html Rename the copy and call it assignmentsV1.html (for version 1).
2. Open the css folder and copy/paste assignments.css. Rename the copy and call it assignmentsV1.css (for version 1)
At this point, you should have the following files:
assignments.html
assignmentsV1.html
css/assignments.css
css/assignmentsV1.css
You will be making changes to assignments.html AND css/assignments.css The files named with V1 are your original versions.
3. Modify the HTML in the assignments.html file to create nested lists.
a) To accomplish this, add a <nav> tag below the <section> tag as shown in the revised code below section e)
b) Insert a <ul> tag before the <h2>Textbook Assignments</h2> heading. Please note the validator doesn't like nested lists and will probably indicate the code isn't valid, when the code is perfectly fine.
c) Change <h3>Lesson2</h3> to <li><a href="#">Lesson 2</a> Do NOT put the ending</li> tag in yet - this is where the nested list will go and the </li> goes after the nested list NOTE: The reason we added <a href="#"> Lesson 2</a> is to allow touch devices to see the submenu (they cannot hover the mouse, so the user has to press Lesson 2 to see the submenu and using the fake link lets them do that.)
d) Below the lesson, you don't need to change the <ul> or <li> tags with the links because they will be your submenu
e) After the </ul> for the nested list, insert the </li> tag which goes with the Lesson 2 text
Revised code:
<section>
<nav>
<ul><h2>Textbook
Assignments</h2>
<li><a href="#">Lesson 2</a>
<ul>
<li><a href="Lesson2/bottom-navigation.html">bottom-navigation.html</a></li>
<li><a href="Lesson2/top-navigation.html">top-navigation.html</a></li>
<li><a href="Lesson2/Road-Not-Taken.html">Road-Not-Taken.html</a></li>
<li><a href="Lesson2/butterfly-garden.html">butterfly-garden.html</a></li>
</ul>
</li>
f) You will need to make the same changes to Lesson 3, that you made to Lesson 2:
1. Change <h3>Lesson3</h3> to <li><a
href="#">Lesson3</a>
2.
Insert the </li> after the </ul> for the nested list
<li><a href="#">Lesson 3</a>
<ul>
<li><a href="Lesson3/mackinac-photos.html">mackinac-photos.html</a></li>
<li><a
href="Lesson3/yosemite.html">yosemite.html</a></li>
<li><a href="Lesson3/top-rock.html">top-rock.html</a></li>
</ul>
</li>
3. Continue making these changes through Lesson 9
After you complete Lesson 9, you will need to add an </ul> tag and an </nav> tag as shown below:
<li><a href="#">Lesson 9</a>
<ul>
<li><a href="Lesson9/famousQuote.html">f<span
class="auto-style1">amousQuote.html</span></a></li>
<li><a href="Lesson9/cube.html">cube.html</a></li>
<li><a href="Lesson9/bouncing-ball.html">bouncing-ball.html</a></li>
<li><a href="Lesson9/song-snippets.html">song-snippets.html</a></li>
</ul>
</li>
</ul> /* ends the
main menu */
</nav>
/* ends the navigation section */
4. Perform the same changes on the lab assignment section of the page.
5. Add the CSS for a horizontal navigation menu. There are 2 examples you can copy from: Acme-Horizontal/css/acme-horizontal.css OR my-profitable-web-design-business.html The css should go into the assignment.css that is in your css folder. You will need to modify colors to match your assignment page, you should NOT need to make too many changes.
If you are experimenting with colors or effects, it is a good idea to copy code and comment out the original code by putting the code between /* and */ By commenting out the original code, you still have it accessible if you don't like the new effect and want to revert back to the original. Any code displayed within comments is ignored by the web browser. When you are working on different effects, commenting out code is extremely useful!
6. After adding the navigation bars, you may want to resize your background image - you can use background-size:cover; to expand the image and fill the screen or you can use background-size:contain to keep it in proportion (it may not fill the screen though)
To see a video showing you how to add the navigation bar icons, watch: https://youtu.be/ObgiVVC-P6M
This is very similar to what we did in the profitable business page.
1. You should be able to take the icon CSS code from the profitable business page and copy/paste it to the bottom of your CSS in the assignment page You will probably want to modify the colors and width of the icons.
2 Next, add the icon code to the footer. You should include links to your own sites or sites you like INSTEAD of links to my sites. Make sure you modify the href
You can include whatever icons you want to use. Resources you can use include the Font Awesome gallery and W3 Schools:
Example:
<footer>
<div class="icon-bar">
<p>
<a href="https://www.pinterest.com/lisabalbach/"><i class="fa
fa-pinterest"></i></a>
<a
href="https://www.linkedin.com/in/lisa-balbach-30a57892/?trk=hp-identity-name"><i
class="fa fa-linkedin-square"></i></a>
<a
href="https://www.youtube.com/channel/UCqL3eLOTWqld5hx4uGxepqA/featured?view_as=subscriber"><i
class="fa fa-youtube"></i></a>
<a
href="https://www.instagram.com/lisabalbach/"><i class="fa
fa-instagram"></i></a></p>
<p style="text-align:right;"> <small>© Lisa
Balbach August 15, 2020. Last Updated September 22 2017</small></p>
</div>
</footer>
Make sure you include the font-awesome libraries between the <head> and </head> tags or you won't see any of the icons. The example above uses font-awesome 4!
3. View the page offline and correct any problems or issues that arise.
Your completed icon bar should look like the example shown below (although the icons you select may be different)
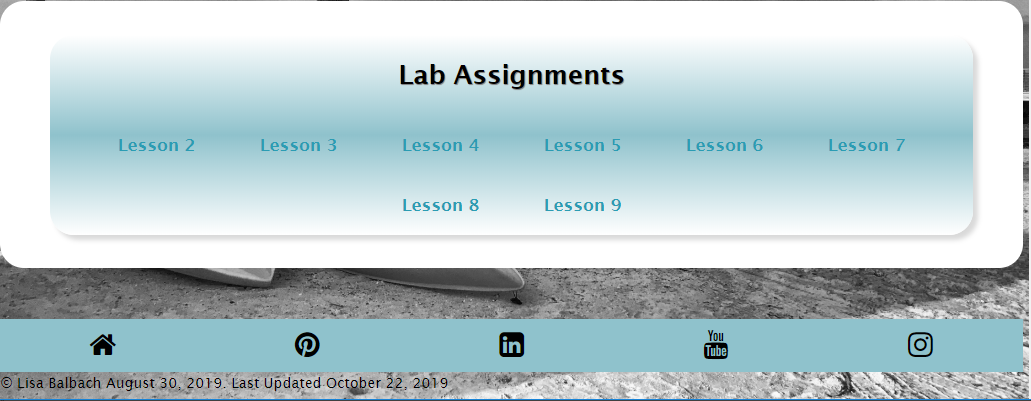
NOTE: If you do NOT see all your icons, then you need to adjust the fontawesome link that you have at the top of the HTML between the <head> and </head> tags. You may need to include more than 1 link to get all the icons.
1. Add the Lesson10 assignment links to the textbook assignment menu. This goes right above the </ul> and </nav> for the menu You will notice the link text is more descriptive than other weeks (that will help you remember what CSS was done to the different pages :)
<li><a href="#">Lesson 10</a>
<ul>
<li><a href="Lesson10/Acme-Vertical/home.html">Acme Vertical Menu</a></li>
<li><a href="Lesson10/Acme-Vertical-ID/home.html">Acme Vertical Menu created
with IDs</a></li>
<li><a
href="Lesson10/Acme-Horizontal/home.html">Acme Horizontal Menu</a></li>
<li><a href="Lesson10/my-profitable-web-design-business.html">Horizontal Menu
and Icon Navigation</a></li>
<li><a href="Lesson10/animation-fun.html">Hoverable Sidebar Navigation</a></li>
</ul>
</li>
NOTE: Some students need to adjust the links because they end up with an Acme-Vertical folder inside another Acme-Vertical folder. If that happens to you, your links should be:
<li><a href="Lesson10/Acme-Vertical/Acme-Vertical/home.html">Acme Vertical Menu</a></li>
<li><a href="Lesson10/Acme-Vertical-ID/Acme-Vertical-ID/home.html">Acme Vertical Menu created
with IDs</a></li>
<li><a
href="Lesson10/Acme-Horizontal/Acme-Horizontal/home.html">Acme Horizontal Menu</a></li>
The links need to match how your folders are set up
2. For the lab assignment, add a link to the original assignment page and add a link to the original assignment page css. This goes right above the </ul> and </nav> for the menu
Example:
<li><a href="#">Lesson 10</a>
<ul>
<li><a href="assignmentsV1.html">original assignments web page file</a></li>
<li><a href="css/assignmentsV1.css">original assignments css file</a></li>
</ul>
</li>
3. Save all your changes and test the links offline to make sure they work. Then transfer assignments.html, assignmentsV1.html to your main directory.
4. Open the css folder and transfer assignments.css and assignemntsV1.css
5. Check the pages live to make sure they display properly
| 1. added pull-down menu to assignments.html page | 15 points |
| 2. added icon nav bar to assignments page footer | 5 points |
| 3. assignments page updated with new links | 5 points |
| Total | 25 points |