By the end of this tutorial, you will be able to:
explain what JavaScript events are
use mouse events to change web page display
explain the difference between a variable and an identifier
create and use JavaScript variables
call JavaScript methods
create and use JavaScript functions
We will be looking at how to add JavaScript to your existing HTML tags, how to create variables to store data, how to retrieve the data from forms and how to process data using functions. We are going to keep the information simple, so you get an idea of what you can do with the language. For a more in-depth study of JavaScript, you would need to take CIT190 our JavaScript programming course.
1. Open your CIT180 folder and create a new folder named Lesson12
2. Open the Lesson12 folder and create a media folder.
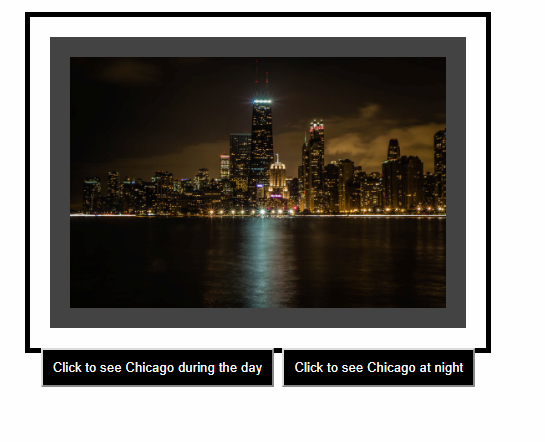
Task: Apply the onclick event handler to existing tags and buttons to make the page more interactive
To see a video demonstration, view: https://youtu.be/R7eIVMwVJfs
Graphic example of what you are creating (this one is not interactive, it's only a graphic :)
1. Create a new page. Name the page events.html and save the page into your Lesson12 folder
2. Download the following day and night images into your Lesson12/media folder:
3. Add the code shown below to your page:

4. View the page offline and test it. Correct any errors.
5. Close the page.
Task: Create a simple script that prompts users, retrieves data and stores data
To see a video demonstration, view: https://youtu.be/seiT2nqrgY0
1, Create a new file, save the file into the Lesson12 folder and name it introductions.html. Enter the code shown below:

2. Save your changes and test the program in a web browser.
Task: Using JavaScript to write content to your page
To see a video demonstration, view: https://youtu.be/_iTi2QZww0g NOTE: The video also shows you how to fix errors
1. Modify introductions.html to write the results to the page instead of using alert to display them
2. Comment out the alert line as shown below:
// alert(name + " you are " + age + " years old. Here are your
favorites: color = " + color + " food = " + food);
NOTE: Single line comments can be coded with // at the beginning of the line OR you could use /* a t the beginning and */ at the end.
3. Below the commented line, enter the following:
document.write("<h2>"+name+", you are "+age+" years old.</h2>");
document.write("<p>Here are your favorites: </p>");
document.write("<p>Color="+ color + "<br>Food=" + food + "</p>");
4. Save your changes and view the page offline in the web browser. If everything looks good, close the page.
Task: Create an interactive page that lets the user set the background color, font color, font typeface and font size. After setting the values, the changes are applied to the current page.
To see a video demonstration, watch: https://youtu.be/Pgohl_qxeXU
1. Download interactive.html into your Lesson12 folder
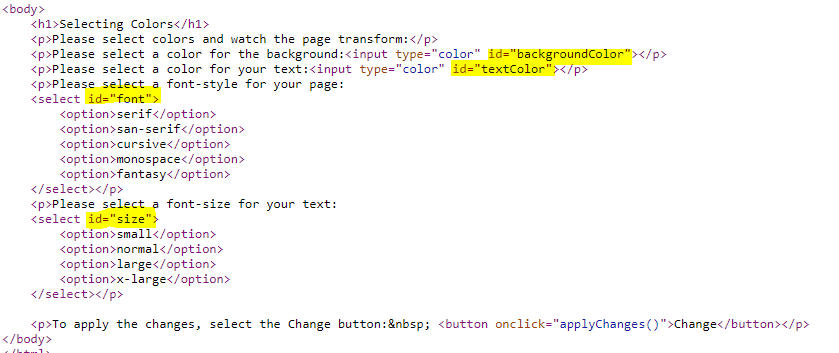
2. Open the file for editing and add the id attributes to the html tags shown below. In addition to the ID's you also need to add the onclick event handler to the button tag
3. Create a new file and name it modifystyles.js. Save the file into the Lesson12 folder. Add the following JavaScript code to the file and save your changes.

Here's what the code is doing:
Line 1 creates the applyChanges function
Line 2 sets the background in
the document to the value the user selected from the input element
Line 3
sets the font color to the value the user selected from the input element
Line 4 sets the font family to the value the user selected from the drop down
list
Line 5 sets the font size to the value the user selected from the drop
down list
4. Link to the modifystyles.js file into your interactive.html web page by adding the code shown below above the </head> tag
</style>
<script src="modifystyles.js"></script>
</head>
5. Test the page offline and correct any errors
6. Save all your changes.
Task: Create a JavaScript side navigation overlay menu and a side navigation push menu
To see a video demonstration, view: https://youtu.be/o7zE4uA4jGk
1. Create a new file and save it into your Lesson12 folder. Name the file push-navigation-menu.html
2. Print the following pdf and enter the code into your file or view the code in the framed area below:
"
3. Save your changes and view the page offline. When you click the button, the menu should open and push existing content to the right. Once the page is working properly, save any changes you have made.
4. Next, make sure push-navigation-menu.html is open and save the file under a new name: overlay-navigation-menu.html There are 2 lines in the old code that you need to remove to create an overlay effect instead of a push effect. In the old code below, you need to remove the lines that adjust the marginLeft setting
Here's what the push code looked like:
<script>
function openNav() {
document.getElementById("mySidenav").style.width = "250px";
document.getElementById("main").style.marginLeft = "250px";
}
function
closeNav() {
document.getElementById("mySidenav").style.width = "0";
document.getElementById("main").style.marginLeft= "0";
}
</script>
Here's what your new code should look like:
<script>
function openNav() {
document.getElementById("mySidenav").style.width = "250px";
}
function
closeNav() {
document.getElementById("mySidenav").style.width = "0";
}
</script>
NOTE: The marginLeft settings have been removed
5. Once you remove the code, save your changes and test the page.
6. Modify the text in the main section to the following:
<h2>Sidenav Overlay Example</h2>
<p>Click on the element below to open the side navigation menu, and
overlay the content on the right.</p>
7. Save your changes and close the page
1. FTP everything in the Week12 folder to the main directory on the server.
The Lesson12 folder should contain the following files:
The Lesson12/media folder should contain
2. After ftping, you should check the pages "live". If there are errors, you should correct them, then transfer the pages again and check them. If you run into problems and you can't figure out an error, make sure the page is online and then send me an email - let me know the name of the page, so I can easily pull it up and take a look at it.
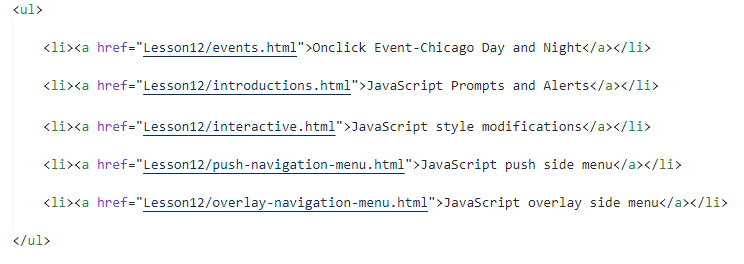
3. Add the Lesson12 assignment links to the textbook assignment menu.
Example:
4. Save all your changes and test the links offline to make sure they work.
5. Transfer assignments.html to your main directory and check the links "live" online.