
By the end of this assignment, you will be able to:
Use HTML 5.0 tags in your web pages.
Use structural and semantic elements
Use text elements
Follow HTML 5.0 standards for entering tags
Use VSCode to create pages
Use FileZilla to transfer pages
Test your pages by viewing them in the browsers and correct any problems
Validate your page using the W3C online validator.
Organizing your content is very important when you begin building web pages. So, our first task is going to be to create some folders where you will be storing pages for this course.
1. Select a drive to store your files on.
2. With the drive open or Document folder open, create a folder named CIT180
3. Open the CIT180 folder and create another folder named Lesson2
To see a video showing you how to create the folders, watch: https://youtu.be/DYTzkHk74SI
To see a video demonstration, watch: https://youtu.be/A0zMgGdtATo
You will be creating the example shown below. You will name the page bottom-navigation.html and save the page into the Lesson2 folder that you created in task 1
Steps to complete the exercise:
1. Launch VSCode and press CTL + N or use the File menu and select New Text File.
2. Save the file as bottom-navigation.html
a) Use the File menu, Save As command.
b)
Navigate to your CIT180, Lesson 2 folder
c) Change the file type to html and enter bottom-navigation as the file name
NOTE: Saving the file immediately as an HTML file will allow VSCode to apply HTML indentation and colors to your page. Your colors may look different than the example and video because you have a different theme applied in VSCode.
3. Enter the tags and content shown below. Make sure you enter both opening and closing tags. You can insert blank lines and spaces to make the code easier to read (the web browser ignores extra lines and spaces UNLESS you code the lines and spaces)
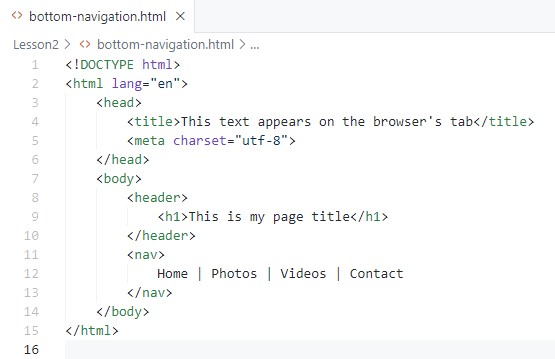
4. Save your changes by press CTL + S or by using the File menu, Save command.
5. To view your page "offline" before you transfer it to the web, find the page on your drive, right click the file and select Open With, then pick the web browser you want to display it in
6. Fix any problems or issues you have with the page, save your changes.
To see a video demonstration, watch: https://youtu.be/pcL5elnzqM4
You will be creating the example shown below. You will name the page top-navigation.html and save the page into a Lesson2 folder that you created in task 1
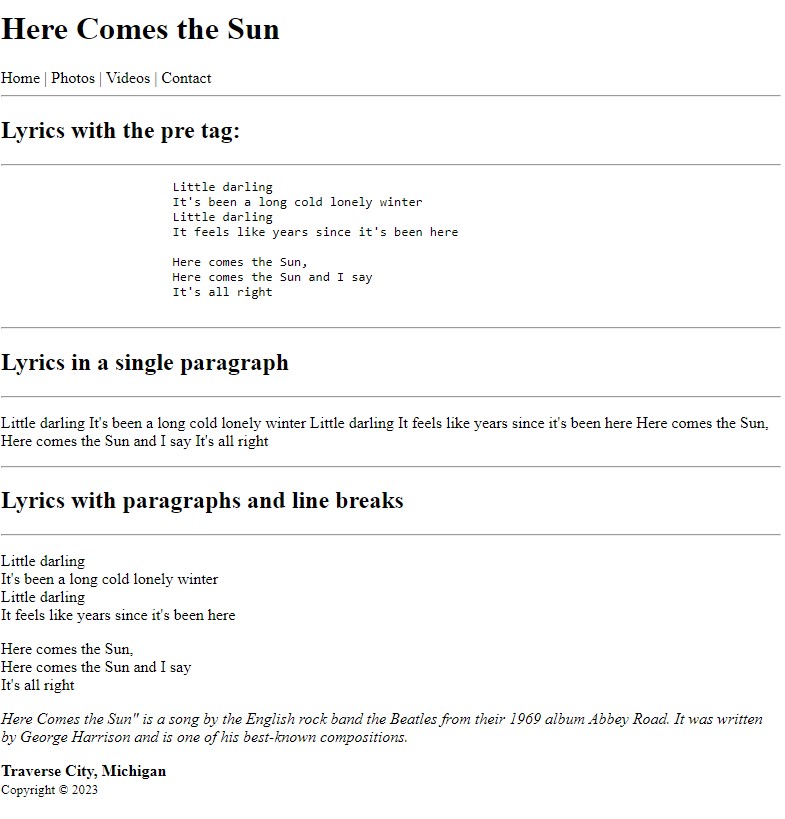
Steps to complete the exercise:
1. Launch VSCode if it isn't already open and press CTL + N or use the File menu and select New Text File.
2. Save the file as top-navigation.html
a) Use the File menu, Save As command.
b)
Navigate to your CIT180, Lesson 2 folder
c) Change the file type to html and enter top-navigation as the file name
3. Enter the tags and content shown below. Make sure you enter both opening and closing tags.


4. Save your changes by press CTL + S or by using the File menu, Save command.
5. To view your page "offline" before you transfer it to the web, find the page on your drive, right click the file and select Open With, then pick the web browser you want to display it in
6. Fix any problems or issues you have with the page, save your changes.
To see a video demonstration showing the modifications you need to make, watch: https://youtu.be/XpG7GtylKmk
1. Open top-navigation.html in VSCode (if it is not already open).
2. Edit the code to match the example shown below:

4. Save your changes by press CTL + S or by using the File menu, Save command.
5. View the page offline (it should resemble the example shown below)
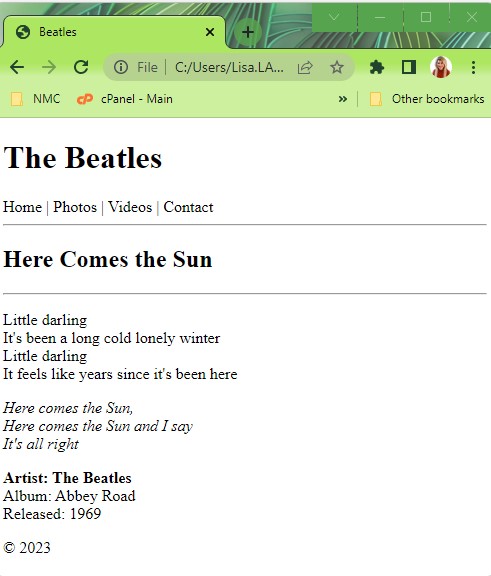
6. Fix any problems or issues you have with the page, save your changes.
To see a video demonstration showing the modifications you need to make, watch: https://youtu.be/ItE9Yqx9oT8
1. Right click the following link and select Save Target as, Save As or Save Link As (the command you see is dependent upon the browser you are using)
2. Navigate to your CIT180, Lesson2 folder and save the file into the folder
3. You will be adding structural, semantic and formatting tags to the file. Your completed file will resemble the example below when you view it in a web browser:

4. To format the file, do the following:
a) Open the file in VSCode (File menu, Open File command)
b) Add the meta tag and title shown below (they should go between the <head> and </head> tags)
<meta charset=utf-8>
<title>The Road Not Taken</title>
c) Add the <main> tag below the <body> tag and the </main> element above the </body> tag
d) Add the <article> tag below <main> and the </article> above </main>
e) Add the following <footer> element below the </article> and above the </main>
<footer>
<cite><small>Retrieved from Poetry Foundation on August 30, 2017<br>
https://www.poetryfoundation.org/poems/44272/the-road-not-taken</small></cite>
</footer>
NOTE: At this point, your code should look like the example below:
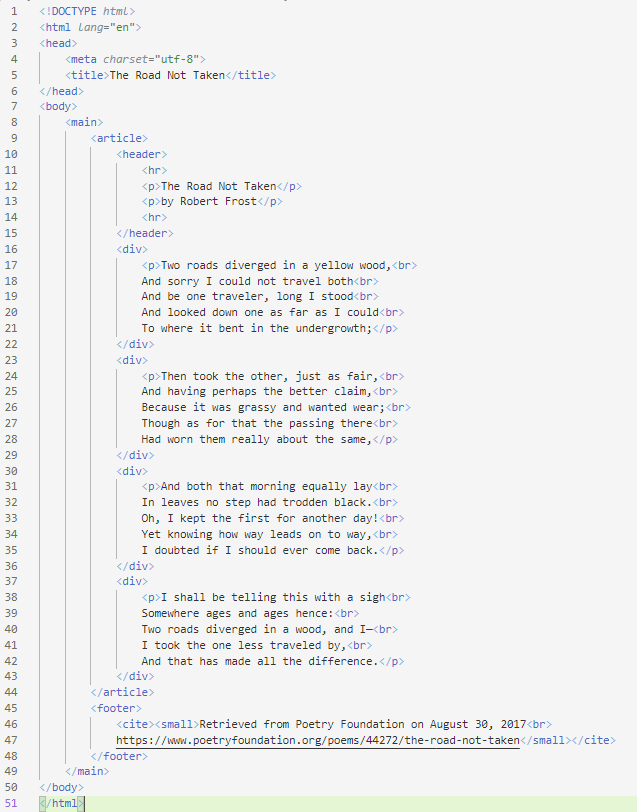
f) Add the following <aside> element above the </main> and below the </footer>
<aside>
<hr>
Robert Lee Frost (March 26, 1874 – January 29, 1963) was an American poet. His work was initially published in England before it was published in America.
He wrote about rural life in New England in the early twentieth century and examined complex social and philosophical themes.He was awarded the
Congressional Gold Medal in 1960 for his poetic works.
<hr>
</aside>
g) Modify the <header> section to include the formatting and structural tags shown below:
<header>
<hr>
<h1><strong>The Road Not Taken</strong></h1>
<h2><em>by Robert Frost</em></h2>
<hr>
</header>
h) Replace all <div> tags with <section> tags and all </div> tags with </section>
NOTE: Your code should look like the example shown below:

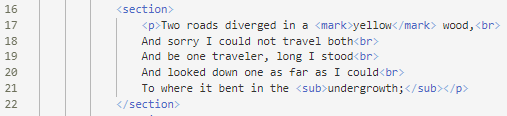
i) In the first paragraph, modify the following text by adding <mark> elements around it:
<mark>yellow</mark>
j) At the end of the first paragraph, modify the following text by adding <sub> elements around it:
<sub>undergrowth;</sub>
NOTE: The modified first paragraph should look like the example shown below:
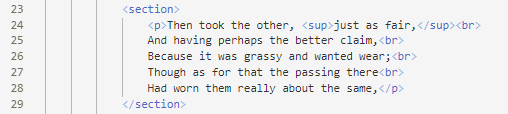
k) In the second paragraph, modify the following phrase by adding <sup> elements around it
<sup>just as fair,</sup>
NOTE: The modified second paragraph should look like the example shown below:
5. Save your changes and view offline in a web browser.
6. Fix any problems or issues you have with the page, save your changes and close the page by clicking the X
To see a video demonstration showing the modifications you need to make, watch: https://youtu.be/3MPgitJ5ZQc
1. Right click the following link and select Save Target as, Save As or Save Link As (the command you see is dependent upon the browser you are using)
2. Navigate to your CIT180, Lesson2 folder and save the file into the folder
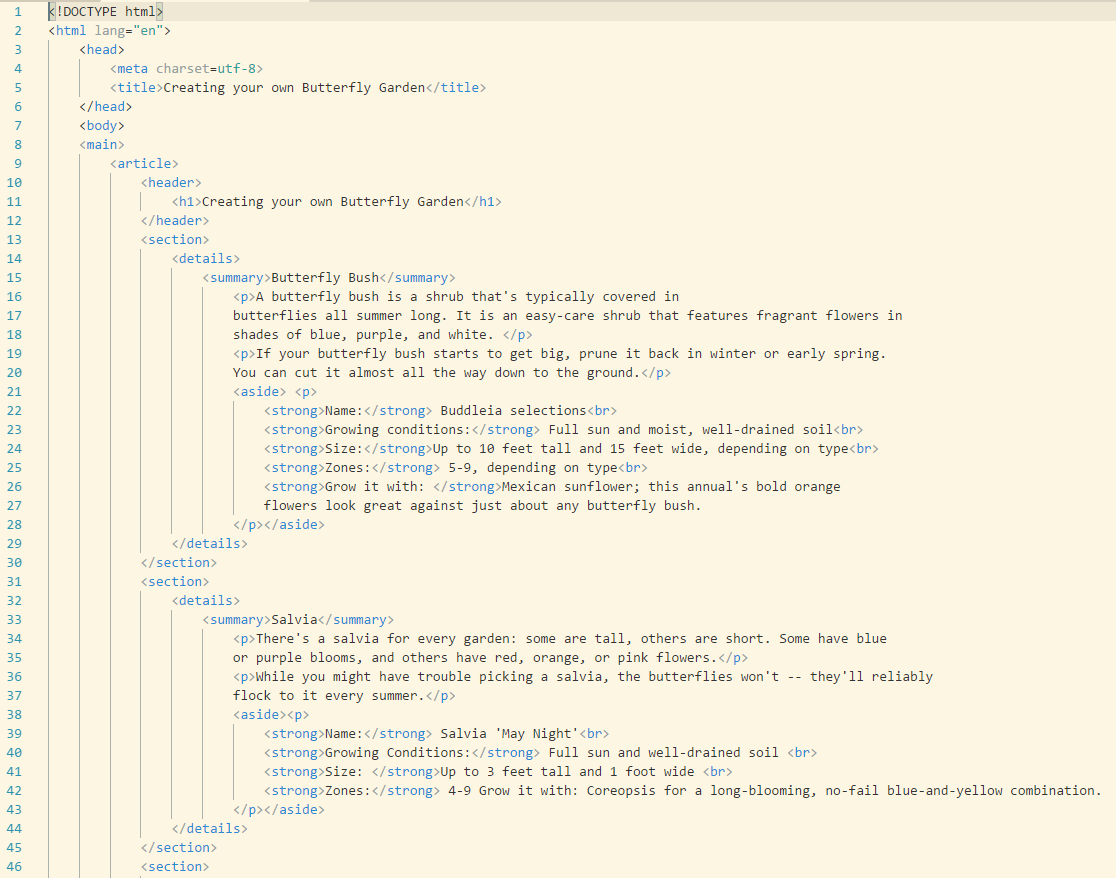
3. You will be adding structural, semantic and formatting tags to the file. Your completed file will resemble the example below when you view it in a web browser:

4. To format the file, open the file and add the semantic and formatting elements shown in the example below:

5. Save your changes and view offline in a web browser. NOTE: The page will display properly in newer versions of web browsers, but not in older versions of Edge, IE and Safari. You can see if a browser can handle different HTML and CSS by going to http://caniuse.com/ You can actually key in the element or CSS value/pair and search to see if it will work in various browsers
6. Fix any problems or issues you have with the page, save your changes and close the page by clicking the X
At this point, you should have the following files in your CIT180, Lesson2 folder:
To see a video showing you how to connect and ftp your files, watch: https://youtu.be/5MEJbCAJvkE
1. Launch FileZilla
2. Make sure you are connected to the Internet. To connect to the web server, enter the following information:
Host: ftp.lisabalbach.com
Username: NMCusername@lisabalbach.com
Password: use the password your instructor emailed to you
Port: 21
Example:

3. After filling in the information, click the Quickconnect button
4. When you see the unknown certificate message, put a check in the box next to Always trust certifications in future sessions and click OK to bypass the messge.

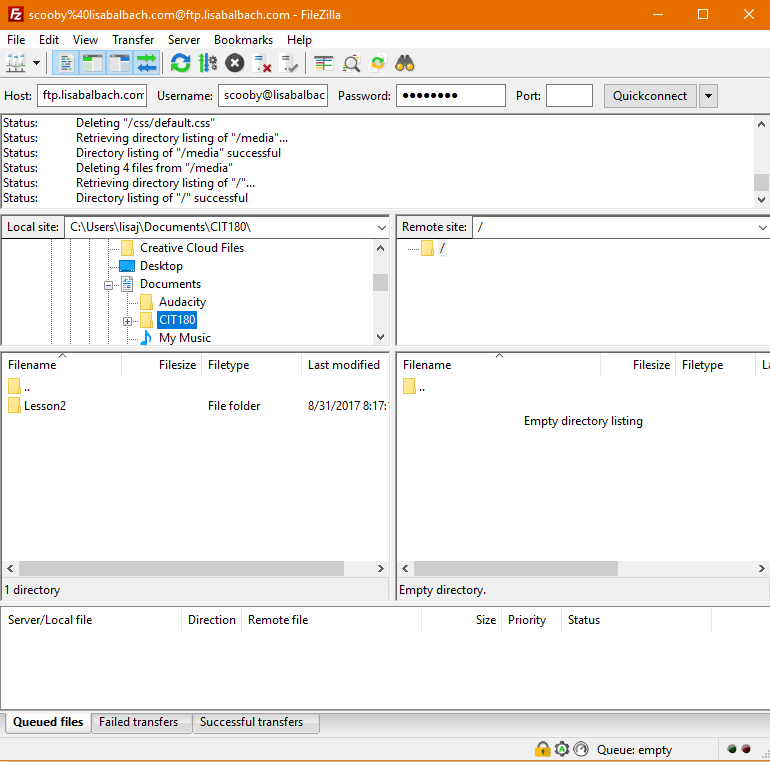
5. Once you are connect, you will see a window similar to the example below. The frames on the left, labeled Local Site represent your computer. The frames on the right labeled Remote Site, represent what you have on the web server.
Example showing connection information and content
6. To transfer files, you need to find the files on your system. To do that, you need to open the drives and folders to navigate to your CIT180, Lesson2 folder.
7. You can transfer files and folders. To transfer the entire lesson2 folder, make sure it is displayed in the pane on the left and then left drag it to the pane on the right
Example describing the FileZilla transfer process
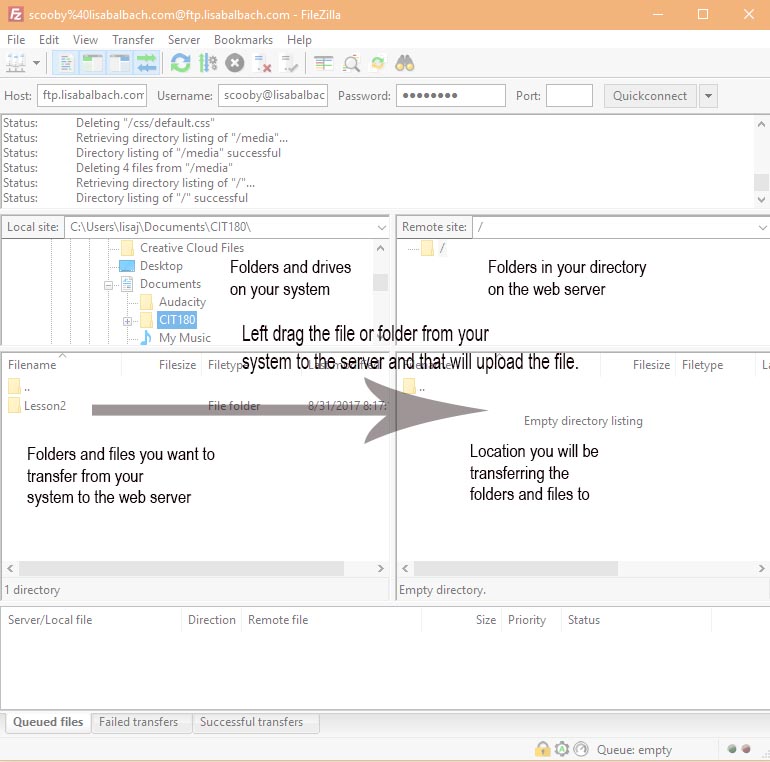
8. Once you see the folder on the right-hand side, you can double click on the folder to open it and ensure all the files are there.
Example showing the transferred folder:

Example showing files within the transferred folder:

9. To view the files online, enter the following: lisabalbach.com/your NMC username/Lesson2/butterfly-garden.html
Example showing the file "live" online:

NOTE: The address is case sensitive, so if you created the lesson2 folder in all lowercase letters, that is how you need to enter it into the address bar.
To see a video showing you how to replace a file, watch: https://youtu.be/6XAHyRZpS7M NOTE: The video shows you what to do if Chrome displays the old version of your page instead of the new version
IF YOU CHANGE A FILE, you will need to retransfer the file. Steps to transfer a file you have changed include:
1. Launch FileZilla
2. Make sure you are connected to the Internet and then connect to the web server using the procedure described above
3. Navigate to the folder on your system where the page is stored.
4. Display the page in the pane on the left-hand side
5. Display the location you want to transfer to in the pane on the right hand side (this means you need to open folder(s) the page needs to be saved into) WARNING: MANY STUDENTS HAVE PROBLEMS doing this correctly because they forget to open the correct folder on the web server, so their pages aren't transferred to the correct location. Then, they try to display the modified page and it looks like their changes didn't take, when in reality they are checking the old page rather than the new one.
6. To transfer your modified page, left drag the file from your system on the left to the right hand side. You will see a prompt from FileZilla asking you for permission to replace the file on the web server. By default the Overwrite option is selected and that is the option you want. I normally check the box next to Always use this action, so I don't have to see the dialog box every time I make changes and transfer a page. Unfortunately, you will always see this window the first time you make a change, but if you check the box, it won't display again during your ftp session.

To see a video showing how to execute commands on the web server using FileZilla, watch: https://youtu.be/eyfANQgAh1k
After your page has been transferred to the Internet, you can validate the page. KEEP IN MIND, this process is not perfect and it can mark pages as incorrect when there aren't any issues. You should look at the error and if it involves a missing tag, check to make sure you didn't make a typo or didn't forget to enter the tag. Those are the types of things you need to look for. Warnings can be ignored.
1. Display your page
2. Copy the web address by clicking on the address and pressing CTL + C to copy
3. Navigate to https://validator.w3.org/
4. Paste the web address into the address textbox (click in the box and press CTL + V to paste)
5. Click the More Options list arrow.
6. Click the check button
7. Read the results. ALL errors need to be corrected. Warnings do NOT need to be corrected. You will probably see warnings in several pages dealiing with adding heading elements to <articles> and/or <sections>. You can ignore the warnings unless you want to add the headings and it makes sense to add them. For example, in the butterfly-garden, you will see a warning that the section is missing a heading tag. Since we are using <details> and <summary> we didn't use a heading tag. Trying to nest a heading tag inside <summary> doesn't work very well. In this case, we would ignore the warnings. In the Road-Not-Taken.html, you may also see a warning about <sections> that are missing heading tags. It doesn't make sense to add headings to the poem, so you can ignore the warnings.
If you have any questions or if you run into problems, let me know that too! It is helpful, if you transfer your page and then send me an email so I can look at it and help you resolve the issue.
| Task 1 - creating folders | 1 point |
| Task 2 - creating bottom-navigation.html | 2 points |
| Task 3 and 4 - creating and modifying top-navigation.html | 6 points |
| Task 5 - Road-Not-Taken | 4 points |
| Task 6 - butterfly-garden | 4 points |
| Task 7 - ftp'd files and Lesson2 folder to the server | 2 point |
| Task 8 - Validated pages | 1 point |
| Total | 20 points |