I. Using Images in Your Web Pages
Once you have created/modified your images, you are ready to place them into a web page. Images can be inserted into web pages using the img tag. Image positioning and customizing is typically done through CSS (we will be covering that next week).
A. Inserting Images
Image tag syntax:
<img src="filename" alt="alternate text" />
src="filename" where "filename" is the file name of the graphic along with the three character extension (ending)
alt="alternate text" where "alternate text" is what you would like to display if the web browser cannot show the picture (many people turn off images so the pages load faster and there are some web browsers that don't support images). For visually impaired students, alternate text is especially imoprtant because the screen reader will use the alternate text to describe the image to them.
IMPORTANT: As long as the image is in the same folder as the web page, all you have to specify within the img tag is the name of the image itself. It is standard practice to place images into a meda or images folder. If the image is in a folder, then you would need to specify the folder name, a slash followed by the filename. <img src="media/filename" alt="alternate text" />
B. More on Attributes of the <img> tag
1) alt attibute
The alt attribute specifies text that should display before the image loads (if the image doesn't load, the text will just display instead). The text is also used by screen readers as mentioned above.
Syntax: <img src="filename" alt="text you want displayed" />
You should always specify alternate text just in case the user turns off the loading of images OR in case there is a problem with the image OR a person with a disability and text reader are viewing the page (Image readers used by people with disabilities read the alt text to describe the image).
NOTE: HTML requires use of both the alt and src attributes
2) title attribute
The title attribute specifies a tooltip that should display when the mouse rests on the image. The tip can be instructions or it can just provide more information about the image. This is not required by HTML, but can be a useful feature.
Syntax: <img src = "filename" alt="text you want displayed" title="tooltip you want displayed" />
3) Image height and width
Speciying image hieght and width helps the browser render the image faster, so you definitely need to indicate the dimensions (in pixels). There are 2 ways to specify height and width: using CSS or using attributes
a) The preferred method is to use CSS
Example: <img src="flower.jpg" alt="may flowers" style="width:400px; height:350px;" />
b) The other method (which will soon become outdated) is to add width and height attributes
Example: <img src="flower.jpg" alt="may flowers" width=400px height=350px />
Even though we haven't discussed CSS yet, we are going to use the CSS method of specifying the height and width.
To determine the height and width, go into the File Explorer (windows) and change the view to content (see example below)
In Content view, you can see the type of file, the dimensions of the file AND the size of the file.
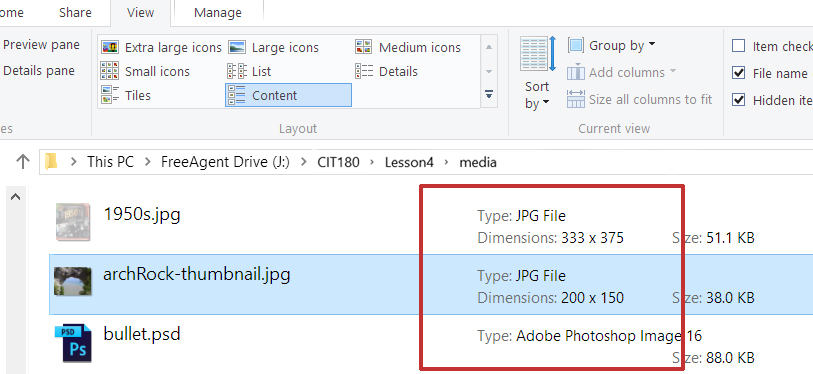
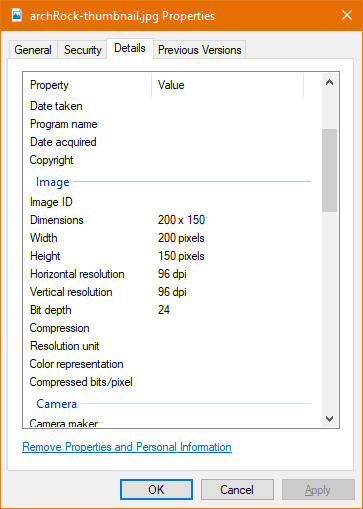
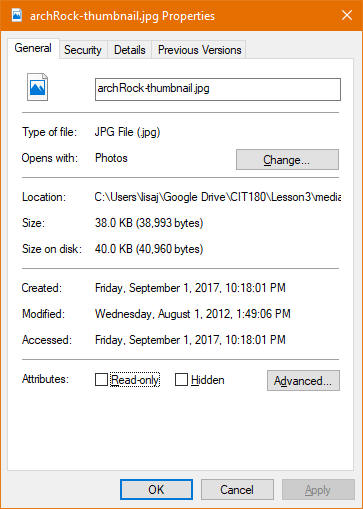
Another method of seeing information on photographs is to right click the photo and select properties.
The details tab will display the dimensions (in pixels).
The general tab will display the file type and the physical size on the disk
Complete Syntax: <img src = "filename" alt="text you want displayed" title="tooltip you want displayed" style="width:#pixels; height=#pixels;" />
Code example: <img src = "media/yosemite-el-capitan.jpg" alt="El Capitan" title="El Capitan, Yosemite" style="width:300px; height::225px;" />
C. Figure and figcaption elements
1. <figure>
The <figure> tag is used to specify self-contained content like images, diagrams, code snippets etc. It is often used with the <img> tag because an image is considered self-contained content
Syntax:
<figure>
<img src = "filename" alt="text you want
displayed" title="tooltip you want displayed" style="width:#pixels;
height=#pixels;" />
</figure>
Code Example:
<figure>
<img src =
"media/yosemite-el-capitan.jpg" alt="El Capitan"
title="El Capitan, Yosemite" style="width:300px;
height::225px;" />
</figure>
The <figure> tag is an HTML 5 semantic tag, so it is relatively new
2. <figcaption>
The <figcaption> tag is used to define a caption for self-contained content within the <figure> element. The tag must be the first or last element within the <figure></figure> tags
Syntax:
<figure>
<img src = "filename" alt="text you want
displayed" title="tooltip you want displayed" style="width:#pixels;
height=#pixels;" />
<figcaption>text
you want displayed</figcaption>
</figure>
or
<figure>
<figcaption>text
you want displayed</figcaption>
<img src = "filename" alt="text you want
displayed" title="tooltip you want displayed" style="width:#pixels;
height=#pixels;" />
</figure>
Example of an image with a caption

Here's what the code looks like:
<figure>
<figcaption>Fig. 1 - Arch
Rock</figcaption>
<img alt="Arch Rock
on Mackinac Island" src="media/archRock-thumbnail.jpg"
style="width: 200px; height: 150px">
</figure>