By the end of this tutorial, you will be able to:
Create a basic style sheet
Differentiate between style classes and style IDs
Construct external style sheets, internal style sheets and inline styles
Use CSS for horizontal and vertical text alignment, text indentation, text spacing, text effects, fonts, color, size, layout, margins, padding and spacing
Use CSS styling for links
Explain how web browsers interpret CSS font family values
Tweak fonts and use web fonts
Describe what the color wheel is, how hex colors work and what a tint, shade and tone are
Describe how to select colors using the following color schemes: monochromatic, analogous, complimentary, double complement, split complement, triad, or natural.
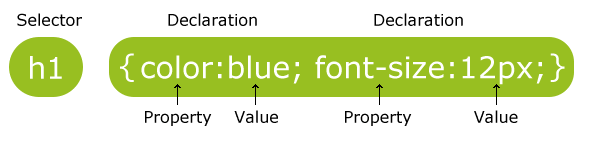
CSS specifies formatting for your HTML tags. CSS is comprised of style rules.
A style rule is made of several parts:
Selector − A selector is an HTML tag at which a style will be applied. This could be any tag like <h1> or <table> etc.
Declaration block - Contains one or more style declarations which are separated by semicolons. Each declaration includes a property name and a value separated by a colon. The entire declaration ends in a semicolon
Property - A property is the HTML feature you are modifying (i.e. color, border, size etc) Properties are always followed by colons.
Value - A value is what you are modifying the property to (i.e. a color of pink, a border that is solid, a font size of 16pts etc). Values are always followed by semicolons.
Syntax: selector { property: value; }
Example #1:
To see this live, view: https://www.w3schools.com/css/tryit.asp?filename=trycss_syntax_id Try changing the color to green and then click run
Example #2:
<style>
h1 {
color:darkorange;
font-size:14pt;
font-weight:bold;
}
</style>
h1 is the selector (element) the style will be
applied to
color is the style property, darkorange is the value you want applied
font-size is the style property, 14 pt is the value you want applied
font-weight is the style property, boldfacing is the value you want applied
NOTE: Colons always follow the property and semicolons always follow the value you want applied.
To see how this looks when applied to text in a page, view: style-formatting-example1.html
We will be using the same CSS commands over and over throughout the semester. Because the commands are flexible, you can apply them to different HTML elements.
There are 3 basic ways you can insert styles into your web pages:
This involves creating a separate page that includes all formatting for a website.
Every web page at the site will include this sheet for formatting.
The main advantages of using this technique are consistency of pages and ease of maintenance (you only have to change the one style sheet and all pages at the web site will include the change).
This is what you should do when creating websites and web pages (it is part of progressive enhancement discussed in week 1).
To see an example, view: http://lisabalbach.com/CIT180/css/CIT180.css
To connect the HTML to the external style sheet, you need to add a <link> tag between the <head></head> tags (this will be discussed in more detail below).
This involves placing <style> and </style> tags between the <head> and </head> tags at the top of your html. Inside the style tags, you would include all formatting for your page.
Internal style sheets are used to override external style sheets for the page you are creating. (You can look at the external style sheet as the default settings. The internal sheet can override the defaults). This is where the concept of cascading comes from. You can have an external sheet that is overridden by the internal sheet.
Internal style sheets are also used for stand-alone pages that are not part of a comprehensive website.
To see an interactive example, view: https://www.w3schools.com/css/tryit.asp?filename=trycss_howto_internal
Creating inline styles involves placing a style attribute inside an html tag.
Inline styles should be used to change the formatting for one specific element in a page. They will override styles specified in an external or internal style sheet.
For example, let's say you want all text in H1 tags to display in dark orange with a style of bold and a size of 24 points. Because you are a good web developer, you set this up in an external style sheet and you include the sheet in the page you are working on. Any H1 tag that you insert will automatically include the color and font formatting (you don't need to specify any formatting as long as you include the external style sheet in your page). As you are working on your page, there is a section where you would like the text displayed in black instead of dark orange. Inside your heading tag, you can include a style to change the color to black - this inline style will override the external style sheet.
The term "cascading" comes from the ability of the internal styles to override the external style sheet and the inline styles to override both the internal and external sheets.
To see an interactive example, view: https://www.w3schools.com/css/tryit.asp?filename=trycss_howto_inline
CSS is a language that has rules you need to follow in order for the commands to work. The rules are a little different depending on if you are creating an external style sheet, internal style sheet or inline style.
External style sheets can be created using web editors or text editors. When you save the file, you should change the file type to css (this should put a .css ending on the file). If you are using a text editor, like NotePad, you need to type .css at the end of the filename.
Rules for creating external style sheets include:
1. Include the html tag name, followed by left curly brace {
2. Below the left curly brace, you should include the CSS style property and value. Between the property and value, you need to insert a colon. On the left of the colon is the css property being modified. On the right of the colon is the value you want applied. You should always insert a semicolon after the value.
3. Each style property/value pair should be on a separate line and they should end with a semicolon
4. After the last CSS command has been entered, you need to insert a right curly brace on a line by itself }
Example:
h1{
color:green;
font-size:28pt;
font-family: Arial;
}
5. After all tags and formatting have been entered, you must save the file using a .css extension or change the file type to css when you save it (this will add the .css extension)
6. It is common practice for web programmers to insert comments into their CSS files. Comments are ignored by web browsers. They are used to provide information to web programmers. To insert a comment, type /* to begin the comment. Then, type the comment text. Once you are done, type */ to end the comment.
Example: /* red color palette */
NOTE: If you want to apply the SAME formatting to multiple html tags, you can place commas between the tag names. The example below will apply the same formatting to h3 and h4 tags:
h3,h4{
color:black;
font-size:14pt;
font-family: Arial;
}
7. To include an external style sheet in your web page, you must insert the following tag between the <head> and </head> tags
<link href="stylesheetName.css" rel="stylesheet" type="text/css">
To see an interactive example, view: https://www.w3schools.com/css/tryit.asp?filename=trycss_howto_external
To see another example, view: http://lisabalbach.com/CIT180/ Then, right click the page and select View Page Source. At the top of the page, you will see the link to the stylesheet.
a) href attribute: The text that follows href, should be the actual name of the style sheet and the location of the style sheet relative to the page you are viewing. The example assumes that the web page and stylesheet are in the same directory (i.e. folder) on the web server. The example at the W3 schools site above assumes the style sheet and web page are in the same directory (that is not how things are normally organized). The example at the CIT180 site has css in a separate folder (that is the standard way of handling external CSS files).
So, if the style sheet is in a different directory (i.e. folder) than your web page, you need to include that information as well. If your style sheet is one level above the page in a css folder, you would need to use href="../css/CIT180.css" If the style sheet is in a different folder within the directory you are currently in, you just need to open the folder and view the file: href="css/CIT180.css"
b) rel attribute: specifies the relationship between the current document and the linked document (this attribute is required) We are using "stylesheet"
c) type attribute: specifies the type of linked document We are using "text/css"
d) media attribute (optional): The media attribute specifies what media/device the target resource is optimized for. This attribute is mostly used with CSS stylesheets to specify different styles for different media types, for example, you may have a print style sheet for printing out the page and another style sheet for displaying the page. You may also have a third style sheet for mobile devices.
The media attribute can accept several values including:
all - for all devices (this is the default)
screen - for computer screens
print - for printing
projection - for projectors
handheld - for mobile devices
braille - for braille feedback devices
aural - for speech synthesizers
tv - low resolution and limited scrolling capabilities for televisions
tty - teletype and other similar media using a fixed pitch character grid
The CSS properties and values for internal style sheets are set up the same as in external sheets. The difference lies in how they are added to the web page. Instead of using the <link ...> tag, you must use the <style> </style> tag.
Rules include:
1. After the <head> tag, insert a <style> tag
2. Below the style tag, include the html selector(i.e. tag name), followed by left curly brace {
3. Below the left curly brace, you should include the CSS property (rule) and value you want applied. Between the property (rule) and value, you need to insert a colon. After the value, you need to insert a semicolon. On the left of the colon is the CSS property (feature) you want adjusted. On the right of the colon is the value you want applied
4. Each style property name/value pair should be on a separate line and they should end with a semicolon
5. After the last CSS command has been entered, you need to insert a right curly brace on a line by itself }
6. Follow steps 2 - 5 for each html tag you want to apply formatting to.
7. After you have entered the formatting for all your tags, type </style>
Example #1:
<head>
<style>
/* heading and paragraph styles */
h1 {
text-align:center;
font-family:"Calisto MT", serif;
color:#CC0000;
}
h2 {
text-align:left;
font-family:"Calisto MT", serif;
color:#CC0000;
}
h3, h4 {
text-align:left;
font-family:"Calisto MT", serif;
color:black;
font-size:14pt;
}
h5, h6 {
text-align:left;
font-family:"Calisto MT", serif;
color:black;
font-size:12pt;
}
p {
text-align:left;
font-family:Calisto MT", serif;
font-size:12pt;
color:black;
}
</style>
NOTE: Don't worry about the different properties and values, you will be learning more about them in the next section!
Inline styles refer to specific formatting that you apply to one html tag only. This is very different than the external and internal sheets described above. External and internal sheets apply to all tags. Inline styles ONLY apply to one specific tag.
Rules for adding inline styles:
1. Within the opening HTML tag itself, add the style attribute by typing: style="
2. Following the " type the CSS style property name and a colon.
3. After the colon, type the value you want applied and a semicolon
4. If you want another CSS style property name/value pair applied, type the style property name, a colon, the value and a semicolon.
5. Continue step 4 until you are done
6. After you have entered all the CSS style property name/value pairs, type a " to end the inline style
Example #1:
<h1 style="color:darkorange;font-size:14pt;font-weight:bold;">
Now that you know how styles are added to pages, we are going to talk more about the styles themselves.
The best way to change the appearance of your text is to use CSS. It gives you the most control and you don't have to worry about the tags being phased out (many, many html tags have been phased out over the years and will no longer be supported by web browsers). The standard is to use HTML to structure the page and CSS to format it.
CSS can be used to change the color of text, links, backgrounds etc. The same procedures are used to change color, regardless of the element you are applying the color to.
The color property is used to set the color of text.
Syntax: color:value
The value can be specified by:
The link below displays a W3C page that shows the color name, rgb and hex#
http://www.w3schools.com/html/html_colors.asp
The link below displays 150 color names and hex# that are supported by all web browsers:
https://www.w3schools.com/colors/colors_names.asp
If you want to change the default color of text within the page, you should add css to the body tag.
Example:
/* Uses color name */
body {
color:blue;
}
/* Uses the color hex# */
body {
color:#0000ff;
}
/* Uses the color RGB value */
body {
color:rgb(0,
0, 255);
}
If you want to change the color of a heading, you can change the heading tag:
Example:
/* hex# to set the color to green */
h1 {
color:#008000;
}
/* rgb value to set the color to green */
h2{
color:rgb(0, 128,0);
}
/* color name to set the color to green */
h3 {
color:green;
}
To see how this works live, go to: https://www.w3schools.com/html/tryit.asp?filename=tryhtml_color_text
You can change the background color in a page using the background-color property.
Syntax: background-color:value
The value can be specified by:
Example:
body
{
background-color:beige;
}
h1
{
background-color:#DC143C;
}
p
{
background-color:rgb(200,100,0);
}
To see how this works live, go to: https://www.w3schools.com/html/tryit.asp?filename=tryhtml_color_names
Color is very important in web design, and can be used to add interest to your website, relay the mood of a page, and emphasize sections of a site. People will judge a website by it's appearance, therefore, the colors you select and the design elements you implement are critical to creating a successful website.
Examples of good websites:
Examples of poor websites:
The difference between good and bad websites deals with how they use color and how they implement design concepts. Because color and design are critical to a successful website, we are going to review basic color theory today and basic design concepts in upcoming weeks.
In traditional color theory, there are 3 pigment colors that cannot be mixed or formed by any combination of other colors. These 3 colors are the primary colors of red, yellow and blue. All other colors are derived from these 3 hues. Secondary colors come from mixing primary colors. Tertiary colors are formed by missing a primary and a secondary color.
PRIMARY COLORS
|
SECONDARY COLORS
|
TERTIARY COLORS |

The color wheel is a circle of color based on red, yellow and blue (the primary colors). It typically includes secondary colors (green, orange and purple) and it also includes tertiary colors (yellow-orange, red-orange, red-purple, blue-purple, blue-green and yellow-green.)
The color wheel can be used to help you select colors for a website.
The color circle can be divided into warm and cool colors.

Warm colors are vivid and energetic, and tend to advance in space.
Cool colors give an impression of calm, and create a soothing impression.
White, black and gray are considered to be neutral.
Tints, shades and tones involve modifying color by adding a second color. The difference lies in the color that is added.
If a color is made lighter by adding white, the result is called a tint.
Example:

If black is added, the darker version is called a shade.
Example:

And if gray is added, the result is a different tone.
Example:

The colors you select for your website will set the tone of the site. Choosing colors that work well together is critical.
Here are some different "formulas" for selecting harmonious, complementary color schemes:
1 Monochromatic Colors
 The
monochromatic color scheme uses variations in lightness and saturation
of a single color. Monochromatic colors go well together and
produce a soothing effect. The monochromatic scheme is very easy on the
eyes, especially with blue or green hues. You can use it to establish an
overall mood for your website. The primary color can be integrated with
neutral colors such as black, white, or gray.
The
monochromatic color scheme uses variations in lightness and saturation
of a single color. Monochromatic colors go well together and
produce a soothing effect. The monochromatic scheme is very easy on the
eyes, especially with blue or green hues. You can use it to establish an
overall mood for your website. The primary color can be integrated with
neutral colors such as black, white, or gray.
Advantages of using this color scheme include it is easy to manage, looks clean, looks balanced and is easy on the eye.
Disadvantages of using this scheme is the inability to highlight important elements through use of color. The scheme also lacks contrast and vibrance.
2. Analogous Colors
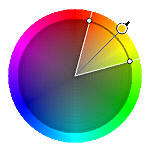 Analogous colors are side by side on a color wheel
When using analogous colors, one of the colors should be dominant. This
scheme is relatively easy to use AND it looks richer than monochromatic.
The scheme provides more contrast and vibrancy than the monochromatic scheme,
but it has less contrast and vibrancy than the complentary scheme.
Analogous colors are side by side on a color wheel
When using analogous colors, one of the colors should be dominant. This
scheme is relatively easy to use AND it looks richer than monochromatic.
The scheme provides more contrast and vibrancy than the monochromatic scheme,
but it has less contrast and vibrancy than the complentary scheme.
Example:
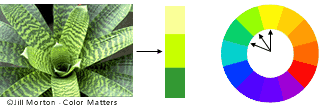
A few things to keep in mind when using this scheme include:
a. Avoid using too many hues in the analogous scheme, because this may
ruin the harmony.
b. Avoid combining warm and cool colors in this scheme.
3. Complementary Colors
The complementary color scheme is made of two colors that are opposite each other on the color wheel. This scheme looks best when you put a warm color against a cool color, for example, red versus green-blue. The complementary scheme is intrinsically high-contrast. When using the complementary scheme, it is important to choose a dominant color and use its complementary color for accents. Using one color for the background and its complementary color to highlight important elements, you will get color dominance combined with sharp color contrast.
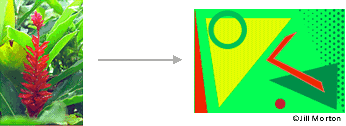
In the illustration below, there are several variations of yellow-green in the leaves and several variations of red-purple in the orchid. These opposing colors create maximum contrast and maximum stability. NOTE: I often pull colors from landscape images (some of the most beautiful color combinations exist in nature)
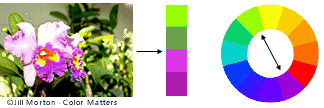
There are quite a few complementary color combinations you can use. The example below shows you different ways of combining colors.
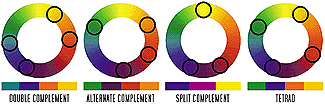
a) Double Complement (tetradic scheme)
 The
rectangle or tetradic color scheme uses four colors arranged into two
complementary pairs. This rich color scheme offers plenty of
possibilities for variation. Tetradic color schemes works best if you let
one color be dominant. You should also pay attention to the balance
between warm and cool colors in your design. NOTE: This scheme can be
more difficult to use because it may be hard to balance the colors. If
your scheme looks unbalanced, avoid using pure colors in equal amounts, you
can subdue your colors by desaturating them.
The
rectangle or tetradic color scheme uses four colors arranged into two
complementary pairs. This rich color scheme offers plenty of
possibilities for variation. Tetradic color schemes works best if you let
one color be dominant. You should also pay attention to the balance
between warm and cool colors in your design. NOTE: This scheme can be
more difficult to use because it may be hard to balance the colors. If
your scheme looks unbalanced, avoid using pure colors in equal amounts, you
can subdue your colors by desaturating them.
 The Square color scheme is
similar to the rectangle, but with all four colors spaced evenly around the
color circle. Square color schemes works best if you let one color be
dominant. You should also pay attention to the balance between warm
and cool colors in your design.
The Square color scheme is
similar to the rectangle, but with all four colors spaced evenly around the
color circle. Square color schemes works best if you let one color be
dominant. You should also pay attention to the balance between warm
and cool colors in your design.
b) Alternate Complement
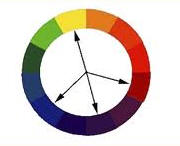 An
alternate complement is a four-hue scheme that adds a complement of one hue
to a triad. It provides contrasting colors and is easier to balance
colors than the double complement. NOTE: This is a great color
scheme. The end result is colors that look good together with an added
pop of color for items you want to stand out.
An
alternate complement is a four-hue scheme that adds a complement of one hue
to a triad. It provides contrasting colors and is easier to balance
colors than the double complement. NOTE: This is a great color
scheme. The end result is colors that look good together with an added
pop of color for items you want to stand out.
c) Split complementary scheme
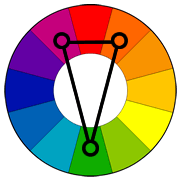 The
split-complementary color scheme is a variation of the complementary color
scheme. In addition to the base color, it uses the two colors adjacent to
its complement. This color scheme has the same strong visual contrast as the
complementary color scheme, but has less tension. The split-complimentary
color scheme is often a good choice for beginners, because it is difficult
to mess up.
The
split-complementary color scheme is a variation of the complementary color
scheme. In addition to the base color, it uses the two colors adjacent to
its complement. This color scheme has the same strong visual contrast as the
complementary color scheme, but has less tension. The split-complimentary
color scheme is often a good choice for beginners, because it is difficult
to mess up.
d). Color Triads (triad scheme)
If you place an imaginary equilateral triangle on the color wheel, the end points (or vertices) will intersect with the wheel and provide harmonious colors you can use in design. Using this technique results in high contrast while retaining harmony between colors. You should use one color in larger amounts than others. If your colors look to bright (gaudy) you should try subduing them by lowering the intensity or strength of the color.
Example of four possible triads from the color
wheel.

4. Natural Colors
Natural colors include color schemes found in nature (see example below).
It is important to consider how you will be using the colors when you select them. When colors are next to each other, their appearance will change. A light block of color near a dark area will appear lighter than it actually is, and the dark one will appear darker.
In the example below, the same orange square looks different depending upon the background. It appears darker when surrounded by lighter colors and it appears lighter when surrounding by darker colors.
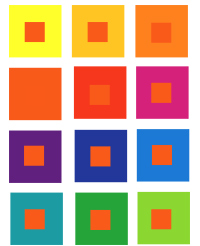
Image retrieved from Color Voodoo Publications
In the example below, the red square looks quite different against the various backgrounds:

Image retrieved from Color Voodoo Publications
Observing the effects colors have on each other is the starting point for understanding the relativity of color. The relationship of values, saturations and the warmth or coolness of respective hues can cause noticeable differences in our perception of color.
The hexadecimal color format is #rrggbb where rr, gg and bb are two-digit hexadecimal values. The position of the numbers in the sequence determines the amount of red, green and blue added.
When using the hex number system, keep in mind the following:
FF means full brightness
00 means no color
CC means 80% brightness
99 means 60% brightness
66 means 40% brightness
33 means 20% brightness
If you specified a hex color of #FF0000 you would have bright red
If you specified a hex color of #FF00FF you would have bright purple
If you specified a hex color of #660066 you would have purple at 40% brightness
The good news is you don't need to come up with these codes on your own - there are many websites that display the hex# for colors (we've looked at many of these sites already). When using hex color, it is useful to understand how the hex# affect the color you see because it will allow you to tweak the colors if needed.
Using hex color is popular because it offers the full spectrum of colors.
There are several useful websites you can use to select color schemes:
1. https://www.w3schools.com/colors/colors_picker.asp - lets you select a color and displays the hex#, rgb value and a range of tints and shades for the color you have selected.
2. https://color.adobe.com/create/color-wheel/ - this site lets you select color schemes and adjust colors. If you click the color swatch you want to use, you can adjust the color in the swatch by dragging the circles. The RGB and Hex values are displayed.
3. http://www.colorpicker.com/ - lets you drag markers on the slider to select the tonal range you want and then you can click a color to select it. You will see the hex# at the top and the RGB values on the right hand side. (This is similar to Photoshop's color picker)
4. http://colorschemedesigner.com/ - you basically select the scheme you are interested in creating (monochromatic, analogous, triadic, complementary etc) and then you select the colors using the wheel provided. If you click the color tables... link you will see info on one of the colors, to the right there is a color swatches link - click this to see the hex# for the colors in your scheme.
5. http://www.colorcoordinator.com/colorCoordinator.php - this site lets you select a base or dominant color and then you can choose the scheme you want to use(i.e. analogous, complementary, double complement, triadic, tetradic etc). The site displays the hex# and rgb number for each number in the scheme. It also displays the hue, saturation and brightness which you could adjust if needed.
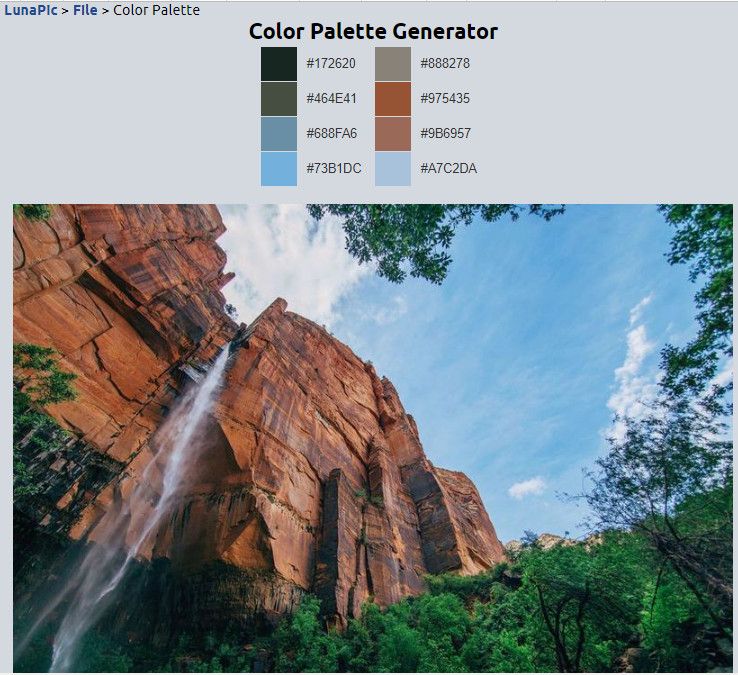
If you have an image containing colors you like, you can upload the image to LunaPic, go into the File Menu and select the Color Palette command. You will see the image displayed with hex color numbers above it
Example:
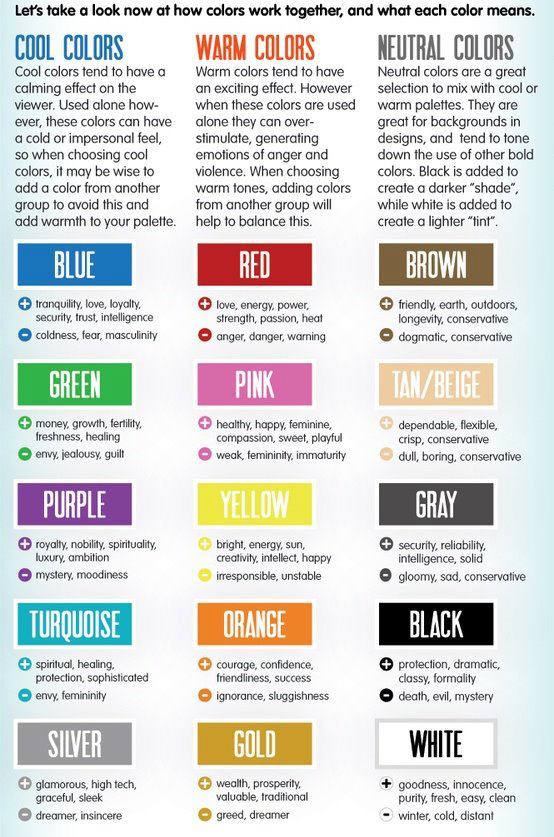
The colors you select for a website will affect the mood and tone of the site.
For information on how colors work together and how they are perceived, view: media/psychology-of-color2.jpg
The CSS background properties are used to define the background effects for elements.
CSS background properties include:
Places an image in the background of the element. When placed in the <body> tag, the picture is in the background of the entire page. However, keep in mind you can use this property with almost any HTML tag.
Syntax: background-image:url('folder/filename');
Example:background-image:url(../media/vertical-swirls.png);
Specifies whether or not an image should repeat and if it does repeat, how the repetition should occur.
Syntax: background-repeat:value;
Where value can be
For larger images, repetition should be turned off. For smaller images, repetition may work well (it depends upon the image and the content of the page)
To try this out live, see: https://www.w3schools.com/cssref/tryit.asp?filename=trycss_background-image Add background-repeat:no-repeat; and click run. Then, change no-repeat to repeat-x and click run. Try repeat-y and click run.
Specifies whether the image position is fixed or not.
Syntax: background-attachment:value;
Where value can be:
NOTE: The values shown are the ones used most often, inherit and initial are also valid values. Initial is the default value and inherit takes the value from the parent element (i.e. the element above the one you are adding this property to)
Specifies where the image should be placed
Syntax: background-position:value;
Where value can be:
Example:
body{
text-align:center;
background-image:url(../media/vertical-swirls.png);
background-repeat:no-repeat;
background-position:top
right;
background-color:snow;
}
Try it out live, go to: https://www.w3schools.com/cssref/tryit.asp?filename=trycss_background-position Set the position to 100px 100px and click run. Then, try 10% and 5%, click Run. Then try top right and set background-repeat to repeat-y and click Run Set the position to bottom left and set background-repeat to repeat-x
CSS font properties define the font family, level of boldness, size, and the style of a text.
Popular font properties include:
font-family - specifies the font typeface you want to use. You should specify more than one because not all computers have the same fonts installed. If the font is more than one word, it must be enclosed in double quotes. When specifying more than 1 font, you need to placed commas between them. Example: font-family:"Calisto MT", cambria, serif
font-size - sets the size of the text, the most popular use is: font-size:#pt; Example: font-size:36pt;
font-style - specifies normal or italicized text. Example: font-style:italic; or font-style:normal;
font-weight - specifies how heavy the font should be applied (can be used for boldfacing). Examples: font-weight:light; or font-weight:medium; or font-weight:bold;
Syntax: font-family:font family or generic family name you want to use
If the name of a font family is more than one word, it must be in quotation marks, like font-family: "Times New Roman".
Example: font-family:"Calisto MT";
If you want to specify more than one font family, you must put commas between them
Example: font-family:"Calisto MT", cambria, serif;
In CSS, there are two types of font family names:
| Generic family | Font family | Description |
|---|---|---|
| Serif | Times
New Roman Georgia |
Serif fonts have small lines (or tails) at the end of some of the characters. Longer text articles typically use these types of fonts because they are easier on the eyes. |
| Sans-serif | Arial Verdana |
"Sans" means without - these fonts do not have the lines or tails at the end of characters. Titles and headlines typically use these types of fonts because they stand out. |
| Monospace | Courier New Lucida Console |
All monospace characters have the same width. These types of fonts are used for code examples. |
The font-family property should specify several font names because not all computers come with all fonts. Specifying more than one name and ending with a generic font family ensures that the style will be applied to the text. If the browser does not support the first font, it tries the next font.
When coding the font-family property, start with the font you want, and end with a generic family, to let the browser pick a similar font in the generic family, if no other fonts are available. NOTE: If the computer rendering the page doesn't have any of the fonts specified, it will just display the text using the web browsers default font.
Full Example:
p{
font-family:"Times New
Roman", Georgia, Calibra, Times, serif;
}
To see how this works live, go to: http://www.w3schools.com/cssref/tryit.asp?filename=trycss_font-family Try changing the arial font to "Comic Sans MS" and then click run Try changing Times New Roman to "Trebuchet MS" and then click run (you should notice the paragraph fonts change to reflect the new font)
Web safe fonts are combinations of fonts that most computers support and they always end with a generic font to ensure compatibility on all systems.
Examples of web safe serif fonts
font-family: "Times New Roman", Times, serif;
font-family: ""Palatino Linotype", "Book Antiqua", Palatino, serif;
font-family: Georgia, serif;
Examples of web safe san-serif fonts
font-family:Arial, Helvetica, sans-serif;
font-family:"Lucida Sans Unicode", "Lucida Grande", sans-serif;
font-family: Verdana, Geneva, sans-serif;
Examples of web safe monospace fonts
font-family:"Courier New", Courier, monospace;
font-family: "Lucida Console", Monaco, monospace;
You can link to the Google Fonts API and pull in a wide variety of web-based fonts quickly and easily. It just requires adding a link to the google font you want to use in the <head> section of your page above the internal stylesheet you want to use the font in.
Example retrieving the Lobster font and using it in the <p> tag:
<head>
<link
href="https://fonts.googleapis.com/css?family=Lobster"
rel="stylesheet">
<style>
p {
font-family: 'Lobster', serif;
font-size: 24px;
}
</style>
</head>
NOTE: To access Google fonts for SSL, adjust the href statement to omit https
Example:
<link href="//fonts.googleapis.com/css?family=Lobster" rel="stylesheet">
Here's how the Lobster font looks applied to a paragraph
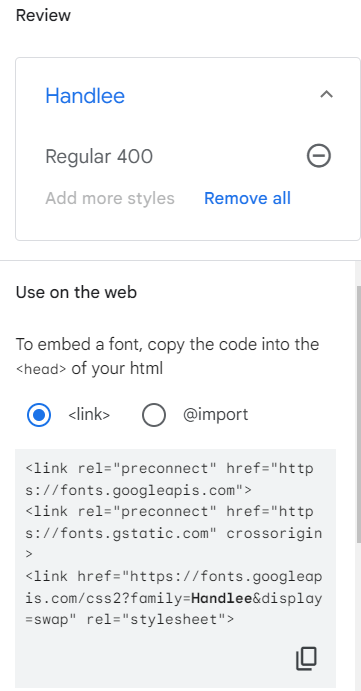
To use google fonts;
a) go to: https://fonts.google.com/
b) find a font you like
c) choose the Type A tester button

d) scroll down and click the Remove all Styles link.
Example:

e) That should display a Select + link, click on that link to open a panel on the right-hand side. The panel will include information for including the font as a link between the <head></head> section of your web document OR for importing the font directly into your css
Example:
The font-size property sets the size of the text. There are several different ways to specify the size, you can use a specific point size, a percentage or a relative size.
Syntax: font-size:value
Value can be:
em - a relative size measurement which is recommended by W3C. 1em is the current size, 2em is double the current size, .5em is half the current size etc. Example: font-size:3em;
pt - the number of points Example: font-size:36pt;
% - a percentage of the current size. Example: font-size:150%;
xx-small, x-small, small, medium, large, x-large, xx-large, smaller or larger - the size is relative to the default which is medium. Example: font-size:xx-small; or font-size:larger;
To see how this works live, go to: https://www.w3schools.com/css/tryit.asp?filename=trycss_font-size_percent_em Try changing 2.5em to 300% and click on run. Try changing 300% to 1.5em and click on run. Change 1.5em to x-large and click on run.
NOTE: If you think your site may be viewed by mobile users, you should go with em or a percentage (mobile users will have smaller screens, so setting the point size doesn't work very well).
The font-weight property determines how heavy or thick the font is.
Syntax: font-weight:value
Value can be:
normal
light (lighter than normal)
bold (makes the characters thick)
bolder (makes the charters thicker than bold)
100, 200, 300, 400,...900 You can set the value to numbers from 100-900. 400 is equivalent to "normal" and 700 is equivalent to "bold"
Examples:
font-weight:800;
font-weight:bold;
To see how this works live, go to: http://www.w3schools.com/css/tryit.asp?filename=trycss_font-weight Try changing font-weight from 900 to 400 and click run, then change it to 100 and click run so you can see the difference. Change bold to light and click run.
The property can be used to display text in italic, normal or oblique (oblique looks the same as italic).
Syntax: font-style:value
Value can be:
To try this yourself, go to: http://www.w3schools.com/cssref/tryit.asp?filename=trycss_font-style
Text-transform changes the casing of the text displayed. You can specify uppercase, lowercase, first letter capitalization or none (default).
Syntax: text-transform:value
Value can be:
none - this is the default and nothing is changed Example: text-transform:none;
capitalize - the first letter in each word will be capitalized Example: text-transform:capitalize;
uppercase - the text is converted to uppercase Example: text-transform:uppercase;
lowercase - the text is converted to lowercase Example: text-transform:lowercase;
NOTE: If you want small caps where everything is converted to uppercase, but the letters are smaller than the original uppercase letters, you need to use the font-variant property. The only thing this property really does is convert to small caps. The syntax is: font-variant:small-caps;
To try this yourself, go to: https://www.w3schools.com/css/tryit.asp?filename=trycss_text-transform
Adds a shadow to each letter. Shadows are used to put emphasis on sections of text. They can also make text more readable if the contrast between the foreground and the background is small
Since this is new, older browsers may not recognize it or display it. The newer browsers all recognize it.
Syntax: text-shadow: h-shadow v-shadow blur color;
Example #1 light blue text with a black shadow:
This text has the shadow effect applied with no blurring (the shadow was set to black).
The code used to create the example is:
<p style="color:lightblue; text-shadow:1px 1px black">This text has the shadow effect applied with no blurring (the shadow was set to black).</p>
NOTE: Without the shadow effect, the light blue text on a white background would not have enough contrast for viewers to read the text.
Example #2:
This text has the shadow effect applied with slight blurring (the shadow was set to black).
The code used to create the example is:
<p style="color:lightblue;text-shadow:1px 1px 1px black" >This text has the shadow effect applied with slight blurring (the shadow was set to black).</p>
To see how this effect works live, go to: http://www.w3schools.com/cssref/tryit.asp?filename=trycss3_text-shadow
Another use of the text-shadow property is to create a text outline:
This text has an outline effect created using the text-shadow property
Here's the code used to create the example:
<p style="color:lightblue; font-size:24pt; text-shadow : -1px 0 black, 0 1px black, 1px 0 black, 0 -1px black">This text has an outline effect created using the text-shadow property</p>
You'll notice that there are 4 shadows specified (no blurring).
Adds or removes underlining to sections of text. When used with links, text-decoration is often set to none to remove underlining. When used with sections of text, you can modify the color, style, and thickness of the line.
Syntax: text-decoration: line-type, color, style, thickness
Example #1: 3 pixel, hotpink, wavy underline
This text has a wavy, hot pink underline applied!
The code used to create the example is:
<p style="text-decoration:hotpink underline wavy 5px;">This text has a wavy, hot pink underline applied!</p>
Example #2: 5 pixel, turquoise, dotted overline
This text has a dotted, turquoise overline applied!
The code used to create the example is:
<p style="text-decoration:turquoise dotted overline 5px;">This text has a dotted, turquoise overline applied!</p>
To try this live, online visit: https://www.w3schools.com/cssref/tryit.asp?filename=trycss_text-decoration2
There are several properties that affect the spacing and alignment. We are going to investigate some of the more popular properties.
The CSS style property for horizontal text alignment is text-align:
The text-align property is used to set the horizontal alignment of a text. It can be used with heading tags, paragraph tags and HTML 5 semantic tags.
Syntax: text-align:value
Values can include:
left
right
center
justify - text is aligned on the right and left margins, spaces are inserted to force the text to fit
inherit - use whatever the tag above (the parent) is using
Example:
h1 {
text-align:center;
}
p{
text-align:left;
}
To try this live, go to: http://www.w3schools.com/css/tryit.asp?filename=trycss_text-align_all
The vertical-align property sets the vertical alignment of an element. This is quite often used with images to align them to text or within cells in a table.
Syntax: vertical-align:value
Typical values include:
sub - aligns the element as it was a subscript
super - aligns the element as it was a superscript
top - the top of the element is aligned with the top of the tallest element on the line
text-top - the top of the element is aligned with the top of the parent element's font
middle - the element is placed in the middle of the parent element
bottom - the bottom of the element is aligned with the lowest element on the line
text-bottom - the bottom of the element is aligned with the bottom of the parent element's font
Example:
img
{
vertical-align:text-top;
}
To try this live, go to: http://www.w3schools.com/css/tryit.asp?filename=trycss_vertical-align
You can indent text using the text-indent property along with the number of pixels you want the text indented by
Syntax: text-indent:#px;
NOTE: The value can be percentages, em, pts etc, but pixels is the value most often used.
Example:
p {
text-indent:50px;
}
To try this live, go to: http://www.w3schools.com/css/tryit.asp?filename=trycss_text-indent
The letter-spacing property increases or decreases the space between characters in a word or phrase. In graphic design and typography, this is referred to as tracking.
Syntax: letter-spacing: value;
Where value can be:
NOTE: Most often, the value is a pixel measurement.
Code Example: <p style="letter-spacing:10px; color:brown;">I love chocolate!</p>
How this looks live:
I love chocolate!
To try this live, go to: https://www.w3schools.com/cssref/tryit.asp?filename=trycss_letter-spacing
The word-spacing property increases or decreases the white space between words. In graphic design and typography, this is referred to as kerning.
Syntax: word-spacing:value;
Where value can be:
NOTE: Most often, the value is a pixel measurement.
Example: <p style="word-spacing:20px; color:brown;">I love chocolate!</p>
How this looks live:
I love chocolate!
To try this live, go to: https://www.w3schools.com/cssref/tryit.asp?filename=trycss_text_word-spacing
The line-height property affects the height of a line and the spacing between the lines (in graphic design, the spacing between lines is referred to as leading). Values can be positive or negative.
Syntax: line-height:value;
Where value can be:
Example:
<p style=line-height:normal;>This is a paragraph with a normal
height.</p>
<p style=line-height:10px;>This is a paragraph with a 10px
height.</p>
<p style=line-height:20px;>This is a paragraph with a 20px
height.</p>
<p style=line-height:30px;>This is a paragraph with a 30px
height.</p>
<p style=line-height:40px;>This is a paragraph with a 40px
height.</p>
<p style=line-height:5;>This is a paragraph with a height of
5x font size.</p>
How this looks live:
This is a paragraph with a normal height.
This is a paragraph with a 10px height.
This is a paragraph with a 20px height.
This is a paragraph with a 30px height.
This is a paragraph with a 40px height.
This is a paragraph with a height of 5x font size.
To try this out live, go to: https://www.w3schools.com/cssref/tryit.asp?filename=trycss_dim_line-height_pixel
Layout properties affect how content is placed on a web page.
Size properties affect the dimensions of the content.
Space properties affect space inside the content and space around the outside of the content.
Elements in pages occupy rectangular areas often referred to as blocks. You can control where and how these rectangular areas display using a variety of properties.
Elements can be displayed inline or in blocks. Elements in blocks display on new lines by themselves and they occupy the full width available. Inline elements display next to each other and are only as wide as necessary.
Examples of block elements by default:
Examples of inline elements by default:
To change the display of these elements, you can insert the display style property
Example:
<h1 style="display:inline">
<div style="display:block">
There are several additional values you can use with display besides inline and block:
More on the FLEX properties (new in CSS 3): The CSS3 Flexible Box, or flexbox, is a layout mode providing for the arrangement of elements on a page such that the elements behave predictably when the page layout must accommodate different screen sizes and different display devices. We will be working more with this later in the semester!
To see how changes to display affect the way the text displays, go to:https://www.w3schools.com/cssref/tryit.asp?filename=trycss_display_inline and change display:inline to display:block; then click the Run button. Change display to display:inline-flex; then click the Run button
The width property sets the width of an element.
Syntax: width:value
Value can be:
auto - the browser calculates the width (this is the default, so unless an external style sheet changed it and you want to set it back, there is no need to use this value)
length in pixels
% - defines the width as a percent of the containing block
inherit - the width will be the same as the element above it (or it's parent)
The height property sets the height of an element.
Syntax: height:value
Value can be:
auto - the browser calculates the height (this is the default, so unless an external style sheet changed it and you want to set it back, there is no need to use this value)
length in pixels
% - defines the height as a percent of the containing block
inherit - the height will be the same as the element above it (or it's parent)
Example that sets the height and width of a paragraph:
p
{
height:100px;
width:100px;
}
To adjust the height and width online, go to: http://www.w3schools.com/css/tryit.asp?filename=trycss_dim_height
The example below shows two rectangular areas whose dimensions were set using height and width. The code used to create the rectangles is shown below:
<div style="width:200px; height:150px; background-color:black;
color:white;">This is rectangle 1</div>
<div style="width:200px;
height:150px; background-color:peachpuff; color:black;">This is rectangle
2</div>
As you can see from the example, the layout for <div> is block. If we wanted the rectangles to display side by side, we would need to adjust the display to inline
The example below shows rectangles with display:inline
You should notice that the height and width were lost when the display was set to inline. To keep the dimensions, you can set the display to: display:inline-flex (see below)
Once you set dimensions of a rectangle or container, you should specify what to do if the contents exceed the space. That is what the overflow properties are used for.
Overflow properties include:
a) overflow - what happens if the content overflows the element's box, should the content be clipped or do you want scrollbars displayed?
Syntax: overflow:value
Where value can be:
To try this live, online, go to: https://www.w3schools.com/cssref/tryit.asp?filename=trycss_overflow Change overflow to hidden, scroll and auto (click Run each time and look at the results)
b) overflow-x -and overflow-y
x- specifies what to do with the left/right edges of the content if it exceeds the container's dimensions
y- specifies what to do with the top/bottom edges of the content if it exceeds the container's dimensions
Syntax for x: overflow-x:value
Syntax for y: overflow-y:value
Where value can be:
To try overflow-x and overflow-y live, online, go to: https://www.w3schools.com/cssref/tryit.asp?filename=trycss3_overflow-xy
The margin properties put space around the outside of the html element.
You can set the same margin for all sides (top, bottom, left and right) OR you can set the margin for individual sides.
Syntax for all sides: margin:#pixels or percentage Example: margin:1%;
Syntax for individual sides: margin-left:#pixels or
percentage;
margin-right:#pixels or percentage; margin-bottom:#pixels or percentage; margin-top:#pixels
or percentage;
Example: margin-left:1%; margin-right:20%;
margin-top:2%; margin-bottom:5%;
Syntax for top/bottom and left/right: margin: #pixels or percentage #pixels or percentage; (the first number is used for the top/bottom margins and the second is used for the left/right margins). Example: margin: 2% 5%;
Additional Examples:
margin:10px 5px 15px 20px;
margin:10px 5px 15px;
margin:10px 5px;
margin:10px;
Example showing rectangles with display:inline-flex and NO margin settings
Example showing rectangles with display:inline-flex; margins:20px; You should notice space around each rectangle which is what the margin setting does.
Padding is the space between the text and the edge (or border) of the element containing it.
The syntax is similar to margins.
Syntax for all sides: padding:#pixels or percentage;
Syntax for individual sides: padding-top:#pixels or percentage; padding-bottom:#pixels or percentage; padding-right:#pixels or percentage;padding-left:#pixels or percentage;
Syntax for top/bottom and left/right: padding:#pixels or percentage #pixels or percentage; (the first number is used for the top/bottom padding and the second is used for the left/right padding).
NOTE: If you only want space to the right adjusted, then only set style="padding-right:#pixels or percentage;" If you only want space to the right and at the bottom set, then use: style="padding-right:#pixels or percentage; padding-bottom:#pixels or percentage";
Additional Examples:
padding:10px 5px 15px 20px;
padding:10px 5px 15px;
padding:10px 5px;
padding:10px;
Example showing rectangles with display:inline-flex; margins:20px; The padding is NOT specified which is why the text is right up against the edge of the rectangle.
Example with padding:30px; You should notice that the text has moved away from the top by 30px and from the left by 30px (it has also moved from the right and bottom by 30px)
CSS uses pseudo-classes (or special states) to add effects to some tags. The <a> tag is one of the elements that has a pseudo-class for formatting links because a link can take on four different states: link, visited, hover or active.
Syntax: selector:pseudo-class {property:value;}
There are some additional rules you need to keep in mind when coding the CSS for the <a> pseudo-class:
To see how the <a> pseudo-class works live, vist: http://www.w3schools.com/CSS/tryit.asp?filename=trycss_link
Typical property:value pairs for links include the following:
1. color:value where value is the color name, hexadecimal number or rgb value
2. background-color:value value is the color name, hexadecimal number or rgb value
3. font-size:value where value is typically measured in pixels
4. font-weight:value where value can be normal, bold, bolder, lighter or a number between 100-900 (the larger the number, the heavier the text).
5. text-decoration:value where the line-type value can be none, underline, overline (line goes over the text), line-through, blink or inherit
To see the different text-decoration values live, visit: http://www.w3schools.com/Css/tryit.asp?filename=trycss_text-decoration
NOTE: text-decoration can use line styles(solid, double, dotted, dashed, wavy), weights (percentages, pixels, em etc.) and colors (color names, rgb values or hex values). For more information see the section E. Using CSS to change Fonts
6. font-family:value
Example:
a:link {
   color:goldenrod;
   text-decoration: underline;
}
a:active {
   color:maroon;
   text-decoration: underline;
}
a:visited {
   color:green;
   text-shadow:1px 1px black;
   text-decoration: underline;
}
a:hover {
   color: white;
   background-color: goldenrod;
   text-decoration: none;
}
How this looks when applied to links:
So far, we have defined styles for specific HTML tags using external, internal and inline styles. You can also define styles generically. These styles can be used inside any HTML tag.
The id attribute can be used to apply styles to any HTML element in your page. If you have styling you want to apply to 1 element, using an ID works well.
To define a style as an ID, begin the selector name with a # followed by the text you want to use for the name.
Example: TIn the example below, #para1 is the ID
<style>
#para1
{
text-align:center;
color:red;
}
</style>
To apply the ID style to your html, add the ID attribute to the opening tag (do NOT include the # symbol - that is only used when you define it)
Example applying the para1 ID to a paragraph:
<p id="para1"> Here is some text with the para1 style applied using the <p id="para1"> element added to the paragraph tag.</p>
Here's how it looks live:
Here is some text with the para1 style applied using the <p id="para1"> element added to the paragraph tag.
The class style is used to specify a style for a group of elements. Unlike the id attribute, the class attribute is most often used to change several elements.
The class style is defined with a "." before the class name
In the example below, all HTML elements with class="center" will be center-aligned:
<style>
.center {
text-align:center;
}
</style>
Examples of how you can use this:
<p class="center">
<section class="center">
<h1 class="center">
Another, less flexible way to set this up would be to associate the style class with a particular HTML tag. This is done by entering the tag, a dot and the name of the class. Associating a class with a particular tag limits the use of the class because it can only be used with that tag.
In the examples below, silly and serious can only be used with paragraph tags.
<style>
p.silly{font-size:16pt; font-family:"Comic Sans MS"; color:purple;}
p.serious{font-size:16pt; font-family:Arial; color:navy}
</style>
Here's how text looks with each applied:
This paragraph has the silly class applied
This paragraph has the serious class applied
Here's how the code looks for each sentence:
<p class="silly">This paragraph has the silly class applied</p>
<p class="serious">This paragraph has the serious class applied</p>