By the end of this tutorial, you will be able to:
Create a basic style sheet
Differentiate between style classes and style IDs
Construct external style sheets, internal style sheets and inline styles
Use CSS for horizontal and vertical text alignment, text indentation, text spacing, text effects, fonts, color, size, layout, margins, padding and spacing
Use CSS styling for links
Explain how web browsers interpret CSS font family values
Tweak fonts and use web fonts
WARNING ON DOWNLOADING FILES: Make sure you right click the links and you do NOT display the page and save the page to your system. If you do that, you will end up with images in folders that we don't want to use! Also make sure you use Chrome or Firefox to download (sometimes Microsoft Edge and the Windows Explorer will create additional folders for graphics that we DO NOT want) Having additional folders to deal with will make linking pages and displaying images a nightmare because what you will have on your system will not match the instructions!!!!
To see a video demonstration, watch: https://youtu.be/kJFzUD8nABo
1. Navigate to your CIT180 folder
2. Open the CIT180 folder and create the following folders:
Example:
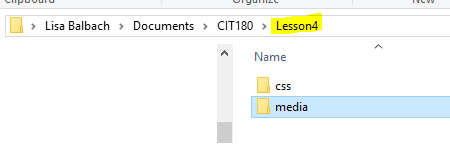
3. Open the Lesson4 folder and create the following folders:
Example
4. Open the Lesson2 folder. Select the butterfly-garden.html file, right click the file and select copy. Go into the Lesson4 folder, right click and select paste
5. Open the Lesson3 folder. Select the top-rock.html file, right click the file and select copy. go into the Lesson 4 folder, right click and select paste.
6. Download the following files to your lesson 4 folder: 1950s-trivia.html, benefits-of-yoga.html and parallax-effect.html
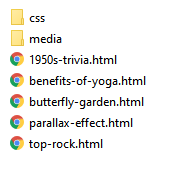
Your Lesson4 folder should look like the example below:
7. Open the Lesson3/media folder, select the rock-n-roll.jpg graphic file, right click the file and select copy. Go into the Lesson4/media folder, right click and select paste.
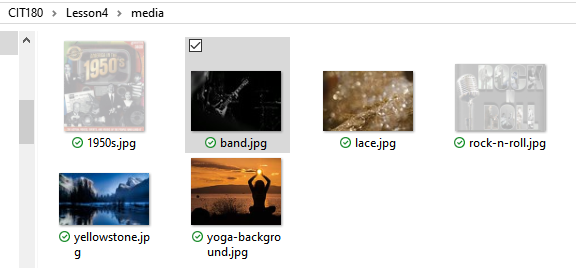
8. Download the following graphics to your Lesson4/media folder: 1950s.jpg, band.jpg, lace.jpg, yellowstone.jpg, yoga-background.jpg
Your Lesson4/media folder should look like the example below:
To see a video demonstration, watch: https://youtu.be/buC1afygmK8
1. Open the Lesson4/butterfly-garden.html file for editing
2. Add the following internal style sheet between the <head> and </head> tags
<style>
body{
color:darkorange;
background-color:peachpuff;
}
</style>
3. Save your changes and view the page offline in the web browser.
4. Add the following inline style to the body tag
<body style="background-color:linen;">
5. Save your changes and view the page offline in the web browser (you can simply reload the page) You should notice that the linen color overrides the peachpuff color (that is how cascading styles work)
6. Modify the internal style sheet between the <head> </head> tags to the following:
<style>
body{
color:black;
background-color:peachpuff;
}
summary{
color:darkorange;
font-family:"Lucida Sans", "Lucida Sans Regular", "Lucida Grande",
"Lucida Sans Unicode", Geneva, Verdana, sans-serif;
font-size:150%;
font-style:italic;
}
h1{
color:darkorange;
font-family:"Lucida Sans", "Lucida Sans Regular", "Lucida Grande",
"Lucida Sans Unicode", Geneva, Verdana, sans-serif;
font-size:150%;
font-weight:bolder;
text-shadow:1px 1px black;
}
</style>
7. Save your changes and view the page offline.
8. Make the following changes to the body tag:
body{
color:black;
background-color:peachpuff;
font-family:Georgia,
"Times New Roman", Times, serif;
font-size:1.25em;
}
9. Save your changes and view the page offline.
10. Add the following internal style for the aside element:
aside{
margin-left:50%;
background-color:#e6e6e6;
width:30%;
padding:10px;
overflow:auto;
}
This will move the aside section so it begins approx halfway across the page, it will make the element's width 30% of the page and it will add spacing between the text and edge
11. Save the changes and view the page offline in the browser
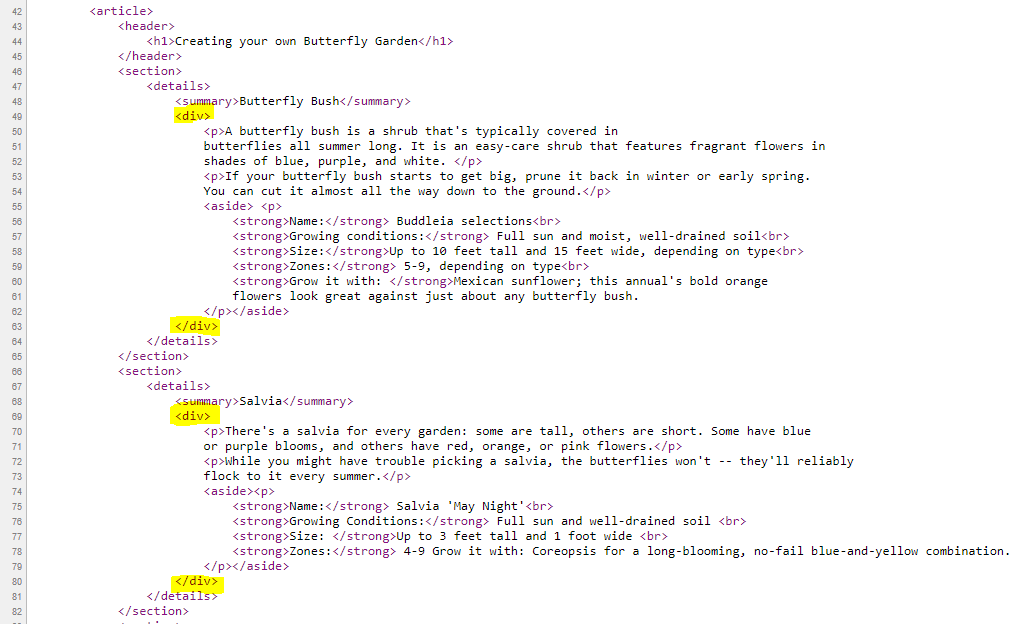
12. To change the background color displayed when you click and view information in the <details> section, we need to style a <div> element and then add the <div> element to our html
a) Add the styling shown below to the internal style sheet:
div{
background-color:antiquewhite;
padding:20px;
}
b) Add the <div> element to the code as shown below:
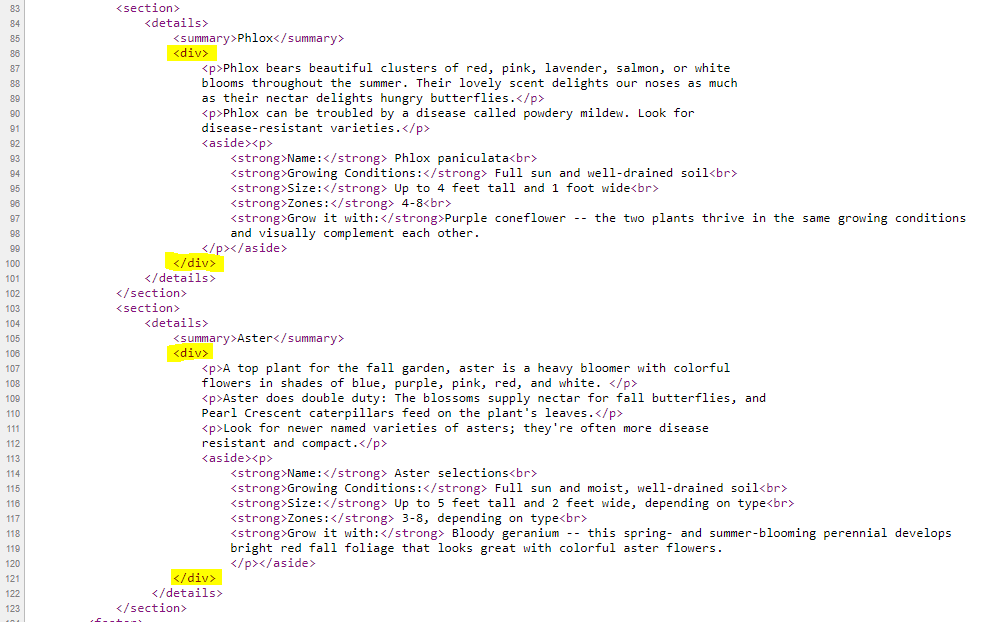
13. Save your changes and view the page offline.
14. Close the butterfly-garden file.
To see a video demonstration, watch: https://youtu.be/SiTq2TcEU8M
1. Open Lesson4/1950's-trivia.html for editing
2. Add an inline style to the h1 tag in the header to change the color to darkgoldenrod. Then, modify both the <hr /> tags in the <header> to have a height of 4px and a background-color of darkgoldenrod NOTE: We used the height style with images last week along with the width style to specify image dimensions. Here we are making the line thicker (you will learn more about height and width later in this lesson)
Old Code:
<header>
<hr />
<img alt="1950s trivia graphic" src="media/1950s.jpg" style="width: 333px; height: 375px; float: right">
<h1>1950's Trivia</h1>
<hr />
</header>
New Code:
<header>
<hr style="background-color:darkgoldenrod;height:4px;"/>
<img alt="1950s trivia graphic" src="media/1950s.jpg" style="width: 333px; height: 375px; float: right">
<h1 style="color:darkgoldenrod;">1950's Trivia</h1>
<hr style="background-color:darkgoldenrod;height:4px;" />
</header>
3. Save your changes and view the page
offline in a web browser.
4. Add the following link to the Kaushan Script google font (this should go below the <head> tag at the top of your code):
<link href="https://fonts.googleapis.com/css?family=Kaushan+Script" rel="stylesheet">
5. Add the Kaushan Script font to the <header> tag as an inline style AND make the text all uppercase using text-transform (see below)
<header style="font-family: 'Kaushan Script',cursive; text-transform: uppercase;">
6. Add the Kaushan Script font to the <footer> tag as an inline style (see below)
<footer style="font-family: 'Kaushan Script',cursive">
7. Save your changes and view the page offline
8. Add the following CSS styles to the internal style sheet located at the top of the code to style the links:
a:link {
color:darkgreen;
text-decoration: underline;
}
a:visited {
color:darkgoldenrod;
text-decoration: underline;
}
a:hover {
color: white;
background-color: darkgreen;
text-decoration: none;
}
a:active {
color:yellow;
text-decoration: underline;
}
9. Save your changes and view the
page offline. To test the <a> pseudo-class, click on a link, then click
the back button in your browser window. You should be able to see the link
settings when the page first displays, the hover settings when you move the
mouse over the link, the active settings when you click the link and when you
click on the back button, you will see the visited settings
NOTE: The there is a link to top rock that uses the 1950's ID. If you named the ID or page differently than the code shown, you will have to adjust the link because it will not work. Also, the link to the assignment page assumes you created the directory structure correctly and that you have the assignment page outside of your lesson folders. If you put the assignment page into a folder, you will need to change the link because it will not work.
10. Correct any errors in the page and save your changes and close the page. NOTE: Errors are typically typos
To see a video demonstration, watch: https://youtu.be/gdJ0ceNkhlY
1. Open parallax-effect.html for editing. You will be creating an external style sheet and adding the style classes to your HTML.
You will have a background image and the rest of the content will scroll over the top of it (that is what the parallax effect is).
2. Create a new css file. Save the file to the Lesson4/css folder and name it parallax.css
3. Add the following css to the parallax.css file
body, html {
height: 100%;
background-color: black;
font-family: "Lucida Grande", "Lucida Sans Unicode", "Lucida Sans", "DejaVu Sans", Verdana, "sans-serif";
}
article{
height:auto;
width:100%;
}
header {
color: ghostwhite;
width: 100%;
text-align: center;
font-size:1.4em;
}
4. Save your changes to parallax.css.
5. In the parallax-effect.html web page, there is already a link to the css file. So, you should be able to view the page offline. At this point, you should notice the font is different than the default and the text in the header is white and centered. If you don't see the change in the color of the text, you should double check the way you named the css file - how you name the file must match the code 100%
6. In the parallax.css file, add the following styling and save your changes
.landslide {
background-image: url("../media/yellowstone.jpg");
background-repeat: no-repeat;
background-size: cover;
background-position: center;
text-align: left;
height:100%;
padding-bottom:20px;
margin-top:10%;
width:75%;
}
.landslide p {
background-color: aliceblue;
color: black;
border-radius: 20px;
opacity: .6;
padding:10px;
width:80%;
}
.landslide h1 {
margin-left: 1%;
color: ghostwhite;
text-shadow: 1px 1px black;
font-size: 1.5em;
}
7. Apply the landslide class to a section in your parallax-effect web page by adding it to the HTML code as shown in the example below:
<article>
<header>
<h1>Fleetwood Mac Lyrics<br>
Songwriter: Stevie Nicks</h1>
</header>
<section class="landslide">
<h1>Landslide</h1>
8. Make sure you have saved your changes to both files and view the page offline.
a) .landslide class
.landslide is a class that places a non-repeating image in the center of the element it is applied to. In this page, we are applying it to a section tag, so the image is placed in the center of the section element. Since the size is set to cover, the image will expand to fill the entire section it is placed within.
The height of the image is set to 100% of the element it is placed inside and the width is set to 75% of the containing element's width. The <section> tag is inside the <article> tag, so <article> is the containing element and article has a width of 100%.
Padding-bottom puts some space at the bottom of the image where nothing else is displayed (in the page we are working with, a portion of the image displays at the bottom without any text on top of it.).
b) .landslide p
.landslide with a p after it affects paragraphs within the landslide class.
Paragraphs within the class will have a slightly transparent light blue background color with rounded corners and a width of 80% of the containing element (the containing element is the one that has the landslide class applied to it). If you look at the page offline and view the graphic, you should notice the blue background takes up 80% of the width of the image.
Padding set to 10 pixels places a little space above, to the right, below and to the left of the text, so the text isn't right up against the edge of its container. Because we have a light blue background, you can easily see the text is not right up against the edge of the blue background - that is because of the padding setting.
c) .landslide h1
.landslide with h1 after it affects heading 1 tags inslide the landslide class.
Heading 1 elements will be colored white, have a text shadow, have a size 150% of the default with a small left margin. You should notice the landslide heading is not up against the left side of the graphic and that is because of the margin-left setting.
9. To center the page and the section with landslide in it, we need to create another class. The class needs to have the left and right margin set to auto. It can be called whatever you want, but it is typically called center (that is what we are going to call it). The class is used to center elements within a page. NOTE: Centering elements is different than centering text. To center text, you use text-align:center. The code below is used to center the contents of HTML elements
Add the following code to your parallax.css file and save your changes:
.center {
margin-right: auto;
margin-left: auto;
}
10. Add the "center" class to your web page as shown in the code below:
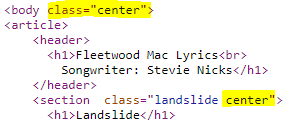
Save your changes and view the page offline in the browser. You should notice that the landslide section is now centered
11. In the parallax.css file, add the following styling and save your changes
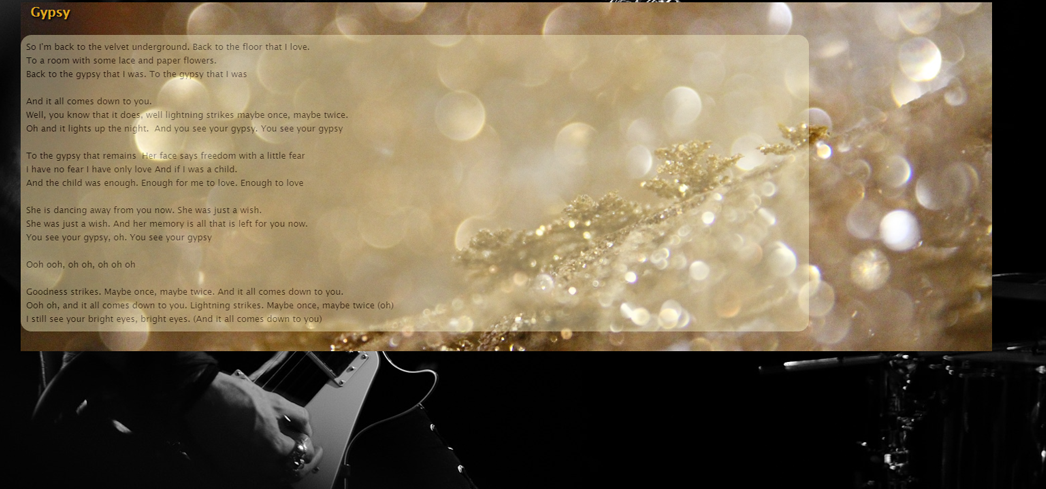
.gypsy {
background-image: url("../media/lace.jpg");
background-repeat: no-repeat;
background-size: cover;
background-position: center;
text-align: left;
height:100%;
padding-bottom:20px;
width:75%;
}
.gypsy p {
background-color: lemonchiffon;
color: black;
border-radius: 20px;
opacity: .4;
padding:10px;
width:80%;
}
.gypsy h1 {
margin-left:1%;
text-shadow: 2px 2px 4px black;
font-size: 1.5em;
color:goldenrod;
}
12. Add the gypsy and center classes to the <section> tag directly above the <h1>Gypsy</h1> tag in your web page. Save your changes and view the page offline.

NOTE: The gypsy class is almost identical to the landslide class. It uses a different image and different colors, but everything else is the same.
13. In the parallax.css file, add the following parallax class and save your changes
.parallax {
/* The image used */
background-image: url("../media/band.jpg");
/* Full height */
height: 100%;
/* Create the parallax scrolling effect */
background-attachment: fixed;
background-position: center;
background-repeat: no-repeat;
background-size: cover;
}
14. Add the parallax class to your web page using a <div> tag. The code should go below the <article> tag and above the <header> tag as shown in the code below:
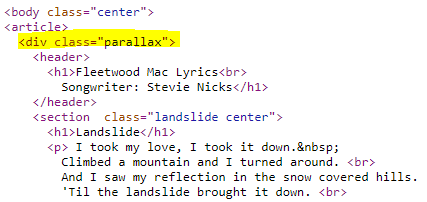
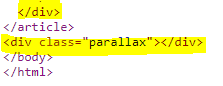
Add the </div> for the parallax class at the bottom of the page above the </article> tag. Then, between the </article> and </body> tags, insert another <div class="parallax"></div> to create the effect The graphic below highlights where the code should be located:
Save your changes and view the page offline. It should look similar to the graphics below and when you scroll the background graphic should NOT move, the content above it should scroll over it.

15. If the page looks good, you can close the browser and the css and html files. If there are problems, check the code for typos. In CSS, a common error is forgetting to add semicolons at the end of lines. When this happens CSS stops working from the point you forgot the semicolon.
If you cannot figure out the problem, you will need to transfer everything to the web and email me so I can take a look at it.
To see a video demonstration, watch: https://youtu.be/Jl8NpbvJ7JM
1. Open top-rock.html for editing.
2. Create a new css file. Name the file rock.css and save it into the Lesson4/css folder.
3. Add the following CSS styles to the external style sheet:
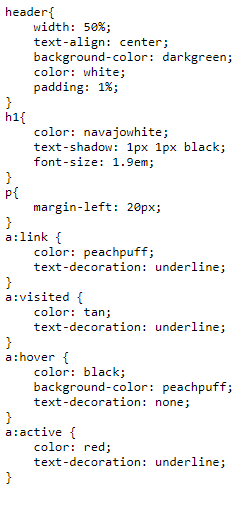
4. Add a link to the style sheet in the top-rock.html file (right below the <head> tag)
<link href="css/rock.css" rel="stylesheet" type="text/css" />
5. Save your changes and view the page offline. Test the <a> pseudo-class by clicking the links.
6. Close the css and html files
To see a video demonstration, watch: https://youtu.be/nolN4caSIkg
1. Open the Benefits of Yoga page for editing.
2. Add a link for google fonts as shown below:

Then, add the google font to the body,html css as shown in the graphic below (code you need to add is highlighted):
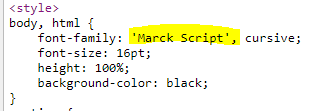
3. Insert the parallax class, the title ID and the subtitle ID, which are highlighted and boldfaced below, into the internal style sheet.
<style>
body, html {
	font-family: 'Marck Script', cursive;
	font-size: 16pt;
	height: 100%;
	background-color: black;
}


.parallax {
	/* The image used */
	background-image: url("media/yoga-background.jpg");
	/* Full height */
	height: 100%;
	/* Create the parallax scrolling effect */
	background-attachment: fixed;
	background-position: center;
	background-repeat: no-repeat;
	background-size: cover;
}

section {
	padding: 2%;
	color: black;
	width: 50%;
	background-color: #fded7e;
	opacity: .6;
	border-radius:0px 60px 60px 0px;
}


#title {
	font-size: 36pt;
	text-align: left;
	color: white;
	text-shadow: 5px 5px 2px gray;
	letter-spacing: 15px;
	margin-top: 10px;
	margin-bottom:5px;
}

#subtitle {
	font-size: 18pt;
	text-align: left;
	color: white;
	letter-spacing: 10px;
	margin: 0px;
}

</style>
Classes are typically applied to more than one html element. The classes below will be applied to multiple elements within the yoga page.
.parallax class: makes the background stationary and allows the text to scroll over it
IDs are typically applied to a single element because of how they are used in web programming languages like JavaScript. The IDs below will be applied to single elements within our page
#title: will be applied to the title text in the page
#subtitle: will be applied to the subtitle text in the page
4. Add the title id to the <p> tag as shown below:
<p id="title">Top 10 Health Benefits Of Yoga</p>
5. Add the subtitle id to the <p> tag as shown below:
<p id="subtitle">By Ann Pizer</p>
6. Insert the dashedborder, border and heading classes, which are highlighted and boldfaced below, into the internal style sheet.
<style>
body, html {
	font-family: 'Marck Script', cursive;
	font-size: 16pt;
	height: 100%;
	background-color: black;
}
.parallax {
	/* The image used */
	background-image: url("media/yoga-background.jpg");
	/* Full height */
	height: 100%;
	/* Create the parallax scrolling effect */
	background-attachment: fixed;
	background-position: center;
	background-repeat: no-repeat;
	background-size: cover;
}
section {
	padding: 2%;
	color: black;
	width: 50%;
	background-color: #fded7e;
	opacity: .6;
	border-radius:0px 60px 60px 0px;
}
#title {
	font-size: 36pt;
	text-align: left;
	color: white;
	text-shadow: 5px 5px 2px gray;
	letter-spacing: 15px;
	margin-top: 10px;
	margin-bottom:5px;
}
#subtitle {
	font-size: 18pt;
	text-align: left;
	color: white;
	letter-spacing: 10px;
	margin: 0px;
}
.dashedBorder {
	border-bottom: dashed 2px gray;
	width: 25%;
}
.border {
	height: 4px;
	margin-bottom: 0px;
	background-color: #fded7e;
	opacity: .9;
}
.heading {
	font-weight: 900;
}
</style>
Classes are typically applied to more than one html element. The classes below will be applied to multiple elements within the yoga page.
.dashedBorder class: creates a dashed gray line below the object it is applied to. The line takes up 1/4 of the page
.border class: creates a colored background with a height of 4px that is slightly transparent
.heading class: makes the object or text boldfaced
7. Add the border class to the <hr> tags as shown below:
<header>
<hr class="border">
<p id="title">Top 10 Health Benefits Of Yoga</p>
<p id="subtitle">By Ann Pizer</p>
<hr class="border">
</header>
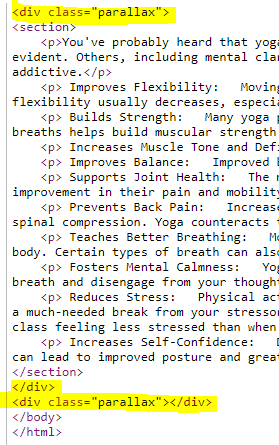
8. Add two <div> tags with the parallax class in the locations shown in the partial code graphic below (the code you need to insert is highlighted in the graphic). The opening <div> should go above the <section> tag and the closing <div> should go below the closing section tag followed by another <div> with the parallax class that only has an opening and closing side by side with no other code between. This will create the stationary background that will allow the text to "scroll" over the top of it.
9. Apply the heading class to a portion of the paragraphs as shown in the example below (the code you need to insert is highlighted in the graphic)

10. Save all your changes and view the page offline. Correct any errors. NOTE: Errors typically involve typos. You can minimize typos by copying and pasting whenever possible.
11. Close the page in the browser and in your editor.
By the end of the textbook assignment exercises, you should have:
butterfly-garden.html (task 2) 5 points
1950s-trivia.html ( task 3 ) 5 points
parallax-effect.html ( task 4 ) 10 points
top-rock.html (task 5) 3 points
benefits-of-yoga.html ( task 6) 7 points
1. Transfer everything that is in the CIT180/Lesson4 folder to the server (that includes the media folder, css folder and all their contents). To see a video demonstration, watch: https://youtu.be/L6y0x0ScXG0
2. View the pages live by going to the website and bringing up the pages. Correct any issues or problems and transfer the corrections
3. If you need help, send me
an email message with a link to your web page and I will look at it and get
back to you.