
By the end of this tutorial, you will be able to:
Create numbered lists, bulleted lists, description lists and nested lists.
Create tables, combine rows within tables and/or combine columns within tables
Apply CSS formatting to lists, tables and to data within tables.
Use the new CSS 3 styles for newspaper columns: column-count, column-gap and column-rule.
1. Navigate to your CIT180 folder
2. Open the CIT180 folder and create the following folder:
3. Open the CIT180/Lesson5 folder and create the following folders:
4. Download the following files to your CIT180/Lesson5 folder
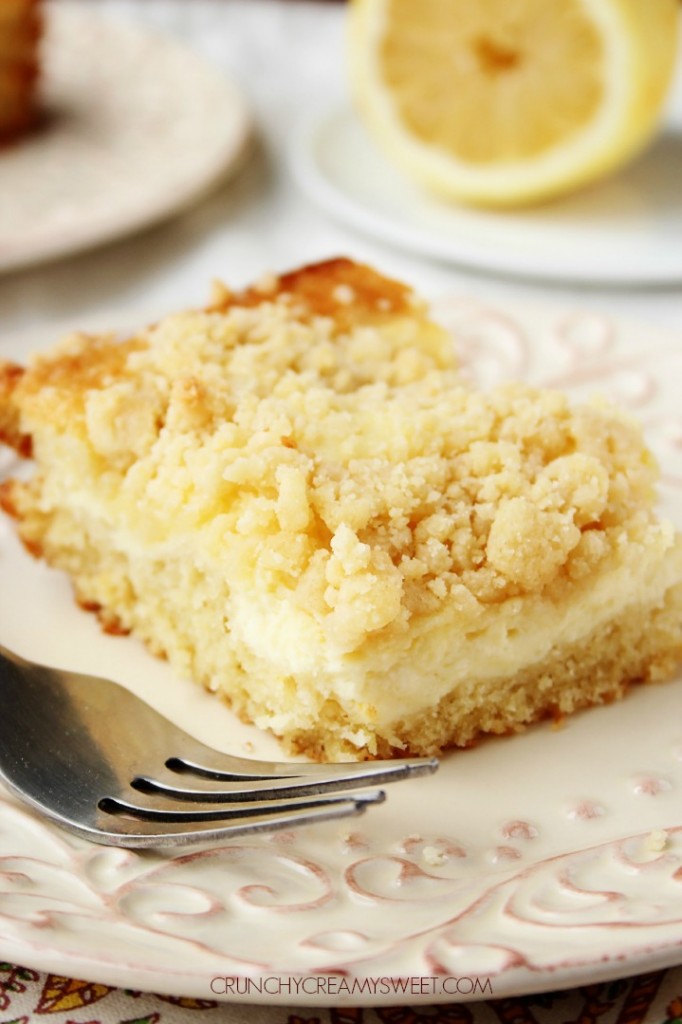
lemon-cream-cheese-crumb-cake.html
WARNING: Make sure you right click the links and you do NOT display the page and save the page to your system. If you do that, you will end up with images in folders that we don't want to use! Also make sure you use Chrome or Firefox to download (sometimes Microsoft Edge and the Windows Explorer will create additional folders for graphics that we DO NOT want)
5. Download the following files to your CIT180/Lesson5/media folder
Lemon-Crumb-Cake-thumbnail.jpg
6. Download the following files to your CIT180/Lesson5/css folder
To see a video demonstration, watch: https://youtu.be/ArAu_Rt64TQ
1. Open lemon-cream-cheese-crumb-cake.html for editing. Convert paragraphs within the <summary> tags to unordered lists as shown below:
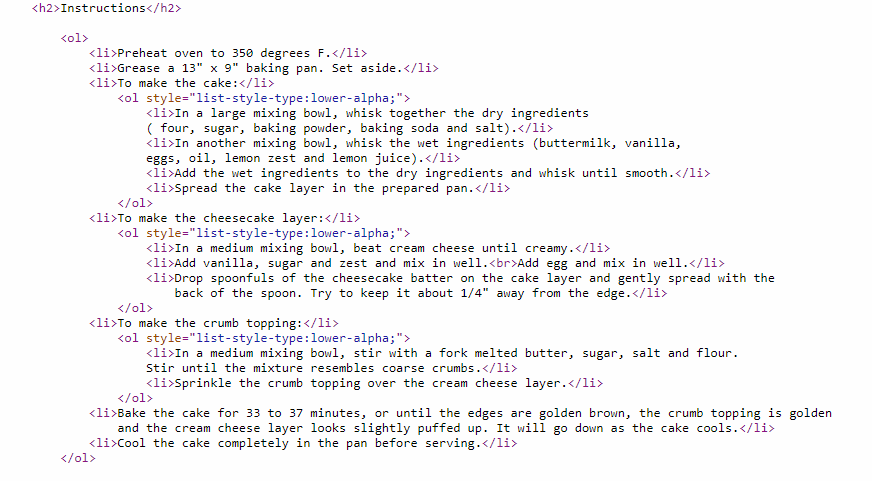
2. Convert the instructions into a nested list (see example below)

Here's the code needed to create the list. BE CAREFUL where you place the <ol> and </ol> If they aren't in the correct location, the web browser may get confused and not display the list correctly. NOTE: The inline styles tell the browser to use letters intead of numbers which is the default.
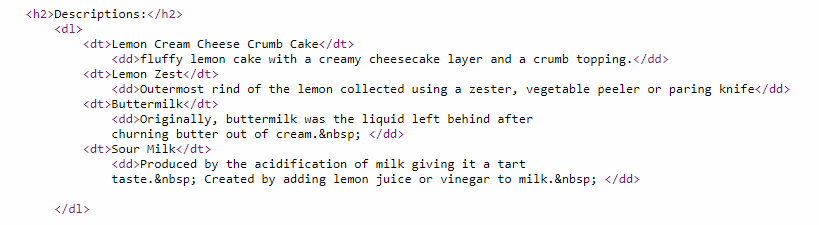
3. Convert the term definitions in the description section into a description list. The code for the list is shown below:
4. Save your changes.
5. View the file offline, correct any errors and save your changes
To see a video demonstration, watch: https://youtu.be/qQcw7N0Lhiw
1. Open cake-recipe.css for editing. Add the following css to the bottom of the style sheet:

2. Modify the css for the main tag to the example shown below (you are adding border styling)
main{
width:70%;
border:groove tan 30px;
}
3. View the file offline, correct any errors and save your changes
To see a video demonstration, watch: https://youtu.be/OY6kiQkdpI8
1. Open the lemon-cream-cheese-crumb-cake.html page for editing
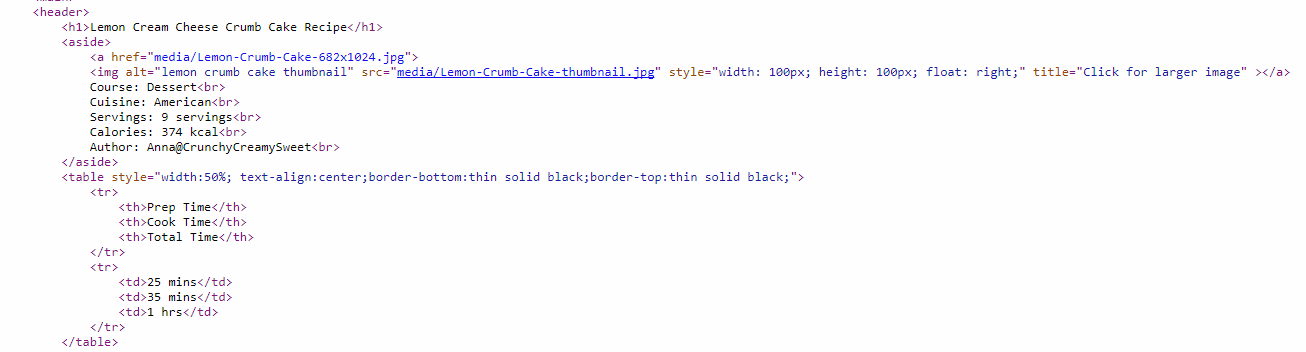
2. Convert the text at the top of the page into a table (see example below)
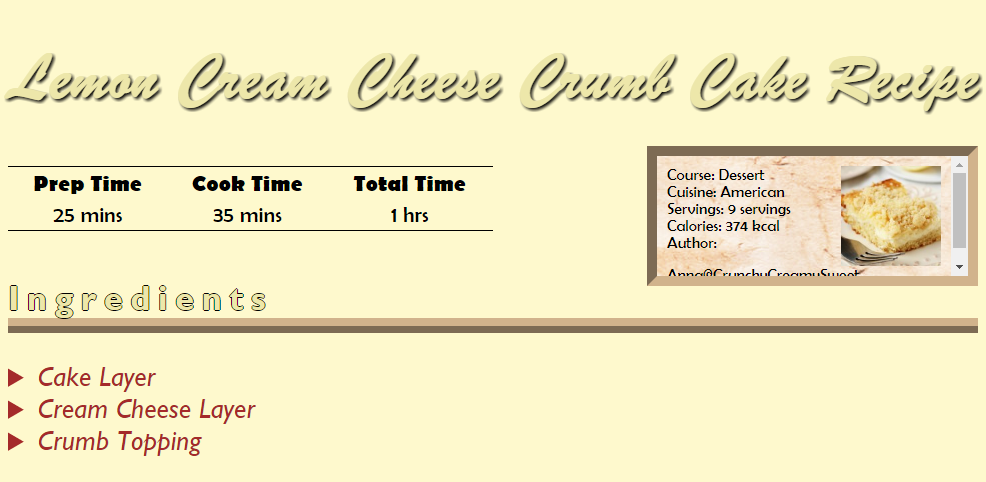
Use the following code to make the conversion (note that the table has inline styling which is typical of tables):
3. Save your changes.
4. View the page off-line and make any corrections needed. Close the cake-recipe.css and lemon-cream-cheese-crumb-cake.html files when you are done.
To see a video demonstration, watch: https://youtu.be/6FL-0Xz32ZE
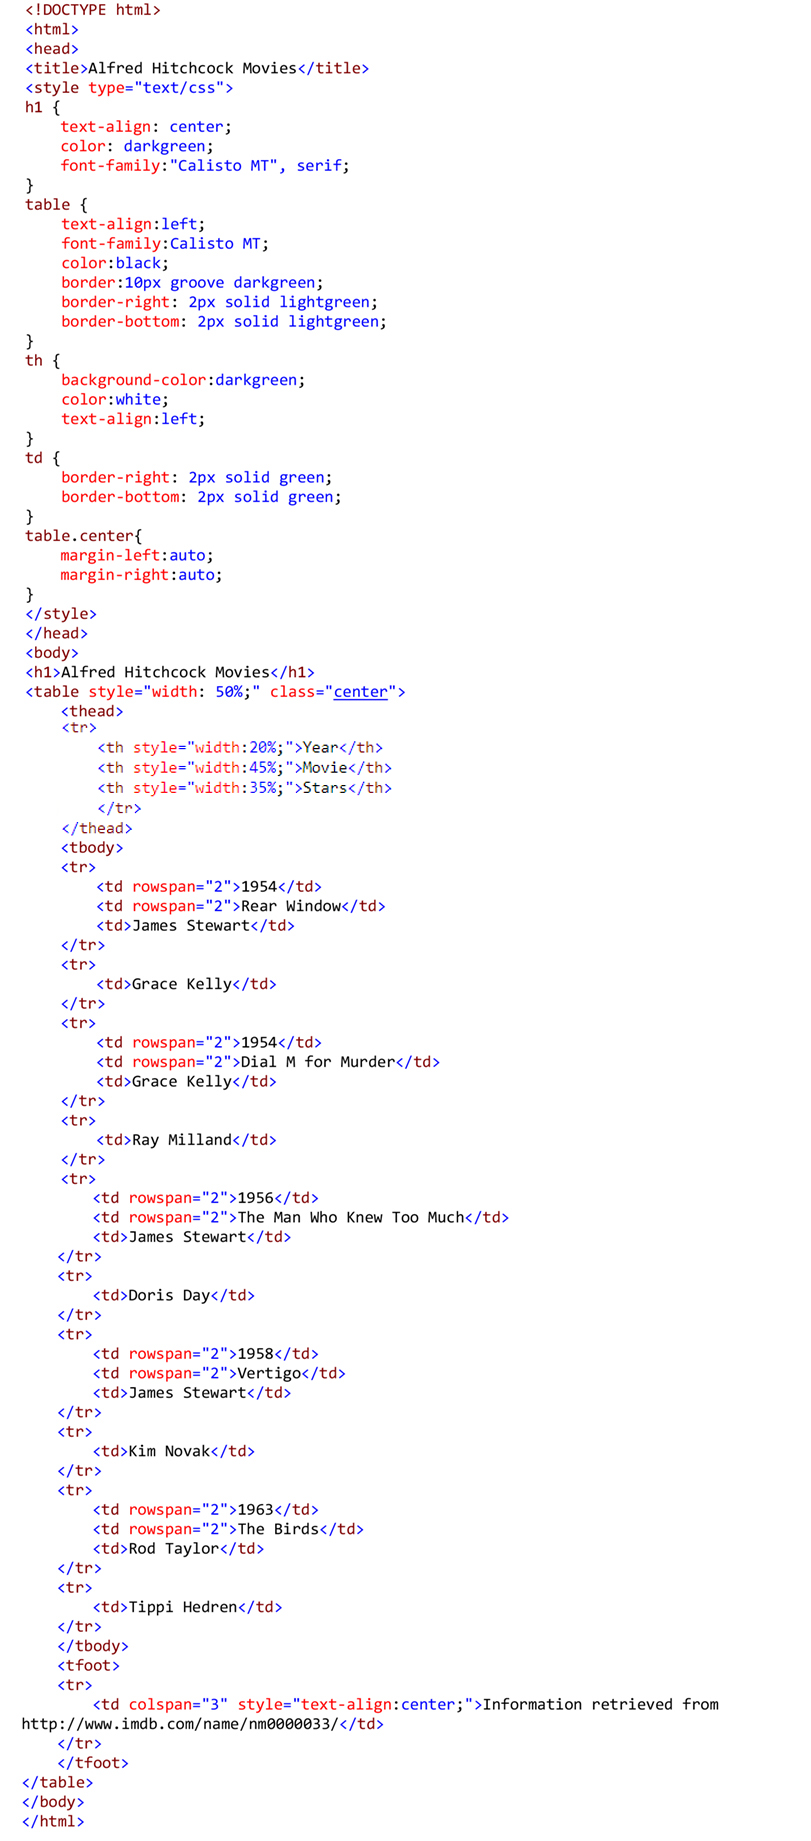
1. Open hitchcock-movies.html for editing
2. Add the table shown below. It should go below the <h1>Alfred Hitchcock Movies</h1> line
3. Save your changes.
4. View the page off-line and make any corrections needed. Save your changes.
To see a video demonstration, watch: https://youtu.be/-RTlZhDoia0
1. Add the CSS styles for the table, td and th tags as shown below (the code should go after the h1 styles in the internal style sheet)

NOTE: The h1 and center styles have been completed for you. To get the table to center on the page, a center class was created (that is what .center does). By placing table in front of .center, we are limiting the use of the center class to a table tag. If you wanted to be able to use the center class with ANY tag, you would remove table and just have .center You will notice in the html that you entered for the table, that you included class="center" inside the table tag :)
2. View the page off-line and make any corrections needed. Save your changes.
To see a video demonstration, watch: https://youtu.be/RuUSG0tDDWk
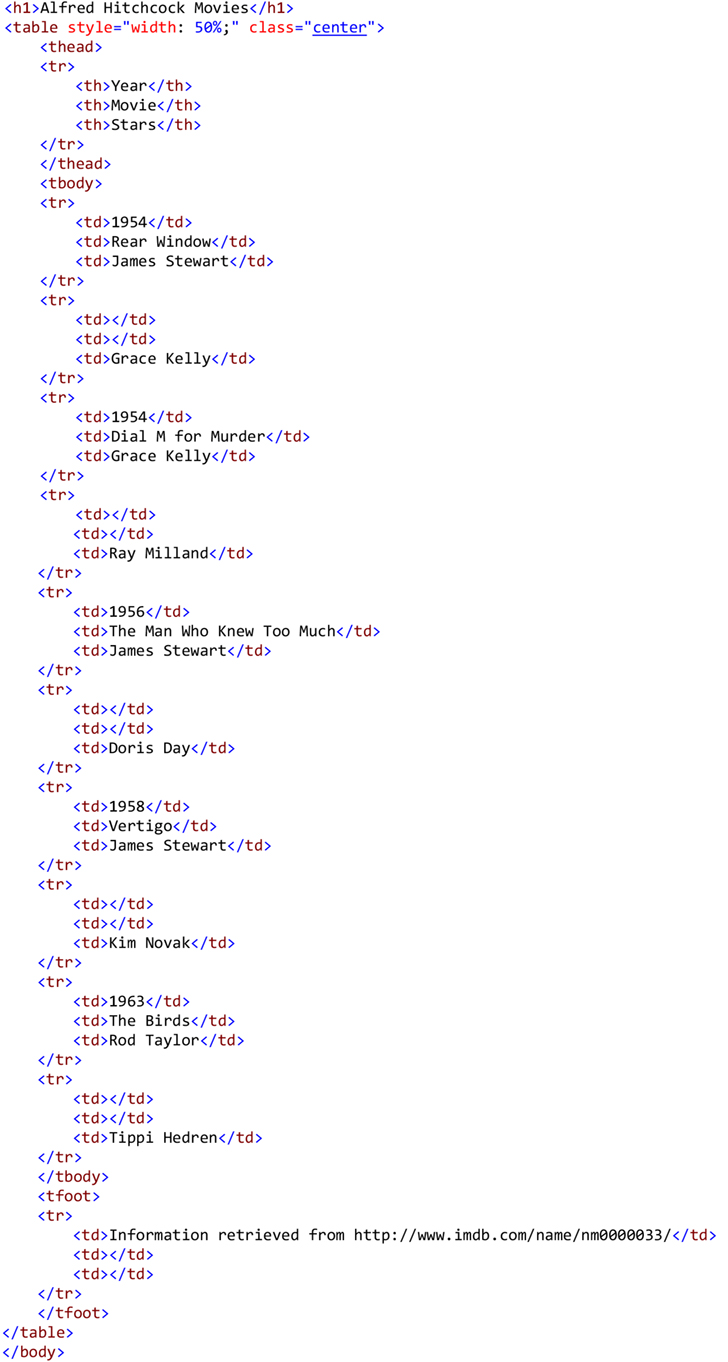
1. To make the Hitchcock table easier to read, we will be combining rows using the rowspan property. We will also combine columns at the bottom of the table in the last row.
a. We need to combine the cell containing 1954 with the cell below it. To do this, we have to use the rowspan attribute in the td tag displaying 1954 AND we need to remove the td tag from the row below 1954.
Modify the code in your table to match the code shown below:
<tr>
<td
rowspan="2">1954</td>
<td>Rear Window</td>
<td>James Stewart</td>
</tr>
<tr>
<td> </td>
<td>Grace Kelly</td>
</tr>
b. We need to combine the cell containing Rear Window with the empty cell below it. To do this, we need to use the rowspan attribute in the td tag displaying Rear Window AND we need to remove the td tag from the row below Rear Window.
Modify the code in your table to match the code shown below:
<tr>
<td rowspan="2">1954</td>
<td rowspan="2">Rear Window</td>
<td>James Stewart</td>
</tr>
<tr>
<td>Grace Kelly</td>
</tr>
c. Follow the same procedure for 1954 and Dial M for Murder, 1956 and The Man Who Knew Too Much, 1958 and Vertigo, and 1963 and The Birds.
d. For the very last row, we need to combine columns. Right now, we have:
<tfoot>
<tr>
<td>Information retrieved from
http://www.imdb.com/name/nm0000033/</td>
<td></td>
<td></td>
</tr>
</tfoot>
</table>
We need to change this to (you'll notice styling was added to center the text within the combined cells):
<tfoot>
<tr>
<td colspan="3"
style="text-align:center;">Information retrieved from
http://www.imdb.com/name/nm0000033/</td>
</tr>
</tfoot>
</table>
2. Modify the widths of the columns in row#1 to the following:
<tr>
<th style="width:20%;">Year</th>
<th style="width:45%;">Movie</th>
<th
style="width:35%;">Stars</th>
</tr>
3. Save your changes.
Your modified code for the entire page should look like the example shown below:
4. View the page off-line. Make any corrections needed and save your changes. Then, close the page.
To see a video demonstration, watch: https://youtu.be/Lz5TnYZ9Ux0
1. Open breaking-news.html for editing. Everything has been entered into the document EXCEPT for the internal style sheet. The internal style sheet will be used to create newscolumns in the page.
2. Enter the following internal style sheet before the </head> tag:
<style>
main{
column-count:2;
column-gap:20px;
column-rule:4px inset black;
}
article{
padding:3%;
}
body{
font-family:"Lucida Sans",
"Lucida Sans Regular", "Lucida Grande", "Lucida Sans Unicode", Geneva,
Verdana, sans-serif;
}
h1{
font-family:"Franklin
Gothic Medium", "Arial Narrow", Arial, sans-serif;
font-size:2em;
column-span: all;
text-align:center;
}
</style>
3. View the page offline in a couple different web browsers
4. If the page doesn't look right, you need to fix the errors in the css, save your changes and reload the page in the browser.
5. Once everything looks good, save your changes and close the page.
By the end of the lecture and hands on exercises, you should have:
1) lemon-cream-cheese-crumb-cake.html, cake-recipe.css (tasks 2, 3 and 4) 16 points
2) hitchcock-movies.html (tasks 5, 6 and 7) 11 points
3) breaking-news.html (task 8) 3 points
1. Transfer everything that is in the CIT180/Lesson5 folder to the server (that includes the media folder, css folder and all their contents). To see a video demonstration, watch: https://youtu.be/uOMSlqUC26o
2. View the pages, "live" and correct any issues or problems. Transfer the corrections
3. If you need help, send me
an email message with a link to your web page and I will look at it and get
back to you.