CIT190 - JavaScript Programming
Complete the following programming exercises: 35 points
1. Open the CIT190 folder and create the following folders: lesson4
Open the lesson4 folder and create the following folders:
Objective: Animate a unicycle. This exercise is designed to give you practice using the DOM, DOM methods, a new Windows method and custom functions
To see a video demonstration explaining the task and how the code works, watch: https://youtu.be/_r_nY7W72-M
You will be using one new method called setInterval() This is a windows method that is used to repeatedly execute a section of code (kind of like a loop)
Window setInterval() Method: The setInterval() method calls a function or evaluates an expression at specified intervals (in milliseconds). The setInterval() method will continue calling the function until clearInterval() is called, or the window is closed. The ID value returned by setInterval() is used as the parameter for the clearInterval() method. Helpful Tip: 1000 ms = 1 second.
Syntax: setInterval(functionCall(), milliseconds);
To see a live example, view: https://www.w3schools.com/jsref/tryit.asp?filename=tryjsref_win_setinterval1 Once you click the try it button, the alert window will display every 3 seconds (this will go on until the page is closed)
1. Download unicycle.zip and decompress the file into your CIT190/Lesson4 folder. You should end up with a unicycle folder that contains a web page and several unicycle images.
2, Open unicycle.html for editing.
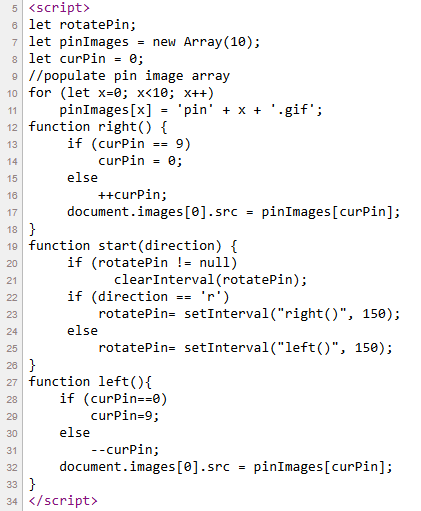
3. View the pushpin.html example and click the buttons to see how it works. You will be creating something similar. The code for the pushpin is shown below:
Here's what the code is doing:
Line 6: the variable rotatePin is used to determine if the setInterval method is currently running.
Line 7: creates the array for the pin images
Line 8: creates a variable to store the location of the current pin in the image array (or the active pin)
Line 10: the for loop adds images to the pin image array
Line 12: the right function rotates the pin to the right by looping through the images in the image array. The image that is placed on the browser when the page loads is pin0.gif (line 37) The function checks to see where the current image is by looking at curPin and if it is at the end of the array (position 9), the curPin is set to 0 which is the beginning of the array If the curPin is not at the end, then 1 is added to it After adjusting the curPin variable, it is used to subscript into the array and set the image displayed in the document - that is what document.images[0].src=pinImages[curPin]; is doing
Line 19: the start function is called when the left or right button is selected. The value r or l is passed to the function to determine whether it should rotate right or left. The function checks rotatePin to see if it has a value - if it does, that means the setInterval method has been active and it needs to be cleared out before we can start the rotation again. If the direction variable is an r, the right function is called using the setInterval method. The timing is set to 150 milliseconds If the direction variable isn't an r, then the left function is called using the setInterval method. The timing is set to 150 milliseconds.
Line 27: the left function rotates the pin to the left by looping through the images in the image array in reverse order. The image that is placed on the browser when the page loads is pin0.gif (line 37) The function checks to see where the current image is by looking at curPin and if it is at the beginning of the array (position 0), the curPin is set to 9 which is the end of the array If the curPin is not at the beginning, then 1 is subtracted from it After adjusting the curPin variable, it is used to subscript into the array and set the image displayed in the document - that is what document.images[0].src=pinImages[curPin]; is doing
4. Add the scripting to the top of the page and test the animation using the buttons
5. Correct any errors and save your changes.
To see a video demonstration explaining the task and how the code works, watch: https://youtu.be/OBBSXULpkM4
1. Create a new web page that includes at least 4 image thumbnails (you will also need the same 4 images that are full-size). The thumbnails should link to larger images. Name the page myImageCollection.html (The page should be saved to your Lesson4 folder and the images should be saved to the Lesson4/media folder)
2. Using the DOM images collection, access the alt attribute and display the name of each image (the display should be formatted so it is easy to read and you need a heading above the list identifying the list as the names of the photos).
3. Use the DOM images collection to access the src attribute and display the URL of the images on the page. (The display should be formatted so it is easy to read and you need a heading above the list identifying the list as the URL source for photos on the page).
4. Use the DOM images collection to create lnks to the larger images using the href attribute in the anchor for the link and the alt attribute for the text to display. (The display should be formatted so it is easy to read and you need a heading above the list identifying the list as Links to the Images).
This exercise is very similar to objectCollectionExample3.html The only difference is you are using your own images and your own formatting
5. Save your changes and test the page. Correct any errors.
To see a video demonstration explaining the task and how the code works, watch: https://youtu.be/g-nmohp6JZk
1. Create a new web page and name the page changingContent.html (the page should be saved to your Lesson4 folder)
2. The page can include any content you want. If you add images, they should be placed in the Lesson4/media folder
3. Your only requirements are:
a) the user can add, delete and update a portion of the page
b) the user can change at least 2 styles on the page
There are several ways you can accomplish the task (the lecture notes offer many examples).
It is up to you how you meet the requirements.
The following examples may come in handy for this exercise:
nodeListing2.html, usingInsertBefore.html, addingHTMLusingNodes.html, removeChildMethod.html, and
replacementHTMLusingNodes.html
4. Save your changes and test the page. Correct any errors.
| Created the lesson4 and media folders | 1 point |
| Added links to the assignment page | 2 points |
| Added scripts to animate the unicycle forwards and backwards | 12 points |
| Created the myImageCollection.html page and added scripts to generate the indices on the page | 10 points |
| Created changingContent.html and allowed users to change content and at least two styles | 10 points |
| Total | 35 points |