KeyPoints: Deployment using Visual Studio Web Deploy
I Objectives
By the end of this lecture/demo, you should be able to:
- Create a website at a host
- Create a database at a host
- Edit your VS project file and add a tag for OutOfProcess
- Download a web deploy settings file from the website host and import that file into VS
- Validate your connection to the host
- Copy the ASP.NET database settings from the host and paste them into your publish settings for database and Entity Framework migrations
- Publish your project and test the database to ensure everything is working.
You will be deploying the authentication project you completed last week. There are a couple of things you will need to modify BEFORE deployment. The hands on at the bottom of the handout includes a video demonstration showing you how to deploy that app to myasp.net which is the host we will be using. After your assignment has been corrected, you will need to delete the database and your app from the site and then you will need to deploy your term project. The hands-on includes a video showing you how to remove your app (this should only be done AFTER I have corrected it).
II. How to Use Web Deploy
The procedure to publish your application to a web host is pretty straightforward if you use Web Deploy which is part of Visual Studio's publishing features.
Your MVC application should be fully tested with migrations completed.
The procedure to deploy:
-
Get a free 60 day trial from https://www.myasp.net/
-
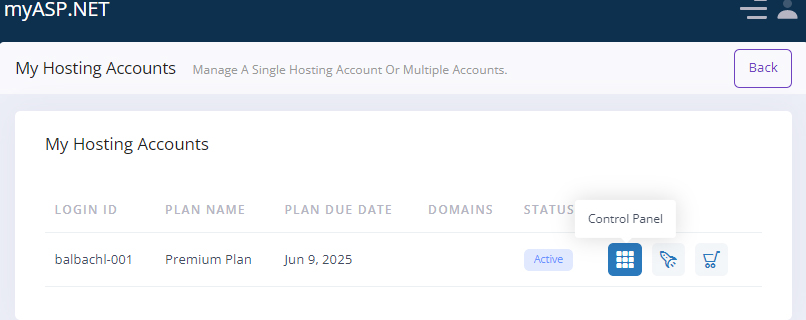
Login to the account and go to the control panel. If you see a Try It button, click the button to start your 60 day trial.
-
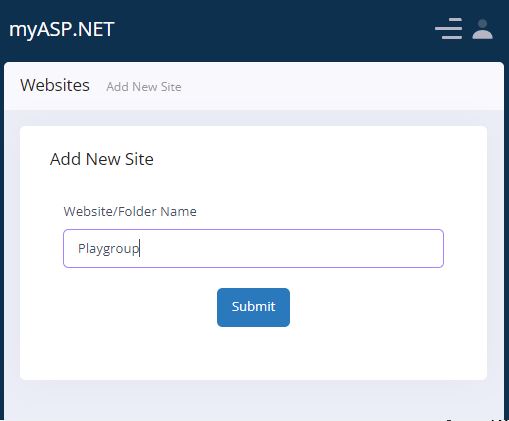
Select the control panel button and then select the Website tab. If you don't see a website displayed, click the New Site button and enter a name for your website. This will create an empty website
Example:
-
Select the databases tab. You will see a menu display, choose MSSQL and then click the New Database button. In the Add Database window, select the version of MSSQL you are using, enter a name for the database and enter a password (you will need to remember the password for entry into VS).
Example:
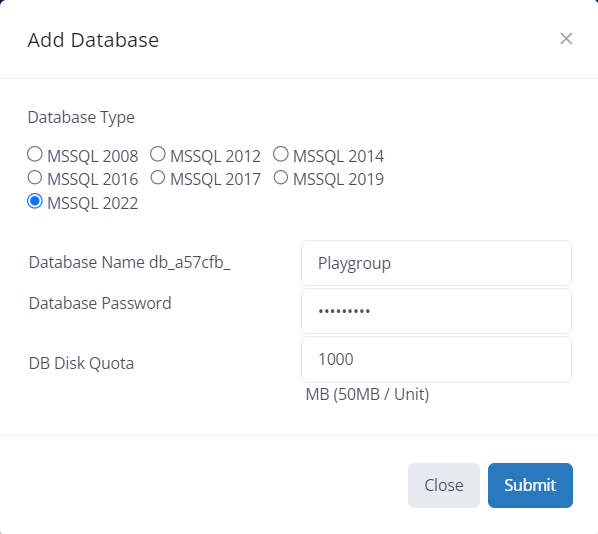
NOTE: You should jot down the password (you will need to add it to your connection string in the Publish section of VS)
-
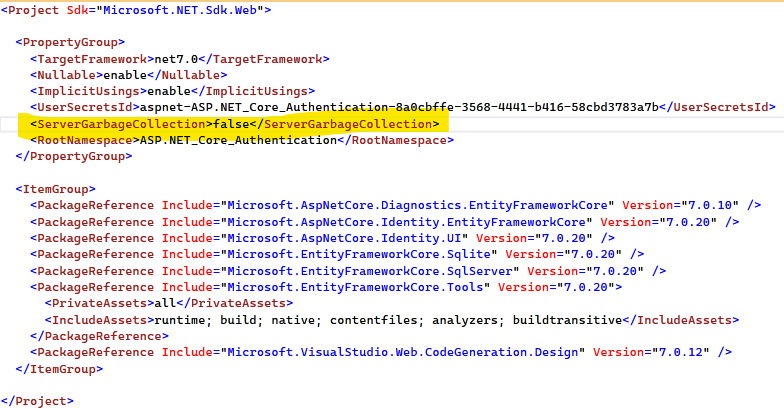
Go into your VS project, right click on the project and select Edit the Project file from the menu. You need to add the ServerGarbageCollection tag to the property group as shown below:
Example from an MVC app
-
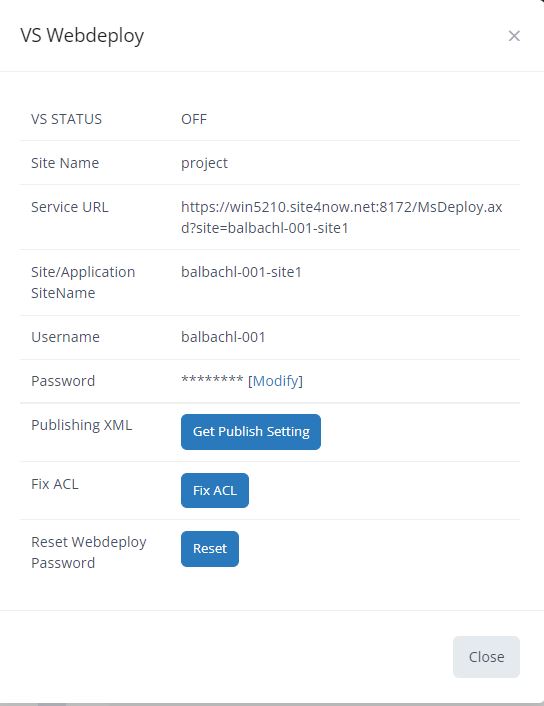
Go back to your webhost and login. Go to the control panel. Select the websites tab and then point to the right of your empty website and select the Show Web Deploy Info icon. You should see a window similar to the one below. If you are NOT sure of the site password, you should select Modify and set the password to something you will remember (you will need that for Webdeploy)
-
Select the Get Publish Setting button next to Publishing XML and save the file (I saved the file into my VS project folder)
-
In VS, right click the project and select Publish.
For Target, choose Import Profile and click Next
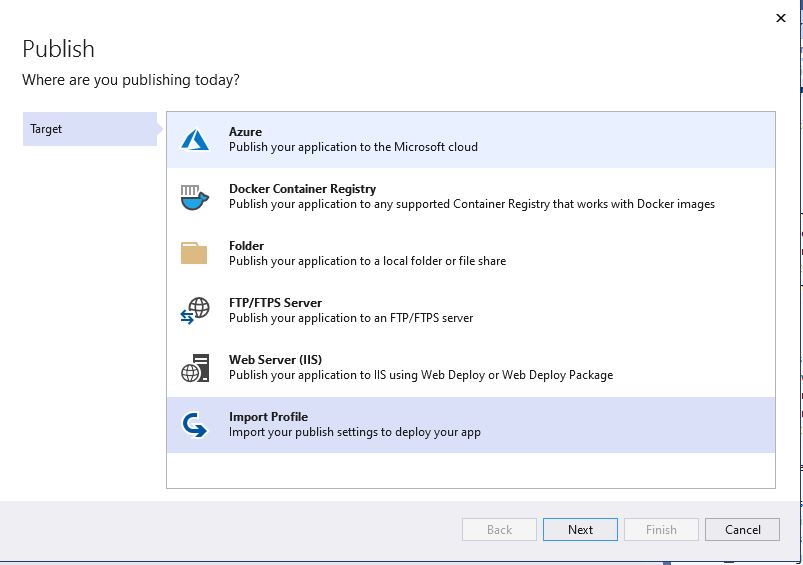
NOTE: If you do not see the Publish window, click the New button to display it.

-
Click Browse, find the file you just downloaded and select it. Then, click Finish and Close.
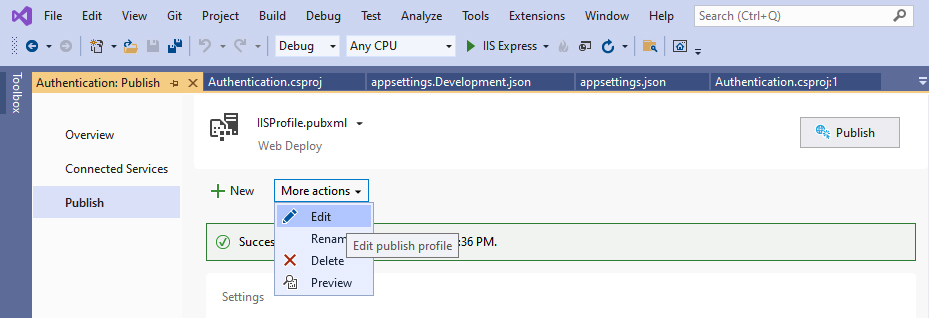
- You should see a publish window similar to the one shown below. Click the list arrow next to More actions and select Edit (there are some settings you will need to adjust).
-
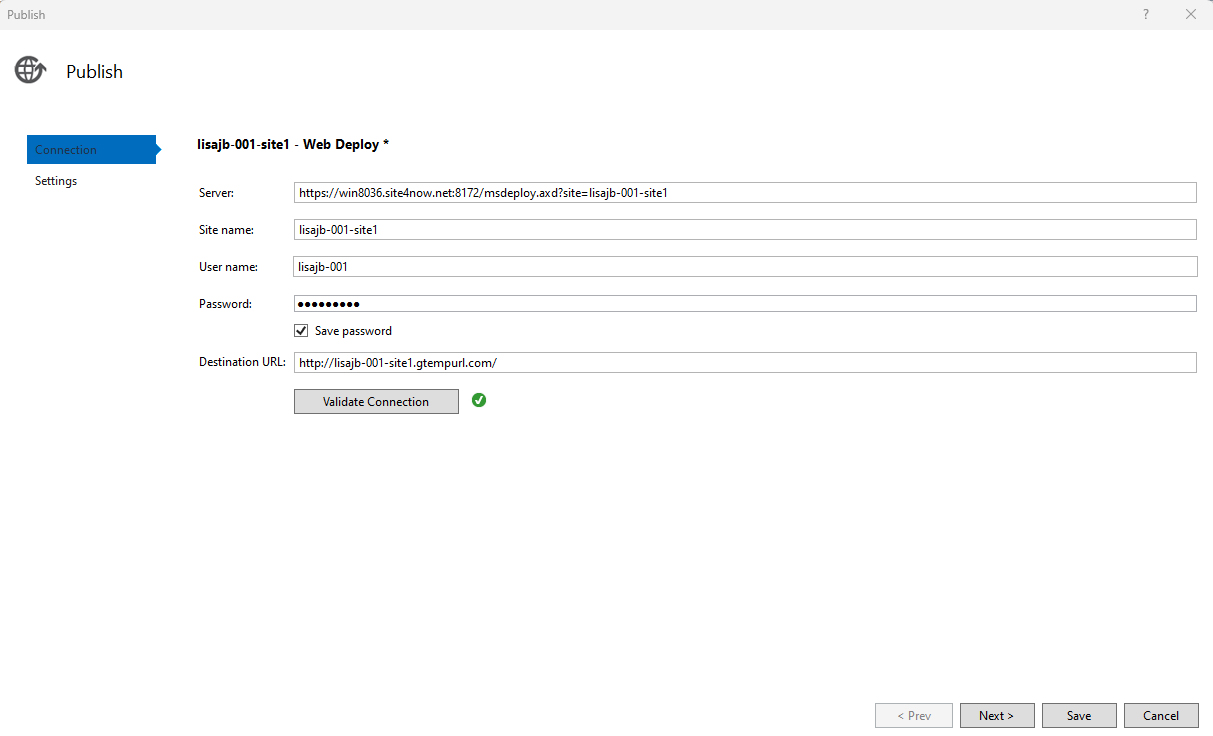
A publish window should display, with a Connection and Settings command. In the Connection page, enter your myASP.NET password (this is the password from the WebDeploy info and it should be the same password you use to login to the site). Then click Validate Connection. It should come back with a green checkmark. If there is an error, the password may not be correct (you should be able to adjust this at the host website)
-
After ensuring the connection is valid, select Settings. Go back out to the web host and get into the Database section (select the Database tab and MSSQL). To the right of the empty database, you will see some command icons. Select the Connection String Examples command.
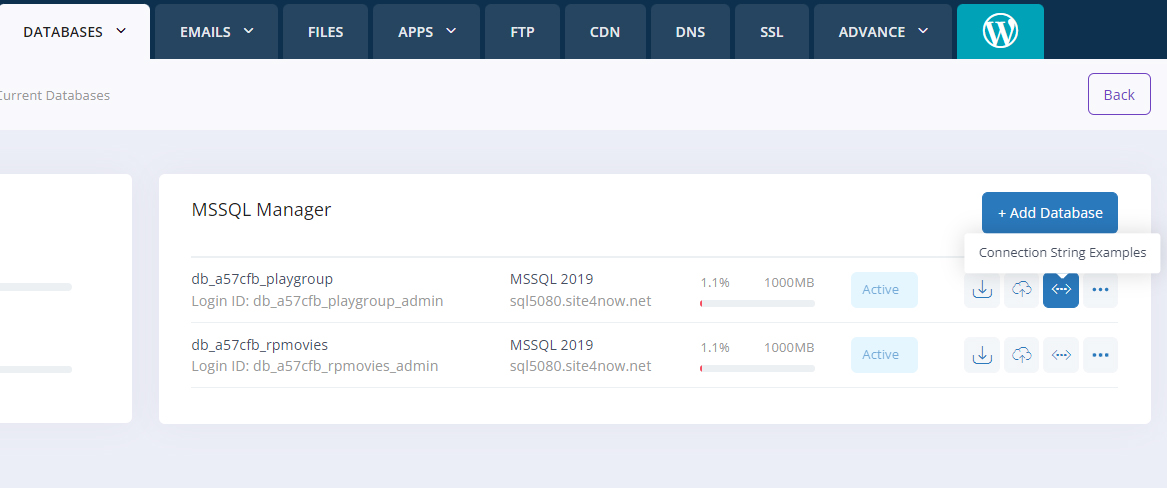
Copy the ASP.NET example, but do not include the quotes at the beginning of the string

-
Go back into VS, make sure you are in the Publish, Settings section. Deployment Mode should be Self-Contained. Paste the example you copied into Default connection and into all EF context boxes. Make sure you turn on the checkboxes in the Database and EF Migration sections. You will need to replace YOUR_DB_PASSWORD with the password you set when you created the database at myasp.net
MVC Example:
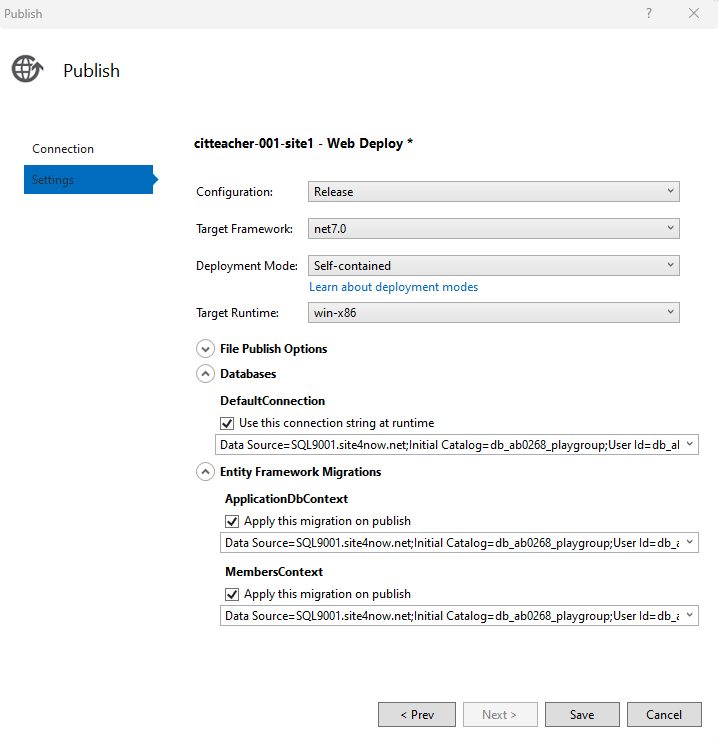
- Save all your settings and click Publish. When the app is deployed, your default web browser should open displaying it.
- Anytime you make a change to your application, you simply need to go into the publish section and click on Publish. If you change a model, you will need to add a migration and update migrations BEFORE selecting publish.
III. Limitations to the free account
The myASP.NET free account allows one website and one database.
To deploy more than 1 application, you will need to either delete the current website and database and create new ones OR use a different email account and obtain another free trial.
Make sure you wait to delete the website until I check your assignment!
IV. Hands On
To see a video demonstrations, watch:
Changes to make before deployment: https://youtu.be/6YqnTM7qmBY
Deploying the app: https://youtu.be/EN5X94CFCQ0
Removing the website and DB from the server and creating new ones: https://youtu.be/vxXDbk6qXng
You will be deploying the authentication project you worked on last week. This project is similar to your capstone project and is a good one to practice on.
1. Make sure VS is up-to-date (if Visual Studio is not up-to-date, your deployment will fail).
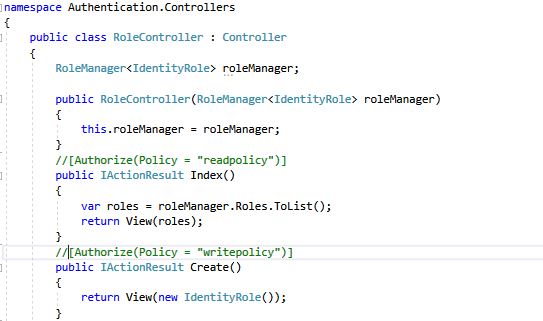
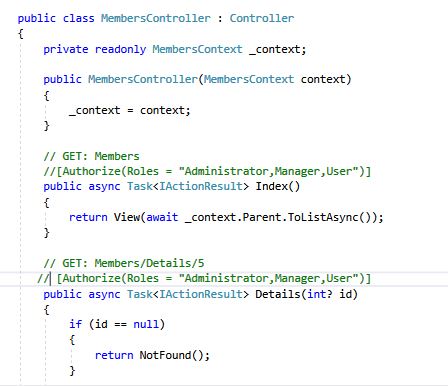
2. To prepare your project, we need to adjust some of the authorization attributes. We need to comment out the read and write policy for roles, so we can add roles to your application once it is deployed. To ensure that the database is working properly, we are also going to comment out the authorize attributes for Index and Details in the MemberController. This will let us view the database content, but it won't let us make any changes until we register and login.
Please complete the following:
a) In the RoleController, comment out all authorize attributes as shown below:
b) In the MemberController, comment out the authorize attribute for the Index and Details action methods as shown below:
3. Run a build and test the application to make sure it still works. Make sure you exit out of the running app before you try to deploy.
4. Login to your myASP.NET account (if you haven't created the account yet, you need to create it now and then login). After logging in, activate the 60 day trial and go to the control panel
5. When you activate your trial, it should create an empty website for you. If you don't see a website displayed, you can create one by clicking the New Site button. You are only allowed 1 website with the free trial. You can rename it if you don't like the name (it doesn't matter what the name is)
Example creating a new site:
6. Create an empty database. Select the Database tab and MSSQL, then click on Add Database. Fill int he form with the DB type, name and password, then click Submit:
Example:
NOTE: You should jot down the password (you will need to add it to your connection string in the Publish section of VS)
7. Go into your VS project, right click on the project and select Edit the Project file from the menu. You need to add the ServerGarbagCollection tag to the property group as shown below:
Save your changes after you edit the file.
8. Go back to your webhost and login. Go to the control panel. Select the websites tab and then point to the right of your empty website and select the Show Web Deploy Info icon. You should see a window similar to the one below.
Select the Get Publish Setting button next to Publishing XML and save the into your VS project folder
9. In VS, right click the project and select Publish.
For Target, choose Import Profile.
NOTE: If you do not see the Publish window, click the New button to display it.
10. Import the file you just downloaded. There are some settings you will need to adjust.
11. To edit the settings, click the list arrow next to more actions to display a menu and select Edit.
a) In the Connection page, enter your myASP.NET password (this is the password you use to login to the site). Then click Validate Connection. It should come back with a green checkmark. If there is an error, the password may not be correct (you should be able to adjust this at the host website)
b) After ensuring the connection is valid, select Settings. Go back out to the web host and get into the Database section (select the Database tab and MSSQL). To the right of the empty database, you will see some command icons. Select the Connection String Examples command.
Copy the ASP.NET example, but do not include the quotes at the beginning of the string. You will need to replace the YOUR_DB_PASSWORD at the end of the string with the password you entered at myasp.net when you created the database.
Go back into VS, make sure you are in the Publish, Settings section.
a) Change the Deployment Mode to Self-Contained.
b) Paste the example you copied into Default connection and into all EF context boxes. Make sure you turn on the checkboxes in the Database and EF Migration sections (If you see an error below entity framework migrations, save everything and run a build, then go back into More Actions and Edit (you should be able to paste the settings now). DON'T FORGET to replace the text 'YOUR_DB_PASSWORD' with your actual password
Example:
IMPORTANT: If you get an error below Entity Framework Migrations that has to do with DotNetToolSettings.xml not in the package, you will need to go into the Terminal (select View, select Terminal)
1. Determine which version of dotnet your project is using by entering the following:
dotnet --list-sdks
2. Force install EntityFramework to match your version of sdks
dotnet tool install dotnet-ef --version <your version number>
Replace <your version number> with 7.0.20 or 9.0.11 or whatever the SDK version is.
12. Save all your settings and click Publish. When the app is deployed, your default web browser should open displaying it.
Anytime you make a change to your application, you simply need to go into the publish section and click on Publish. If you change a model, you will need to add a migration and update migrations BEFORE selecting publish.
13. After you finish deploying the app, to view it, you need to retrieve the login information (this is a NEW procedure that was implemented due to fake accounts). To retrieve the information, go into MyASP.NET, select the control panel and go into the WebSite tab. You will see a link for Password Protection.
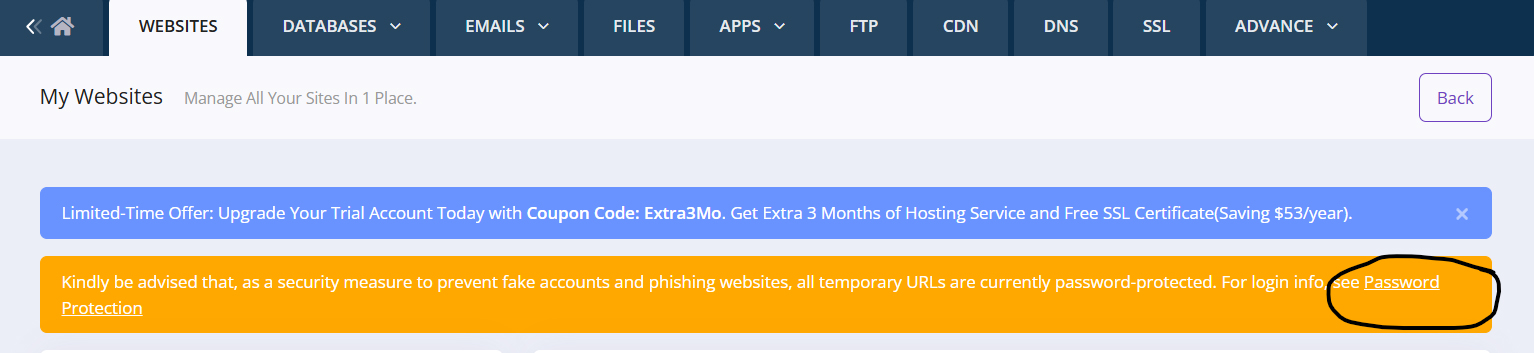
Click this link and it will show you a window similar to the one below with the login information you need to access the site.
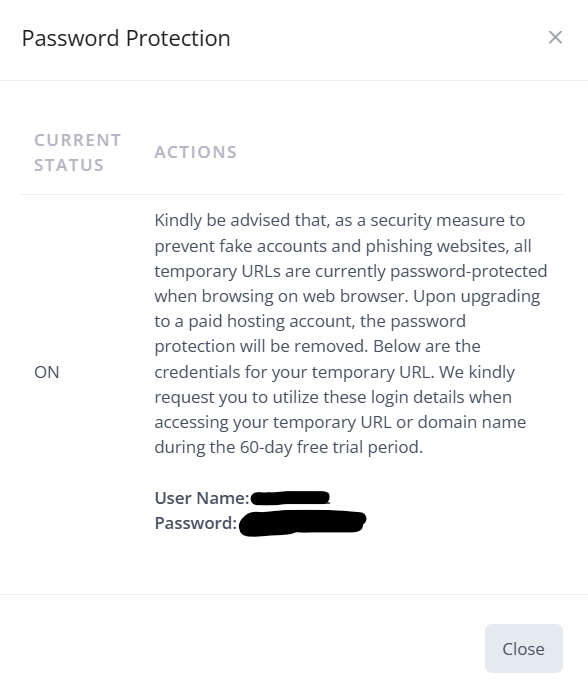
13. Submit a link to the deployed application into the dropbox ALONG WITH the User Name and Password needed to login. You should also email me so I know it is complete, that way I can correct it right away and you can work on deploying your term project.
14. When you test your app, you should use Firefox to register the users (Chrome doesn't like the unsecure website and will block you from creating accounts).