The first month of the course will involve learning the Python language and becoming familiar with the coding environment.
This lecture/demo focuses on programming in Python starting with an overview of the language followed by how to code variables.
The lecture/demo includes Hands On Exercises you need to complete because they are your lab assignment! Once you are done with all the Hands On exercises, you are done with the lab assignment!
To see sample exercises that go with the Try It Yourself sections in the chapter, download: chapter_02.zip
Python is a popular, versatile programming language that can be used for:
Python features include:
Python is a little different than other languages you may be used to. Conventions that are unique include:
To see a video showing how to check for Python on your system, watch: https://youtu.be/SOuiGVhDMuk
1. Check to see if you have Python installed (chapter 1 in the textbook and online at: https://ehmatthes.github.io/pcc_2e/setup_instructions/setup_instructions/ ):
a) Open the Command Prompt or Windows PowerShell (either click search and type Command OR SHIFT + R Click the desktop and select either Open Command window here or Open Powershell window here
b) Type python --version and press enter. If python is installed, you will see the version you have. You need at least Python 3.6
To see a video showing you how to download and install Python, watch: https://youtu.be/HtEQejGFx6g
1. If you have to download Python because you don't have the current version or you don't have it at all, go to: https://www.python.org/ .
a) Point to Downloads and select the current version of Python (If you want to use the version in the video, scroll down and find Python 3.9.1 ) NOTE: If you are running an older version of windows (version 7 or lower) you cannot install the current version, you will need to try a lower version, but you need at least version 3.6 for this course. In the download window, there is a link to see other versions of Python, so you can find a version compatible with your OS
b) After Python downloads, you will need to install it (I normally right click and run it as an administrator)
I am assuming most of you have the software because it was required in previous courses. If you do not have VS Code, you can download it for free from: https://code.visualstudio.com/download
To see a video showing you how to customize VS Code, watch: https://youtu.be/rbxfoW-BwHI
1. Open VS Code and then open the extensions pane (you can click the toolbar icon or use the View Menu, Extensions command)
2. Type Python into the search box in the extensions pane. You should see a Python extension that you can install.
3. You will also need the Jupyter extension installed (on my system, it was installed when Python was installed).
4. Finally, you should install the Pylint extension which provides intellisense (when you create your first Python program, you will see a prompt asking if you want Pylint installed, you should accept the installation)
To see a video demo showing how to create and run a little test program, watch: https://youtu.be/9c3O8GILfGc
1. Create a CIT228 folder and open the folder in VSCode
2. Create a new file and name it test.py
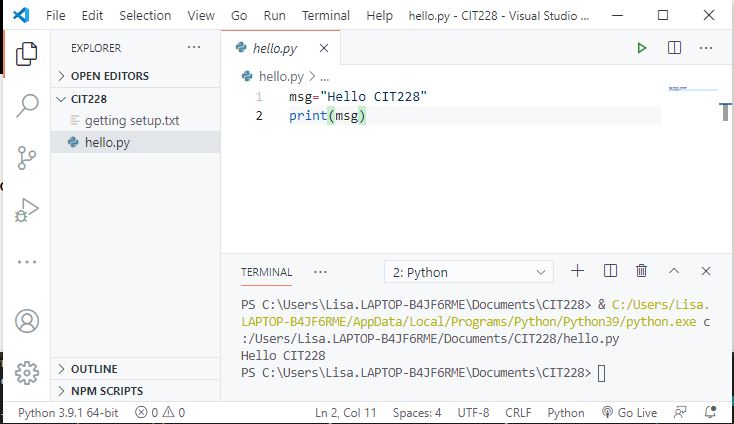
3. Add the following code to the program:
msg ="Hello CIT228"
print(msg)
4. Run the program by clicking the run button ![]()
5. Look in the Output window for the printed message
To see a video demo showing you how to set up debugging, watch: https://youtu.be/MixHqkd9yOg
1. Point in the left margin next to print(msg) and click to add a breakpoint.
2. Press F5 to get the debug menu (on a laptop, press FN + F5)
3. Choose Python File Debug from the menu
4. Run the program and use the breakpoint menu commands which are similar to Javascript's commands (the video explains what each command does).
To see a video explanation, watch: https://youtu.be/v86ZJjhtblk
You can run Python code in interactive mode or script mode programming.
Interactive mode involves executing code from a command line. In Windows, you launch the command prompt, type python and once you see the Python prompt >>>, you can enter and execute code.
Example:

Script mode programming involves creating a Python file with the extension.py and invoking the interpretter to execute the code.
You can typically run the code from inside your editor OR on the command line.
To run the code from inside VS Code, make sure you have saved the file as a python file and that the current version of python displays in the lower left corner of the window. Then, use the run button ![]() to execute the code.
to execute the code.
Example showing how to run inside the VS Code editor
To run the same program from the command line, you need to open the Command Prompt. You must pay attention to the current directory the command prompt is looking at. In order to execute your code, you either need to specify the directories in the command OR you need to change directories prior to executing the code.
To change directories, you can use the cd command followed by the name of the directory
Example: cd Documents
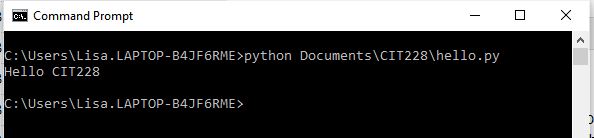
In the example below, the directory was changed to Documents and then it was changed to CIT228 which is where the program file is stored. The script was executed by entering Python hello.py (hello.py is the name of the file).

In the example below, the directory wasn't changed, so it had to be included in the execution command.
python is the command
Documents\CIT228\ are directories
hello.py is the program we want to run
Useful commands when working in command prompt include:
1. cd (change directory)
cd directoryName
or
cd .. (two dots in place of the directory name takes you up one level)
2. cls (clear screen)
clears the screen and moves the prompt to the top
3. dir (directory)
when in a directory, typing dir will show you the files and directories that are stored in the current (or active) directory
4 help
Will give you a listing of commands you can use in command prompt
To see a video demonstration, watch: https://youtu.be/1KcgaqdW0OE
1. Create a CIT228 folder on a jump drive or in your Documents folder if you haven't done so already
2. Create a Lesson1 folder inside the CIT228 folder
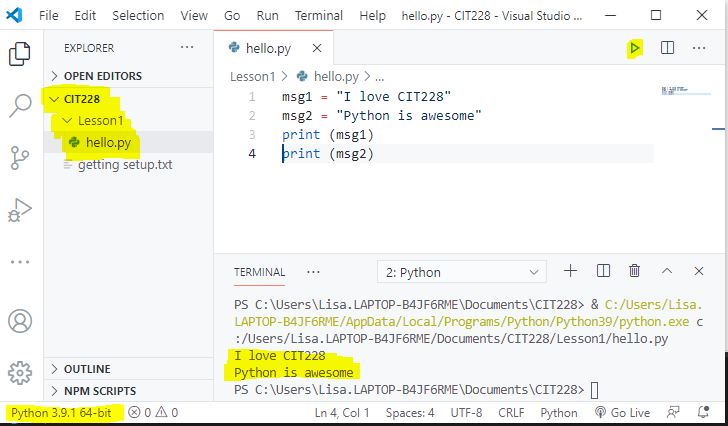
3. Open VS Code and open the CIT228/Lesson1 folder
4. Create a new file named hello and save it as a python file
5. Enter the following code, save your changes and execute the code using the run button:
6. Make sure you have saved all your changes. Open the command prompt.
7. Run the script from the command line. NOTE: This will be different for everyone depending upon where the file is saved. In the example above, I would either need to change directories or include the directories in the run command. The example below shows you both methods and assumes your file is in Documents\CIT228\Lesson1 If you have the file saved somewhere else, you would need to adjust the path.

8. Another thing you can do in the command prompt is execute lines of code that are not in a script.
To practice this, type py and press enter (it doesn't matter what directory you are in)
When you see the >>> prompt, enter the following command:
print ("I love Python programming")
You should see something like the example shown below:

9. Close the command prompt window.
10. Keep VS Code open.
To see a video explanation, watch: https://youtu.be/8VYQm32oQNI
Syntax are rules you need to follow within a programming language. Python doesn't have a lot of rules, but the rules it has must be followed or you will get errors when you run your code.
Python is a case sensitive language. When you create variables, uppercase and lowercase are treated differently.
Python uses new lines of code to signify the end of commands (it doesn't use any terminating characters like semicolons)
If you have code that continues onto another line, you can use the continuation character \
Example:
total = item_one + \
    item_two + \
    item_three
If you are defining an array or object and are using brackets or curly braces and your code is on multiple lines, you con't need to use the continuation character. It is only required when regular code spans multiple lines.
Python uses indentation to signify blocks of code (it doesn't use curly braces). An indentation can be one space or multiple spaces (you should be consistent in how you indent your code). For readability, 5 spaces is easier to recognize than 1 space.
Python comments begin with a #. If you have a multi-line comment, you need to begin each line with a #. Comments are quite useful when debugging code. If you want the program to skip over a section of code, you can simply put # in front of each line you want skipped.
Variables are reserved memory locations to store values, so when you create a variable in Python, you occupy some space in memory.
In Python, variables are created when you assign a value to it. There is no special command to create a variable and you don't need to assign a data type to the variable.
The equal sign (=) is used to assign values to variables. The operand to the left of the = operator is the name of the variable and the operand to the right of the = operator is the value stored in the variable.
Example:
msg1= "I love CIT228"
msg1 is the variable name and I love CIT228 is the value being stored.
The Python interpreter determines the data type of the variable and allocates memory to it. It also decides what can go into reserved memory (an area of memory that is set aside for use by the application).
Rules for naming variables include:
A common mistake new developers make is forgetting which letters are uppercase and which letters are lowercase. To avoid this problem, you should enter everything in lowercase letters. If your variable name is multiple words, you can use an underscore between words OR you can capitalize the first letter of the second word. It is important that you are consistent in how you name and use variables.
Python is a loosely typed language which means, you can store anything you want in variables and you can change what is stored at anytime.
If you want to specify what data type a variable contains because you believe Python will guess incorrectly, you can "cast" the data type when you assign the value.
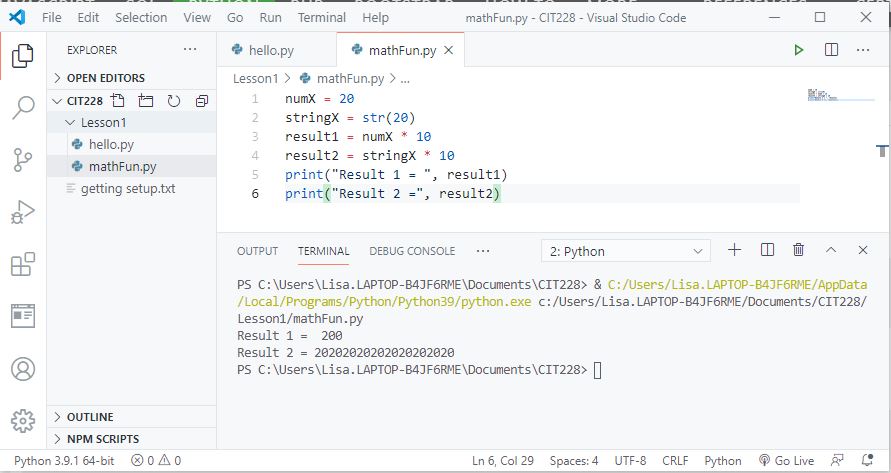
In the example below, Python will assume 20 is a whole number. If you want 20 to be a string, you can cast it as a string so Python knows what type of value is being stored.
numberX = 20
stringX = str(20)
Q: Why does this matter?
A: If you are doing arithmetic, results will vary greatly if Python believes the value is a number vs a string
The type() function can be used to retreive the data type assigned to a variable.
Syntax: type(variableName)
To view the type, you can add it to a print statement
Example:
print (type(stringX))
print(type(numberX))
Python allows single or multiple assignment.
Example of single assignment:
number1=100
Example of multiple assignment:
number1=number2=number3=0
To see a video demonstration, watch: https://youtu.be/6OqNbX30SdY
1. Create a new file named mathFun and save it as a python file
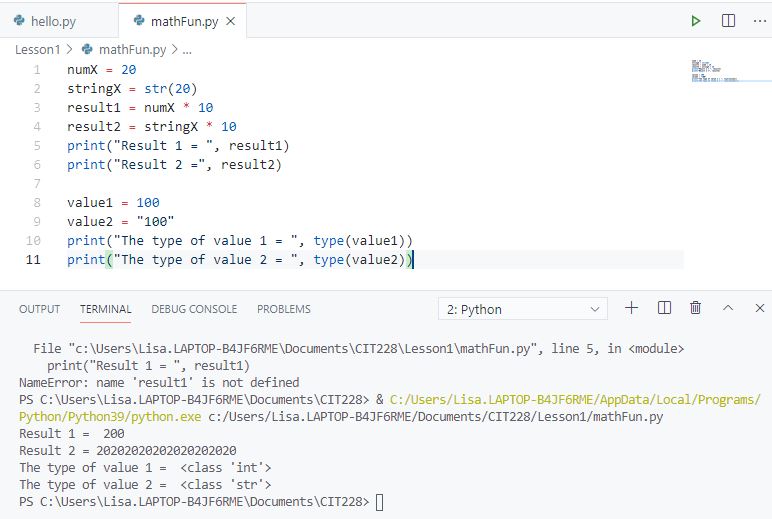
2. Enter the code shown below and run the program - note what happens to the value in result 2 when the string is multiplied by 10.
3. Correct any errors and make sure you code runs correctly.
4. We are going to create an error so you can see what happens if you have a syntax error and how to fix it. Change the variable name result1 to Result1 with a capital R and then run the code. You should notice that it has flagged result1 in the print statement as an error because it doesn't match the name of the variable Result1. You can see the variable underlined in red in the code and you can see the error message in the terminal window. You should also note that the file name in the Explorer panel on the left is in red indicating there is an error

5. To fix the error, change Result1 back to result1 and run the program. Save all your changes.
6. Modify the program by adding a few more variables with values and then print the variables data types using the type() function as shown below. Run the code (it should be similar to the example shown below:)
7. Save all your changes
To see a video explanation, watch: https://youtu.be/Dpmspq62WQ8
It is important to understand the different data types in Python so you can understand how to use it.
Python has 5 standard data types:
We will cover strings and numbers today. In upcoming weeks, we will examine the other data types and how they are used.
Anything entered in single quotes or double quotes is considered a string.
Example:
'I am a string'
"I am also a string"
It is good practice to use double quotes around strings and use single quotes within a string for apostrophes
Example
"This is CIT228's string"
When you create a string variable, you are creating an array object. Each letter is stored in one element of the array and can be accessed by subscripting into the array beginning at 0
course="CIT228"
is stored in an array that can be visualized as:
| Subscript | Value Stored |
|---|---|
| 0 | C |
| 1 | I |
| 2 | T |
| 3 | 2 |
| 4 | 2 |
| 5 | 8 |
To access the entire string, just use the name of the string.
If you want to access individual elements, then you need to subscript into the string:
Example:
Output:
CIT228
C
I
T
String objects can use a variety of methods to change the way the string looks.
1. title() method
Used to capitalize the first letter of each word
Example (in the print statement, the name is the object and title() is the method being called):
name = "scooby doo"
print(name.title())
Output:
Scooby Doo
2. upper() method and lower() method
Used to convert text to all uppercase or all lowercase
Example (in the print statements, name is the object, upper() and lower() are both methods being called)
name = "scooBy dOo"
print(name.upper())
print(name.lower())
Output:
SCOOBY DOO
scooby doo
3. Format Strings (f-strings) - new in Python 3.6
Python lets you format and combine strings and store them in a variable using the f operator
Syntax: newVariable = f "{stringVar1} {stringVar2}"
Where stringVar1 and stringVar2 are the variables you created.
Example:
Output:
The happy little penguin went for a swim
Anytime you want to combine constant data with a variable string, you can use an f-string
Example (either of the following print statements work)
print("Here is my wonderful sentence: ", sentence.upper())
print(f"Here is my wonderful sentence: {sentence.upper()}")
Output:
Here is my wonderful sentence: THE HAPPY LITTLE PENGUIN WENT FOR A SWIM
Here is my wonderful sentence: THE HAPPY LITTLE PENGUIN WENT FOR A SWIM
4. Concatenating Strings
The + sign can also be used to concatenate strings in Python (but it doesn't involve any type of formatting)
Example:
Output:
The Happy Little Penguin Went For A Swim
5. rstrip()
Removes whitespace on the right-side of strings
6. lstrip()
Removes whitespace on the left-side of strings
7. strip()
Removes whitespace on both sides of strings
Example using rstrip(), lstrip() and strip()
Output:
          CIT228 is awesome
CIT228 is awesome
CIT228 is awesome
If you want extra spacing between variables OR you want variables printed on separate lines, there are some control characters you can use
\t (tab) - puts space between variables
\n (newline) - starts variables on the next line
Example:
Output:
fruit            veggie

apple

banana

                 corn
To create a multiline string, use three double quotes to begin the string and three double quotes to end the string.
Example:
longString="""Lorem ipsum dolor sit amet,
consectetur adipiscing elit,
sed do eiusmod tempor incididunt
ut labore et dolore magna aliqua."""
print(longString)
To see a video demonstration, watch: https://youtu.be/OjFHdTSpC1U
1. Create a new file and name it stringFun.py (save the file as a Python file - that will put the py extension on for you)
2. Enter the code for exercises 1 and 2. You do not need to enter the comments, but you do need to enter your own examples! Run the code when you are done (it should look similar to the sample run below)

3. For exercise #3, find a quote or an excerpt from a poem or book that you like, store it in a variable and print it out. HINT: This is similar to an example in the section above.
Sample output:
-----------------------------------------------
Exercise 3

Twas brillig, and the slithy toves
      Did gyre and gimble in the wabe:
All mimsy were the borogoves,
      And the mome raths outgrabe.
Beware the Jabberwock, my son!
      The jaws that bite, the claws that catch!
Beware the Jubjub bird, and shun
      The frumious Bandersnatch!
4. For exercise #4, create a two column printout using \t and \n You can store data in variables or you can simply print it out (it is up to you) HINT: This is similar to an example in the section above.
Sample output:
-----------------------------------------------
Exercise 4

Colors                  Food

Orange                  Pizza

Green                   Yogurt

Turquoise               Shrimp
5. Save all your changes.
To see a video explanation, watch: https://youtu.be/nWEoh_k3GAE
There are three numeric types in Python:
Any whole number is an integer. Python doesn't have variations for integers, there is only one integer type and that is int.
Example:
number = 100
Numbers with decimals or scientific notation are float.
Most languages have different float types which deal with precision of the decimal places. In Python, you don't need to worry about that - it will try to represent the value as precisely as possible.
Example:
number=100.00
Complex numbers include the letter j as the "unknown" or imaginary part
Example:
x = 3 + 5j
z= 10j
print(x)
print(z)
When you print complex values, it prints out the equation because it doesn't know the result.
Output:
(3+5j)
10j
1) Calculation results
When you do any type of integer division (even if the result is an integer), Python will store it as a float.
Example:
result = 4/2
print(result)
Output:
2.0
2) Type Conversion
You can convert data from one type to another using casting
Example:
result = int(4/2)
print(result)
Output:
2
3) Entering large integers or float values - new in Python 3.6
You can group values using an underscore instead of a comma (this will help you enter the values accurately). When you print the values, only digits print out (you will not see the underscores or commas)
Example:
Output:
1000000000
1000000000.0
4) The type() function will return the data type of the variable
Since you don't know what the data type is unless you type cast the variable, you can determine the data type usign the type() function.
Example:
Output:
1000000000
1000000000.0
<class 'int'>
<class 'float'>
Arithmetic operators are used with numeric values to perform common mathematical operations:
| Operator | Name | Example |
|---|---|---|
| + | Addition | x + y |
| - | Subtraction | x - y |
| * | Multiplication | x * y |
| / | Division | x / y |
| % | Modulus (stores the remainder from integer division) | x % y |
| ** | Exponentiation | x ** y |
| // | Floor division (retrieves the whole number and discards the remainder) | x // y |
Example:
x = 15
y = 2
print(x // y)
print(x / y)
print(x % y)
print (x ** y)
Output:
7
7.5
1
225
Python includes a module that creates random numbers. To use the module, you must import it. To retrieve random numbers, you need to use the randrange() method.
Syntax:
import random
number = random.randrange(1,100)
print(number)
Constants are values assigned to variables that do not change. Constants can be any data type, but are typically strings or numbers.
Constants are identified by entering variable names in all capital letters and assigning them a value.
Example:
PAY_RATE=20.0
HOURS =40
You can use contstant variables in your code, just like any other variable, but you shouldn't change the value stored.
Example:
Output:
Gross Pay = 1250.0
To see a video demonstration, watch: https://youtu.be/LG3zDH7uTI8
1. Create a new file and name it numberFun.py (save the file as a Python file - that will put the py extension on for you)
2. Use the random number module to retrieve 2 numbers between 1 and 100. Print out each number.
3. Perform the following math calculations and display the results: division, floor, modulus, addition, subtraction and multiplication
Your results should look like the example below:
First number= 49
Second number= 28
49 / 28 = 1.75
49 // 28 = 1
49 % 28 = 21
49 + 28 = 77
49 - 28 = 21
49 * 28 = 1372
4. Create a constant variable called NUMBER2 and set it equal to 25. Use the constant value in place of number2 and perform the math calculations again, printing the results
HINT: The easiest way to do this is:
NUMBER2=25
number2 = NUMBER2
Then, copy/paste the same equations as before
Sample output for the entire program:
First number= 67
Second number= 76
67 / 76 = 0.881578947368421
67 // 76 = 0
67 % 76 = 67
67 + 76 = 143
67 - 76 = -9
67 * 76 = 5092
First number= 67
Second number= 25
67 / 25 = 2.68
67 // 25 = 2
67 % 25 = 17
67 + 25 = 92
67 - 25 = 42
67 * 25 = 1675
5. Save all your changes.
6. Open hello.py
7. Retrieve and display the Zen of Python philosophy by adding import this to the bottom of the code and then printing this
import this
print(this)
8. Save your changes
9. Add links to your lesson1 GitHub repository to the dropbox.
To see a video demonstration, watch: https://youtu.be/T-iuAIAL6h0
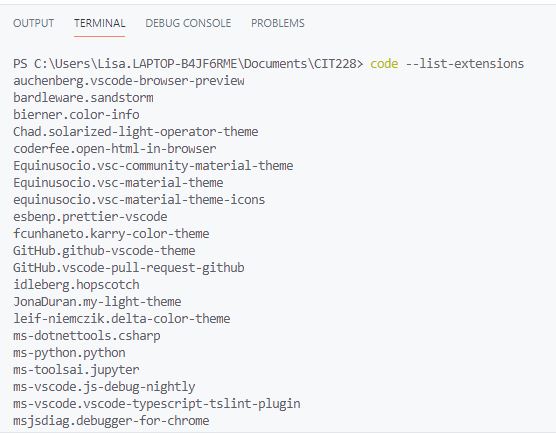
1. To upload to GitHub, go into VS Code and install the GitHub Pull Requests and Issues extension (if it is not already installed).
To see if it is installed, type code --list-extensions at the prompt in the Terminal panel (see example below)
2. Connect your VS Code application to your GitHub account, by clicking the Accounts icon (which should have a blue flag next to it). This will open your default browser where you will need to login to GitHub and authorize VS Code to access it. When you see that it was successful, there will be a prompt to open VS Code, you need to open the application (even if it is open already) because there is an authorization token it will apply.
3. After installing the GitHub extension and connecting your account, click on the Source Control icon. If you do not have GitHub installed on your computer system, you will see a command link to install GitHub (you should be directed to the following page: https://git-scm.com/ ) Select the Download link, then download and install GitHub. Once GitHub is installed on your system, you will be able to use it in VS Code.
4. After you install GitHub, close VSCode and reopen it. Now when you click Source Control, you will see commands that let you create a repository and publish to a repository.
5. We are going to publish everything in your CIT228 folder to GitHub and then each week we will add to that.
To get your code uploaded, you need to:
1. Make sure the CIT228 folder is open (not the Lesson1 folder, but the main folder).
2. Select Source Control and then click the Initialize Repository button (by default, it assumes the selected directory is the one you want to upload).
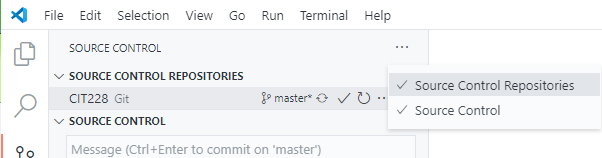
3. Initially, all the files in the selected directory will have a U next to them which means they are untracked. To make using the commands easier, click the ... (ellipsis) next to Source Control at the top of the panel and turn on Source Control Repositories - this will display your CIT228 folder in the panel (see below)
4. Click the ... next to CIT228 Git and select the Changes menu, Stage all Changes command.
5. In the Message window below Source Control, enter Initial Commit and then click the ... next to CIT228 Git and select the Commit menu, Commit Staged command
6. Go out to GitHub and create a repository for CIT228 (this will need to be a public repository so I can access it to correct your work). Copy the URL for your repository
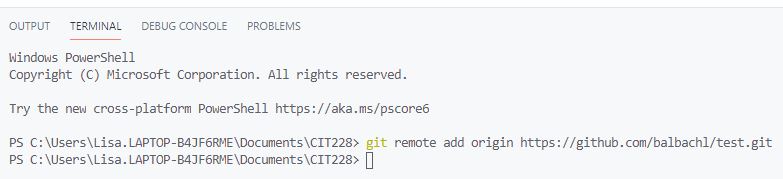
7. Go back into VS Code. Open a new terminal window using the Terminal menu, New Terminal command
8. Make sure the prompt is showing your CIT228 folder (see example below). Then enter the following command:
git remote add origin URL you copied
9. Display the menu next to the CIT228 Git folder by selecting ... and select the Push command (If you see a prompt, answer yes)
10. This will put all files and folders inside your CIT228 into your GitHub repository
11. Your Lesson1 directory on GitHub should have the following files in it:
Make sure you verify that the files are there. Then, go into Moodle and add a link to your repository in the lab assignment dropbox.