
Chapter 7 covers how to use the input() function to accept user input and how to code while loops.
To see an explanation of all lecture material in chapter 7, watch: https://youtu.be/SqiNotSyI1s
To see sample exercises that go with the Try It Yourself sections in the chapter, download: chapter_07.zip
The input function lets you prompt the user for input and store the input in a variable.
Syntax: variableName = input("text prompt telling the user to enter data")
Example:
Sample Output:
Please enter your username: Lisa
What is your favorite movie?All Harry Potter Movies
-------------------------------------------------------------------------------
Lisa, your favorite movie is All Harry Potter Movies
Some things to keep in mind when using user input include:
1. Some editors don't let you input data within the editor. In VS Code, the terminal window where the code displays DOES allow you to enter data without any issues.
2. Versions of Python prior to 3.6 used the raw_input() function instead of the input() function
3. For prompts longer than 1 line, you should put them into a variable and then include the variable in the prompt
Example:
prompt = "If you tell us who you are, we can personalize the messages you see."
prompt += "\nWhat is your first name? "
name = input(prompt)
4. ALL data retrieved using input is stored as a string (even numbers are considered to be strings). This is similar to how JavaScript retrieves data from forms. There are functions you can use that will convert the string into a number
The int() function can be used to convert a string number into a whole number you can use in equations
Example:
age = input("How old are you? ")
age = int(age)
Example from book (even or odd program)
number = input("Enter a number, and I'll tell you if it's even or odd: ")
number = int(number)
if number % 2 == 0:
print(f"\nThe number {number} is even.")
else:
print(f"\nThe number {number} is odd.")
The float() function can be used to convert a string number into a real number you can use in equations
Example:
needMoreMoney = input("How much did you spend? ")
needMoreMoney = float(needMoreMoney)
To see a video demonstration, watch: https://youtu.be/dDBWDjOopfA
1. Open the CIT228 folder and create a new folder named Chapter7
2. Create a new file and call it seating.py (save the file into your Chapter7 folder)
3. Using the seating.py file, complete Try It Yourself 7-2 (page 117)
Sample Output:
How many people are in your dinner party? 10
Please wait in the lounge until a table is available.
How many people are in your dinner party? 2
Your table is ready, please follow me.
4. Save all your changes.
5. Create a new file called multipleOfTen.py and complete Try It Yourself 7-3 (page 117)
Sample Output
Please enter a number and I will tell you if it is a multiple of 10: 21
The number 21 is not a multiple of ten.
Please enter a number and I will tell you if it is a multiple of 10: 500
The number 500 is a multiple of ten.
Please enter a number and I will tell you if it is a multiple of 10: 8
The number 8 is not a multiple of ten.
While loops will run as long as a condition tests true (for loops execute once for each item in a list or collection). While loops are coded a little differently depending on if you use definite repetition or indefinite repetition.
While loops can use counters when you know in advance how many times you want the loop to run.
Syntax for counter-controlled while loops:
variableToTest = value
while variableToTest < value
statement 1
statement 2
statement n
variableToTest is incremented
Example using a numeric counter:
counter=1
while counter < 10:
print(counter)
counter +=1
Keypoints to remember:
1. The counter must be initialized above the loop
2. The counter must be incremented at the bottom of the loop
3. The end of the while statement requires a colon
4. All lines you want executed as part of the loop must be indented.
While loops can use a sentinel value when you don't know how many times a loop should run. Sentinel values can be entered by the user in a prompt OR they can occur in the program as a result of some action (games use this type of sentinel)
Syntax:
variableToTest = initialValue
while variableToTest < value
statement 1
statement 2
statement n
variableToTest = input("Prompt to user to continue or end")
Example #1 from the book:
prompt = "\nTell me something, and I will repeat it back to you:"
prompt += "\nEnter 'quit' to end the program."
message =""
while message != 'quit':
message = input(prompt)
print(message)
Example #2:
A few things to note:
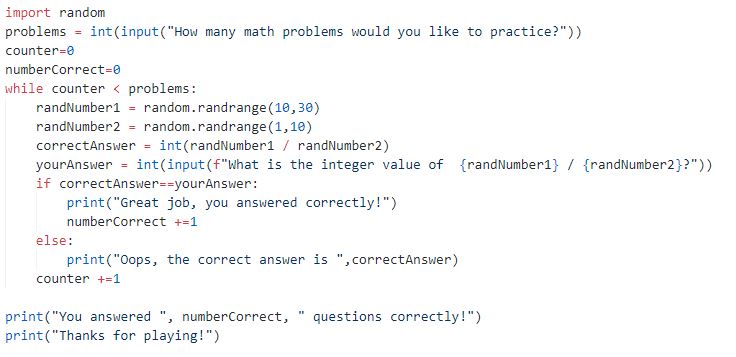
1. The input prompt for the user's answer includes an f-string that is displaying the 2 random numbers. It is also converting the user's answer to an integer before saving it to the yourAnswer variable.
2. The program includes 2 prompts, one for the answer to the equation and another to continue playing. The prompt to continue playing is at the bottom of the loop and serves as the sentinel value
Another type of sentinel can be a flag that is set to false when the loop should end. this type of flag is used in games.
In games, flags can be turned on or off based on action that is taking place. You can use a flag as a sentinel where the user stays in a loop until the flag is set to false. Examples of this would be staying in a certain level until you have reached a goal and are eligible for the next level or you run out of food and are forced out of a loop in the game.
Syntax:
flagVariable = True
while flagVariable:
statement1
statement2
statementn
statement that can change the flagVariable
Example:

Sample Output
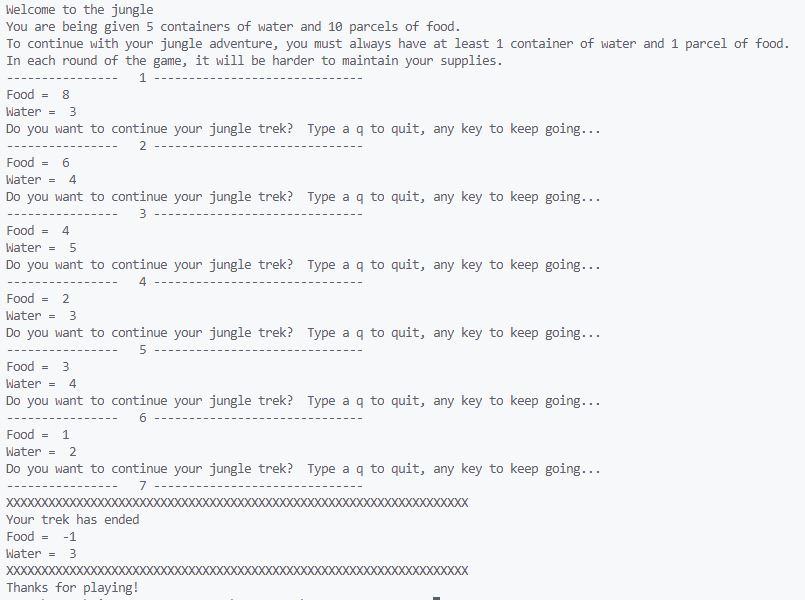
A few things to note :
1. When setting boolean values you must use True or False with capital letters (that is how Python recognizes them as booleans). You should note they are NOT in quotes
2. To test a boolean for a true condition, you only need the variable name
Example:
if keepPlaying:
or
while keepPlaying:
3. In the program, there are 2 conditions checked in the while loop, the keepPlaying flag which is set to false if the user runs out of food or water AND the prompt variable which gives them an out if they get tired of playing the game.
Break is used to end the while loop and execute the statement that follows the loop (it doesn't matter if the condition the loop checks is still true, break will end the loop)
Example: In the code snippet below, the if statement checking the water <1 or food <1 executes a break if either condition is true. When that happens, the print("Thanks for playing") will be executed.
Continue is used to skip the remaining statements in the while loop and continue at the top of the loop.
Example: In the code example below, only even numbers are added to the result. If the number has a remainder >0, continue forces execution to move back to the top of the loop.
counter = 0
result=0
while counter < 20:
counter += 1
if counter%2>0:
continue
result += counter
print(result)
An infinite loop occurs when the condition you are testing never tests false.
Any time you want to end a loop early or if you need to stop a program that is in an infinite loop, press CTL + C
To see a video demonstration, watch: https://youtu.be/MDw6NC8iHqI
1. Create a program similar to the one shown below, but the random number range should be 1, 1000 for each random number and the arithmetic should be either addition or subtraction. Name the program mathMagic.py
2. Save all your changes.
3. Copy mathMagic.py into a new file named mathMagicWithBreak.py.
4. Copy mathMagic.py into a new file named mathMagicWithSentinel.py
5. Open mathMagicWithBreak.py and modify the program to loop 10 times. Check the number of questions answered incorrectly and if the number is > 5, display a message indicating they need to get some help from a tutor and break out of the loop.
6. Open mathMagicWithSentinel.py and modify the program to ask the user if they want to continue playing and use a sentinel in the while loop instead of a counter. HINT The processing is similar to Example 2 above in the Sentinel-Controlled section.
For loops should be used if you need to access everything and you are not planning on changing or modifying anything.
While loops should be used if you need to modify or change items within lists or dictionaries.
Examples of modifications made with while loops include:
You can use the pop() and append() methods to remove from one list and add to another.
Example from the book:
When you use remove, it only removes the first occurence. If you add it to a while loop, you can remove all occurences.
Example from the book:
You can request user input and have that serve as the key to a dictionary item you have them enter as shown in the example below (their name is the key for the response to the mountain they want to climb).
Example from the book:
To see a video demonstration, watch: https://youtu.be/VyyfDKnY4P0
1. Complete Try It Yourself 7-8 and 7-9 on page 127. Name the file deli.py (HINT: This is similar to processing in the confirmed_users.py and pets.py examples in the book. When you remove items from the sandwich_order list and put them into the finished_sandwich list, you need to use a while loop for processing!)
Sample Output from 7-8
I made your Vegan sandwich
I made your Italian sandwich
I made your Steak sandwich
I made your Pastrami sandwich
I made your Greek sandwich
I made your Italian sandwich
I made your Pastrami sandwich
I made your Tuna sandwich
I made your Steak sandwich
Sandwiches that were made today include:
Vegan
Italian
Steak
Pastrami
Greek
Italian
Pastrami
Tuna
Steak
Sample Output from 7-9
I am sorry, we are out of pastrami!!!
I made your Vegan sandwich
I made your Italian sandwich
I made your Steak sandwich
I made your Greek sandwich
I made your Italian sandwich
I made your Tuna sandwich
I made your Steak sandwich
Sandwiches that were made today include:
Vegan
Italian
Steak
Greek
Italian
Tuna
Steak
To see a video demonstration, watch:https://youtu.be/Ykzz5DFuNRE
1. You should have the following files in your Chapter5 folder:
2. Upload Chapter7 to GitHub
a. Click the ... next to CIT228 Git and select the Changes menu, Stage all Changes command.
b. In the Message window below Source Control, enter Chapter7 and then click the ... next to CIT228 Git and select the Commit menu, Commit Staged command
c. Display the menu next to the CIT228 Git folder by selecting ... and select the Push command
d. This will put all files and folders inside your CIT228/Chapter7 directory into your GitHub repository
3. Open a web browser and go to your CIT228 repository. Make sure the Chapter7 directory and files are there, then copy the URL and paste it into the lab assignment dropbox (you are done with the second part of your lab assignment!)