The textbook author does a great job walking you through the project step by step. This document will highlight concepts presented AND provide links to download graphics needed for the game. I will also cover any modifications you need to make for the game to run properly.
You need to work through the chapters and create the alien invasion game. You do not need to complete the try it yourself exercises. What you need to turn in is the competed game. After you complete the game, you will be working on your own game which will give you practice applying techniques covered in the chapters.
NOTE: Anytime you want to know what a variable contains, you can use the print command to print it to the terminal window (that may help you follow what the code is doing)
Example from chapter 13: The print statements that are commented out in the code below illustrated how the grid of aliens was being added to the game. You can insert print statements to check values in any section of the code.
Download the following graphics to your alien_invasion/images folder by right clicking the links and saving them into the folder:
ship.bmp (used in Chapter 12)
alien.bmp (used in Chapter 13)
Chapter 12 involves creating the ship with firing capabilities. Pygame uses classes to for game settings, components (like the ship and bullets) and for the game itself.
As you work through the chapter, pay attention to classes and objects (instances) of each class and how they are used. If you need a refresher, review chapter 9 information :)
There are 2 adjustments you will need to make to the code:
1) You will need to make the following adjustment to close the pygame window using the close button (X)
Page 229 shows the following code in the alien_invasion.py program:
To use the close button, you need to change this to:
NOTE: The book has you change to full-screen mode, which makes clicking the X irrelevant. If you prefer to see the game borders and you don't use full-screen mode, you will need the ability to close the window.
2) In VSCode, if your active folder is CIT228, you will need to change the path to the ship so it includes the alien_invasion folder. If you omit this step, your ship will not display
Page 233 uses the followng path in the self.image attribute in the ship.py program:
You need to change the path to:
IMPORTANT: After you enter each major section of code, you should run the program to make sure it works. It is much easier to correct typos as you go instead of waiting until the end.
PIP is a package manager for Python. It allows you to install and manage additional libraries and dependencies that are not distributed as part of the standard library
Sometimes when you install packages, you will get a warning that you aren't using the most current version of PIP
If you see the warning, you can easily update pip:
a) Open the command prompt
b) Enter the command below:
python -m pip install --upgrade pip
Pygame is a cross-platform set of Python modules designed for writing video games. It includes computer graphics and sound libraries designed to be used with the Python programming language
For a full listing of features, read the pygame documentation: https://www.pygame.org/docs/
To use Pygame, you need to install it in VSCode's terminal window
python -m pip install --user pygame
Your output should look something like this:
Installing collected packages: pygame
Successfully installed pygame-2.0.1
WARNING: You are using pip version 20.2.3; however, version 21.0.1 is available.
You should consider upgrading via the 'C:\Users\Lisa.LAPTOP-B4JF6RME\AppData\Local\Programs\Python\Python39\python.exe -m pip install --upgrade pip' command.
NOTE: I did update PIP after I got the warning using the steps explained in the PIP section above
For the main game class, the init method creates the screen object and all other objects you place in the game screen.
Example:
A part of the screen where a game element can be displayed. Each element in a game has it's own surface (including the game window itself) Surfaces are typically redrawn to display changes and movement
pygame.display.flip() - makes the most recently drawn screen visible
pygame.display.set_mode() - defines the game window's surface
pygame.event.get() is an event listener. It is typically used in a loop that checks for various keyboard or mouse events.
Key press events:
In the main game class, at the bottom, within the check to ensure that the current program is the main class, you create an instance of the game (ai) and you use the instance to run the game (ai.run_game())
You should have a settings.py file that initializes your game window and any other element you place on the game window.
When you specify color, you are using RGB (red, green blue) color values which can be from 1 to 255. To select your own colors, you can use the following online RGB color picker: https://www.w3schools.com/colors/colors_rgb.asp
The author recommends using Bitmap graphics saved in a .bmp file; however, these files have backgrounds that display IF the game background color is different from the background color of the graphic (for our game, they are the same color which is why you can't see the background). You can adjust the background color of a bmp image
Personally, I like vector graphics saved in a png format because they have transparent backgrounds.
There are several royalty free sources you can use to find these graphics. Make sure the graphic has a creative commons license because those allow for free use.
Most graphics will be too big for your game and will need to be resized. If you know how to use image editing software, you can resize grapics in the software.
Pygame includes a pygame.transform.scale(widthpx,heightpx) command that lets you resize graphics before you connect them to the rectangle they are displayed inside. The code typically goes into the __init__() method for the game component you are creating
To use a different ship ( rocket-ship.png ) you can download the graphic and adjust the code in ship.py as shown below
pygame.image.load(loads the image)
image.get_rect() connects the image with the rectangle
Pygame treats all game elements as rectangles. Using rectangles is easier to code and manage than more complicated shapes and works well in Python games. Also, the game playing surface is a rectangle so checking boundaries is easier too.
To move elements that are connected to rectangles, you can use the x and y coordinates of the top, left corner which are the ones used to adjust positioning.
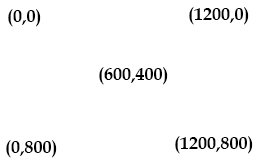
In Pygame, the origin(0,0) is the top left-corner of the screen. The bottom right corner is the full dimension of the screen (if your screen is 1200px, 800px, the bottom right corner coordinates are 1200,800)
Example:
You can also position objects using rectangle attributes like self.rect.midbottom, self.rect.topleft, self.rect.topright, self.rect.midtop etc For more on the rectangle class, see: https://www.pygame.org/docs/ref/rect.html
Helper methods are created with a single leading underscore, such as _check_events()
They are not called by objects, they are called by other methods and are used inside the class.
Example:
Movement is achieved by changing the x or y position of the rectangle containing the object.
For small objects, like the ship, converting the x value to float allows for decimal increments in positioning. When the object is small and we are moving it by pixels, which are also very small, this data type adjustment makes sense
To change the type to float:
self.x = float(self.rect.x)
NOTE: This is done in the ship.py module where self refers to the ship.
The ship.py file also includes commands to move the ship to the right and left. You'll notice that += adds the ship_speed (1.5 pixels) to the current x value of the ship moving it to the right. The -= setting subtracts the ship_speed(1.5 pixels) from the current value of x moving it to the left. The speed settings are on a loop that will continue while the key is pressed AND the ship stays in-bounds (i.e. on the game board).
self.x += self.settings.ship_speed
self.x -= self.settings.ship_speed
For bullets, the y value is adjusted because the movement is vertical. The bullets start at the ship and move upward so the y value is decreased as the bullets move.
Checking boundaries for the bullets is important because once they are off the screen, they are still in memory and our game can get bogged down. The bullets need to be removed once they are off screen.
For bullets, we are only concerned with the top boundry that has a y value of zero. Once the bottom of the bullet is at the 0 position, we can remove it from the game.
Checking boundaries for the ship is important because it isn't fun to play when the ship is off the screen and you cannot see it (we shouldn't allow the ship to move off the screen).
The ship's boundaries are checked in the ship.py module.
For the right side of the ship, we are checking the right side of the ship's rectangle against the right side of the screen's rectangle. As long as the ships right side is less than the right side of the screen, we can move it to the right
For the left boundary, we are just making sure the left side of the ship's rectangle is greater than 0
pygame.sprite is used to manage and draw game objects. It is designed to be a base class for all your game objects and the code is optimized so the game will run faster.
The sprite class lets you add and remove objects. It also lets you group objects (like bullets or aliens)
To create a class that uses sprites, you need to inherit from the Sprite class
Example:
import pygame
from pygame.sprite import Sprite
class Bullet(Sprite):
Attributes for your sprite can be set up in a settings module and then assigned to a rectangle in your new inherited class (i.e. the bullet class)
self.rect = pygame.Rect(0, 0, self.settings.bullet_width,self.settings.bullet_height)
NOTE: width and height are coming from the settings module. 0,0 is the x,y position of the rectangle when we first create it.
After the rectangle creating the sprite (bullet) has been created, you can place it on the screen (we are aligning ours with the ship)
self.rect.midtop = ai_game.ship.rect.midtop
To store the sprites in a group, in your main program's __init__() method, you assign the bullet object to a pygame.sprite.Group()
self.bullets = pygame.sprite.Group()
The focus of this chapter is adding aliens to a group that moves across the screen and down toward the ships. When bullets hit the aliens, they are removed from the screen.
The alien class is inherited from the Sprite class which is used to manage groups of assets or objects. Each alien is added to a sprite group similar to what was done with the bullets in chapter 12. The aliens are placed on the screen at position 0,0 which is why there aren't any settings for alien placement.
WARNING: Watch where you add the dots and underscores, it is easy to put them in the wrong spot which causes errors in your code.
Checking for collisions between sprites involves seeing if the rectangle containers overlap.
There are a couple different ways to check for collisions:
Syntax:
dictionaryVariable = pygame.sprite.groupcollide(group1, group2, remove1, remove2)
Every Sprite inside group1 is added to the return dictionary. The value for each item is the list of Sprites in group2 that intersect. If remove1 is set to True, the sprite is removed after a collision. If remove2 is set to True, the sprite is removed after a collision.
Example:
Syntax: booleanVariable = pygame.sprite.spritecollideany(group1,group2)
If either sprite's rectangles intersect, the method returns True.
Example:
The rows and columns of alien ships are calculated as follows:
Alien ships (aka columns) within a single row:
To determine the number of ships that can fit in a row, you need to figure out how much space you want on the left and right of the alien group AND how much space you want between alien ships.
NOTE: The floor operator is being used to divide and round down.
Max number of rows on the screen for alien ships:
To determine the number of rows, you need to figure out how much space you want at the top and bottom of the screen.
The sleep() function suspends execution of the current ghread for a given number of seconds. To use the sleep() function, you need to import the time module.
Syntax: sleep(seconds)
Example: sleep(0.5)
By the end of the chapter, your files should look like the graphic images of the files shown below:
The focus of this chapter is rendering text, incorporating scoring and setting up for different levels within the game. As you are working through the chapter, make sure you read the text below the code you need to add or rearrange (sometimes if you only look at the example, you don't know if code is moved or added, reading the section below the example explains what the code is doing and you will know whether to move or add code).
To use text, you need to import pygame.font
You need to assign pygame.font.SysFont to a font attribute
Example: self.font = pygame.font.SysFont(None,48)
Pygame works with text by rendering the string you want to display as an image.
Sample code:
font.render() turns the text into an image which is connected to a rectangle and placed on the screen (in this case, it is placed on a button).
Arguments passed to font.render() include the text itself (msg in the example), True or False for antialiasing (text smoothing), text color and background color (if you don't pass a background color, it will be transparent)
To set up the text so it will display on the screen, you need to use the screen.blit() method (similar to what we did with the ship that shoots missiles) self.screen.blit(self.msg_image, self.msg_image_rect) After that , it just needs to be drawn to the screen using the draw method. Because the text will be on a play_button, all we need to do is draw the button.
In pygame, the last items drawn are on top. To have game buttons display ON TOP of other elements, you need to draw them right before the command pygame.display.flip()
Retrieves the x and y coordinates of the mouse when the mouse button is clicked.
Example:
mouse_pos = pygame.mouse.get_pos()
pygame returns a tuple and stores it in mouse_pos (to see what it looks like, print out mouse_pos
Example:
Here's output from the print statement:
Mouse position tuple= (710, 384)
Used to check if a coordinate is within the area of a rectangle object. We are using it to see if the mouse is on the start button
self.play_button.rect.collidepoint(mouse_pos) returns a value of true or false. You can store the value in a variable or you can use it in an if statement as shown in the example below.
Example:
if self.play_button.rect.collidepoint(mouse_pos):
self.stats.game_active = True
If you want to be able to play the game over and over, when you click the play button, you will need to do the following every time the play selects the play button:
The play button itself will occupy a space in memory even when it no longer displays. This creates a problem because if you click in that area, the game will restart. You can work around this by only allowing a restart when game_active is set to False
Example:
NOTE: The result of self.play_button.rect.collidepoint(mouse_pos) is stored in a variable (button_clicked) which is checked in the if statement along with the game_active flag. If the game isn't active and the button was clicked, then everything is reset
You can turn on or off the display of the mouse by sending True or False to pygame.mouse.set_visible()
Example:
# Hide the mouse cursor.
pygame.mouse.set_visible(False)
The round() function normally rounds a decimal number based on the number of decimal places given in the second argument.
Example: round(self.stats.score,2)
IF you pass a negative number as the second argument, round() will round the value to the nearest 10, 100, 1000, and so on.
Example round(self.stats.score, -1)
Because the number is negative, it will round to the nearest 10
The format() methods returns a formatted string based on the formatting type provided.
Syntax:
variable = "{:type}".format(valueToFormat)
Some of the more useful formatting types include:
"{:,}" - inserts commas as a thousands operator
"{:%}" - percentage format
"{:.2f}" - float format with 2 decimal places
"{:,.2f}" - float format with commas and 2 decimal places
Example:
Sample Output:
Number1= 100.50
Number2= 2,000,000.33
Number3= 123,456
Number4= 25.00%
You can apply formatting using f-strings by specifying the width and data type after the value you are printing.
Syntax: print(f " text {variable1:type} text {variable2:type}")
where
Examples:
{variable:,} - adds commas to integer variables
{variable:,.2f} - adds commas and 2 decimal places to floating point values
{variable:.2%} - adds 2 decimals and a % sign to percentages
{variable:10.2f} - makes the value 10 characters wide with 2 decimal places (values are right aligned and spaces are used to pad the value)
Example:
Sample Output:
Number1 = 100.50
Number2 = 2,000,000.33
Number3 = 123,456
Number4 = 25%
To compare your files to the ones you should have at the end of chapter 14, view the following graphic images of the code:
These are the files you should have in your project when you turn it in. The game should work correctly with scoring and levels in place.
1. Upload alien_invasion and all it's contents to GitHub
a. Click the ... next to CIT228 Git and select the Changes menu, Stage all Changes command.
b. In the Message window below Source Control, enter "initial commit" and then click the ... next to CIT228 Git and select the Commit menu, Commit Staged command
c. Display the menu next to the CIT228 Git folder by selecting ... and select the Push command
d. This will put all files and folders inside your CIT228/alien_invasion directory into your GitHub repository
2. Open a web browser and go to your CIT228 repository. Make sure the alien_invasion directory and files are there, then copy the URL and paste it into the lab assignment dropbox