
This chapter builds on what you learned about urls, views and templates. In the previous chapter, we retrieved and displayed data. In this chapter, you will learn how to add data through forms and how to update (or edit) existing data. Because we will allow users to insert and edit their own entries, you will also learn how to create and manage users, in addition to developing a simple registration system.
Video demonstrations and explanations are in the hands on sections of this document.
Any page that allows users to enter and submit information is considered to be a form in Django.
Django includes a helper class, ModelForm, that makes creating and using forms relatively easy.
The procedures to use ModelForm require 1 more step than the procedures to use a Template:
1. Add the new form class derived from ModelForms to forms.py (forms.py is a file you create in the same directory as models.py)
2. Edit urls.py and add a path to the new form template you will be creating
3. Edit views.py to retrieve data the form needs and/or to render the form
4. Create a form template that extends from the base template
You will create a new class that derives from model.ModelForm. The new class will include a Meta class with parameters for the model and fields you want to display. You can also provide labels and other information (there are many options that allow customization of forms).
For more information, see: https://docs.djangoproject.com/en/3.1/topics/forms/modelforms/
Syntax for the models (models.py):
from django.db import models
class ClassName(models.Model):
fieldName1 = models.fieldtype(options)
fieldName2 = models.fieldtype(options)
fieldNamen = models.fieldtype(options)
def __str__(self):
"""returns a string representation of the model"""
return self.text
Syntax for the forms (forms.py)
from django import forms
from .models import ClassName
class ClassNameForm(forms.ModelForm):
class Meta:
model =ClassName
fields = ['fieldName1', 'fieldName2','fieldNamen']
Code example of models.py (adapted from docs.djangoproject.com, March 2021):
from django.db import models
TITLE_CHOICES = [
('MR', 'Mr.'),
('MRS', 'Mrs.'),
('MS', 'Ms.'),
]
class Author(models.Model):
name = models.CharField(max_length=100)
title = models.CharField(max_length=3, choices=TITLE_CHOICES)
birth_date = models.DateField(blank=True, null=True)
def __str__(self):
return self.name
class Book(models.Model):
name = models.CharField(max_length=100)
authors = models.ManyToManyField(Author)
Code example of forms.py (adapted from docs.djangoproject.com, March 2021):
from django import forms
from .models import Author,Book
class AuthorForm(forms.ModelForm):
class Meta:
model = Author
fields = ['name', 'title', 'birth_date']
class BookForm(forms.ModelForm):
class Meta:
model = Book
fields = ['name', 'authors']
The table below shows some of the defaults (for a full list, please review the documentation at: https://docs.djangoproject.com/en/3.1/topics/forms/modelforms/
| Model field | Form field |
|---|---|
| BigIntegerField, IntegerField, PostiveBigIntegerField, PositiveIntegerField, SmallPositiveIntegerField, SmallIntegerField | Text Input (when field.localize is set to false). Normalizes to a python integer. Validates values as integers. If max_value and min_value are set, it validates the range |
| BooleanField | CheckboxInput. Normalizes to a True or False value. Validates the value is True (the checkbox is checked) if the field has required=True NOTE: By default all subclasses have required=True, so if you want to be able to check or uncheck a checkbox, you need to pass required=False when creating a BooleanField |
| CharField | TextInput. Normalizes to a string. Can validate length if max_length and min_length are used. Includes 4 optional arguments: max_length, min_length, strip (if true, the value will be stripped of leading and trailing whitespace), empty_value which defaults to an empty string. |
| ChoiceField | Select input. Normalizes to a string. The choices argument is used to set values (values can be an enumeration of choices or an iterable of 2 tuples) |
| DateField | DateInput. Normalizes to Python's datetime.date object. If input_formats is used, you an format the object |
| DecimalField | TextInput (when field.localize is set to false) Normalizes to a python decimal. Validates values as decimals. If max_value and min_value are set, it validates the range Arguments include: max_value, min_value, max_digits, decimal_places |
| EmailField | EmailInput. Normalizes to a string. Uses the emailValidator to validate the address. |
| FileField | ClearableFileInput. Normalizes to an UploadedFile object. Arguments include max_length and allow_empty_file. |
| FloatField | TextInput (when field.localize is set to false) Normalizes to a python float. Validates values as decimals. If max_value and min_value are set, it validates the range |
| MultipleChoiceField | SelectMultiple. Normalizes to a list of strings. Validates that everything in the list validates to a list of choices The choices argument is used to set values (values can be an enumeration of choices or an iterable of 2 tuples) |
You can override defaults using the Meta class.
If you don't like the default form element Django is going to use, you can override it with the widget attribute
Any character field will automatically be represented by an <input type=text> element. You can override this to use a different form element
The default label for a field is the field name. Underscores are converted to spaces and only the first letter of the field is capitalized. If you don't like the default, you can override it use the label attribute.
Example overriding a label:
name = forms.CharField(label='Your name')
url = forms.URLField(label='Your website', required=False)
Example from the book - the widget attribute is used to override the <input type=text> element with a <textarea> element:
class EntryForm(forms.ModelForm):
class Meta:
model = Entry
fields = ['text']
labels = {'text': ' '}
widgets = {'text': forms.Textarea(attrs={'cols': 80})}
Example from Django documentation:
from django.forms import ModelForm, Textarea
from myapp.models import Author
class AuthorForm(ModelForm):
class Meta:
model = Author
fields = ('name', 'title', 'birth_date')
widgets = {
'name': Textarea(attrs={'cols': 80, 'rows': 20}),
}
You can also use the Meta class to specify labels, error messages and help text.
from django.utils.translation import gettext_lazy as _
class AuthorForm(ModelForm):
class Meta:
model = Author
fields = ('name', 'title', 'birth_date')
labels = {
'name': _('Writer'),
}
help_texts = {
'name': _('Some useful help text.'),
}
error_messages = {
'name': {
'max_length': _("This writer's name is too long."),
},
}
Modifying urls for a form template is the same as any other template. You need to tell it the web address it needs to look for, the view function it needs to run and the name associated with the entry.
Syntax:
urlpatterns=[
path('request',ViewsFunctionName,NameIndex),
]
Where
The views.py file is responsible for rendering the correct form. Inserts will use different forms than edits (they will NOT use the same form). If the form hasn't posted, an empty form will be displayed. If the form has posted, it will be checked to ensure the data is valid and the data will be saved to the database.
One convention Django uses is the assumption that when a form is submitted, the action used is POST. GETS are for retrieval only (not posting).
The template for a form is similar to the templates we used to display data. We will still extend for a base.html file to give us a consistent structure AND we will insert our code between the opening {% block content %} and the {% endblock content %}.
Because we are working with form data, we need to prevent cross-site request forgery (CSRF) hacks. This type of hack occurs when an authorized user executes malicious commands.
To prevent CSRF we need to add {% csrf_token %} below our opening form tag.
Example:
The {{ form.as_p }} tells Django to format the fields in paragraph format
To see a video demonstration and explanation, view: https://youtu.be/t56BvcKaJeQ
We will be creating a form that can handle inserting new topics
1. Create learning_logs/forms.py as directed on page 410
2. Edit learning_logs/urls.py and add a path to the new_topic template you will be creating (see page 411) NOTE: When you enter localhost:8000/new_topic/ you will be routed to new_topic function in views.py. Views.py will then render the new_topic.html template
3. Edit learning_logs/views.py. Modify the first line to import redirect and render. Import the TopicForm class from the forms file. Add the new_topic function as directed on page 411
4. Create the templates/learning_logs/new_topic.html template as directed on page 413
5. Logically, we would have an Add Topic button display on the Topics Summary page. Edit the topics.html template and add a link to create new topics as shown on page 413
6. Save all your changes
7. Run the app
To see a video demonstration and explanation, view: https://youtu.be/DtXhYo4YmEw
We will be creating a form that can handle inserting new learning entries
1. Edit the learning_logs/forms.py file and add Entry to the imported models along with the EntryForm class as directed on page 414
2. Edit learning_logs/urls.py and add a path to the new_entry template you will be creating. (see page 415)
3. Edit learning_logs/views.py. Add EntryForm to the forms import and create the new_entry function as directed on page 415. NOTE: There is a typo in the book on the return redirect statement. Use the line highlighted in the code snippet below (the book has topic_id=topic_id and it should be topic_id=topic.id instead)
4. Create the templates/learning_logs/new_entry.html template as directed on page 416
5. Logically, we would have an Add new entry button on the Topic Detail page. Edit the topic.html file and add a link to create a new entry as shown on page 417
6. Save all your changes
7. Run the app
NOTE: If you haven't saved all your changes, you could get errors when you run the app. Saving your changes will prevent that from occuring.
To edit an entry, we need to:
1. Modify urls.py to add a new path which should include the id (that is what we will retrieve the record with)
2. Create a new function retrieving the data and passing it to the proper template in views.py
3. Create the edit html template file
4. Add an editing link to the appropriate detail (or summary) template
To see a video demonstration and explanation, view: https://youtu.be/mJOaNeQJebo
We will be creating a form to edit existing learning entries.
1. Edit learning_logs/urls.py and add a path to the edit_entry template you will be creating. (see page 418)
2. Edit learning_logs/views.py. Add Entry to the models import and create the new_entry function as directed on page 418
3. Create the templates/learning_logs/edit_entry.html template as directed on page 419
4. Logically, we would have an Edit entry button on the Topic Detail page. Edit the topic.html file and add a link to edit the entry as shown on page 420
5. Save all your changes
6. Run the app
A Django project can include multiple apps. Each app you create will have it's own directory infrastructure similar to the learning_log structure.
The procedure to create a new app is:
1. Open the command prompt
2. Navigate to your main directory (in our case, it is learning_log)
3. Activate the virtual environment
4. From you main directory, enter: python manage.py startapp appName (in our case, appName will be users). This is the command that creates the views.py, admin.py and models.py files
To include the app in your project, you need to modify the settings.py file
1. Go into VSCode, edit learning_log/settings.py
2. In the section labeled INSTALLED_APPS, add the name of the directory
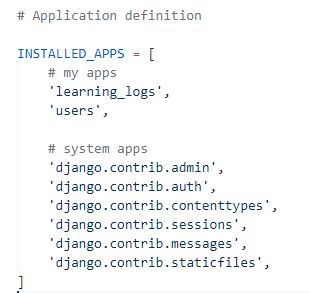
Once you do that, the users app will be included in the project.
To include all URLs we will be creating for the new users app, we need to edit the root url file (learnng_log/urls.py) and add a path to users
Example:

This code will handle any URL that starts with users, such as users/login/ or users/register/
Create a urls.py file inside learning_log/users (this file will register paths to user pages we create)
If you are using Django's authentication system to login, you don't need to create a view, but you will need to create templates
You also need to be aware of the directory conventions, so you know how to set up your structure (which will ensure that Django will find your pages).
By default, Django's authentication views look for templates inside a template/registration folder. You need to create a structure that looks like the following: users/templates/registration. Templates that deal with registration should be saved into the users/templates/registration folder.
The login system works out of the box, but if you want to create a registration page, you will also need to create a view for it (we will be doing that in hands on 6)
To see a video demonstration and explanation, view: https://youtu.be/o5t36Me_6Vs
We will be creating and modifying a users app for registration and authentication
1. Go into the command prompt and navigate to the learning_log directory. Activate the virtual environment.
2. From the learning_log directory, run the following command to create the users app infrastructure:
python manage.py startapp users
3. Type dir at the command prompt, you should see a directory named users. Type dir users to see what is in that directory (see example below). You should notice it is identical to our learning_logs directory (all Django apps use the same structure)

4. Using VSCode, edit learning_log/settings.py and add 'users', to the my apps section as directed on page 421
5. Using VSCode, edit learning_log/urls.py and add a path to users as directed on page 422
To see a video demonstration and explanation, view: https://youtu.be/DUzi0l727AA
We will be using the default login view Django provides. We still need to identify a path to the page, but the code is going to look different from the code used in learning_log because we are using Django's defaults.
1. Create a new file inside learning_log/users/ and name it urls.py
2. Add the code shown on page 422 to the urls.py file and save your changes
The path command is including some default URL_patterns like login and logout.
For the path defined below, when the user enters localhost:8000/usrs/login/ they will route to Djangos default login view, so we do NOT need to code that.
path('', include('django.contrib.auth.urls')),
Django doesn't have a default login template, so we DO need to enter that.
3. Using VSCode, create a new folder inside learning_log/users named templates.
4. Inside learning_log/users/templates, create a new folder named registration
5. Create the login.html template and save it into the learning_log/users/templates/registration folder. See page 423
A few things to note:
6. To make the login available throughout the app, we wiill add a link to the base.html template. - see page 423. Save your changes
The code just checks to see if the user is authenticated. If they are, a hello message displays. If they are not, a link displays
In Djangos authentication system, every template has a user variable available with an is_authenticated attribute set to True or False depending on if they have logged in or not.
7. Go into the command prompt and start the server.
8. Launch the web browser and enter localhost:8000/users/login
You should be able to login with your superuser account.
NOTE: If you get an error, you may not have saved all your changes. Make sure you have saved the files.
9. Add the logout link to base.html as directed on page 425
10. Create a logged out confirmation page as directed on page 425
11. Test your pages in the browser.
To see a video demonstration and explanation, view: https://youtu.be/4agOa0GGVrM
1. Create the registration template using the following steps:
a) Register the URL as directed on page 426
b) Create the register function in learning_log/users/views.py as directed on page 426 and 427
c) Create the learning_log/users/templates/registration/register.html template as directed on page 427
d) Edit base.html and add a link to the registration page as directed on page 428
2. Save your changes
3. Test your pages in the browser.
a) If you are logged into the app, logout
b) Select the register link
c) Create a new account
d) It should automatically register you and route you to the topics.
Now that you know how to register and login users, you can restrict access to pages
A decorator is a directive you can place before a function to alter how the function behaves. It wraps the function and modifies its behavior.
@login_required is a decorator that restricts access to a function if you are not logged in.
For more on decorators, see: https://www.python.org/dev/peps/pep-0318/ or https://wiki.python.org/moin/PythonDecorators
As we have been creating views, we have been passing them Django's request object and they have been returning response objects.
When a page is requested, Django creates an HttpRequest object that contains metadata about the request. Then Django loads the appropriate view, passing the HttpRequest as the first argument to the view function. Each view is responsible for returning an HttpResponse object.
Django uses request and response objects to pass state through the system. The request object includes metadata on the content length, content type, host, request method, server information AND user information. It stores information on whether or not the user has been authenticated. You can use that information to connect user's to the information they create.
For more information on the request and response objects, see: https://docs.djangoproject.com/en/3.1/ref/request-response/
To see a video demonstration and explanation, view: https://youtu.be/CH5ypxEeWV0
1. Open learning_logs/views.py in VSCode. Add the import statement at the top and the decorator above the topics function as directed on page 429
2. The modification we made in views.py requires a redirect if the user isn't logged in. To make this work, we need to adjust learning_log/settings.py (see page 429) The code we are adding simply redirects the user to the login page. Make sure you add the code to the bottom of the page as directed.
3. Edit learning_logs/views.py. Add @login_required to every function except for the index (home page) - see page 430 (We will not be adding it to the registration page either, but that is in a different view file).
4. To connect the data to a user, you need to connect the highest level data (lower level, related data, will follow). If we connect the topic to the user, the entries will automatically connect to the user too because they are related to the topic.
To make the connection, we need to modify learning_logs/models.py and add a foreign key for the owner as shown below and on page 431
class Topic(models.Model):
"""A topic the user is learning about."""
text = models.CharField(max_length=200)
date_added = models.DateTimeField(auto_now_add=True)
owner = models.ForeignKey(User, on_delete=models.CASCADE)
The owner field is coming from django.contrib.auth.models, so we need to import that into models.py
from django.contrib.auth.models import User
5. Because we are adding a foreign key, Django will want to know which user to associate each topic with before it can migrate the database.
a) We are going to use the Command prompt and Django shell to determine who the users are on the system and what their IDs are. Follow the steps on page 431
b) After viewing the users and their IDs, we will perform migrations and assign a user to all the topics when we see Python's error message. See page 432 to run makemigrations. NOTE: User 1 on your system should be the superuser. When Django asks "select an option" enter 1 for the id
c) Verify that makemigration worked by entering a 1 after the migration is completed (see page 432)
Sample Output from the process:

d) Run the migration command to update the database - see page 432
e) Run the Django shell and execute the commands on page 433 to verify who the owner of the topics is.

f) Exit() from the Django shell
To see a video demonstration and explanation, view: https://youtu.be/CH5ypxEeWV0
1. To limit the topics retrieved for each user to ONLY those topics they posted, we are going to filter the topics by their owner. We can compare the owner to the user who is logged in using the request.user attribute which is part of the request object's metadata.
Edit learning_logs/views.py and replace the statement below:
with the following statement that filters the topics based upon the current user (see page 433)
topics = Topic.objects.filter(owner=request.user).order_by('date_added')
The command will retrieve only those topics where the owner of the topic is the same as the current user.
2. To verify the command works, login to the app using the superuser - you should see all the topics display. Then, logout and login as a different user (they shouldn't have any topics) Don't try to add any new topics yet - we still need to make some changes!
3. At this point, we have prevented users from seeing topics that don't belong to them, BUT we have not prevented users from entering another user's topic ID in the URL and accessing topics that way (you could still enter localhost:8000/topics/1 and retrieve the topic, even if it wasn't your topic).
To prevent this from occurring, we need to adjust the def topic(request, topic_id) function. See page 434.
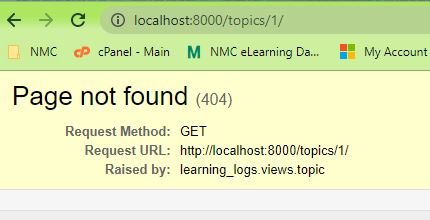
NOTE: The code we are adding throws a 404 error if a user tries to access a topic through the URL that doesn't belong to them (this is a standard page not found error)
4. Our topic page is protected, but the edit_entry pages could still be accessed from the URL (localhost:8000/edit_entry/1 or another number) We are going to add the same topic.owner check to the edit_entry function in the views.py file that we added to the def topic function - see pages 434-435
5. Since we modified the Topic model and added owner, we cannot add new topics because owner isn't filled in (you will get an error if you try to add a topic). The error is an integrity error because owner cannot be a null value (it must be filled in). To fix this, we are going to modify the new_topic function in the views.py file and assign the request.user to the owner right before we save the data to the table.
Follow the instructions on page 435 to add code to fill in the owner and save the data to the table.
6. Test the app (everything should work). The logged in user should only be able to see their own posts and entries.
7. Take the following screenshots of the running app:
a) Registration page
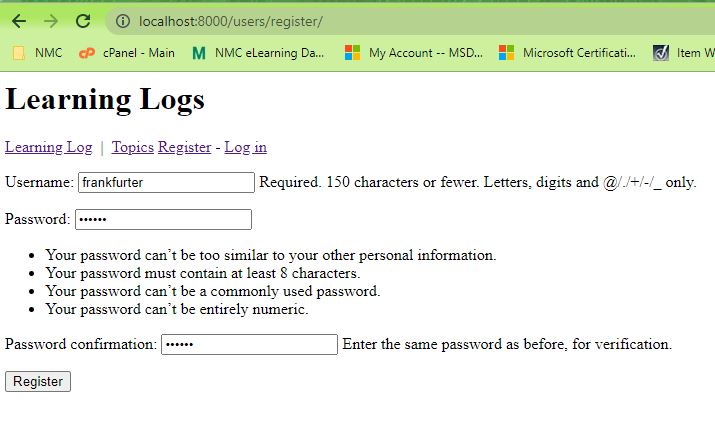
b) Login page

c) Topics page with the user logged in and at least 2 new topics displayed that are not chess or rock climbing

d) Entry page for one of the new topics with at least 2 entries displayed

e) Error page when you try to access another users topic
There are no additional exercises this week because you will be working on your last project.
For this assignment, you will need to upload the following screenshots of the app running in the browser :
| ScreenShot | Points |
|---|---|
Registration page |
4 |
Login page |
4 |
Topics page with a new user logged in and at least 2 topics displaying (other than chess and rock climbing) |
4 |
Entry page with the user logged in and entries for the new topic displayed |
4 |
Error page when you try to access another users topic or entry |
4 |
| Total Points | 20 |