We will cover how to incorporate Bootstrap into your app for styling. Classes that you use in your Django app can be used in regular web pages, so the information you learn is transferable to any web page you work on.
We will also cover how to interact with GitHub from the command prompt and how to deploy apps to Heroku from GitHub using the command prompt.
TEXTBOOK CORRECTION:
Page 448 in the book under installing required packages has: (ll_env)learning_log$ pip install psycopg2==2.7.*
You need to change that one line of code to: (ll_env)learning_log$ pip install psycopg2-binary
Bootstrap 4 is the newest version of Bootstrap, which is the most popular HTML, CSS, and JavaScript framework for developing responsive, mobile-first websites.
Bootstrap consists of classes that you apply to your HTML elements (that is how formatting is done). Using Bootstrap is a matter of learning what the classes do and applying them to your HTML elements.
Advantages of using Bootstrap include:
Bootstrap 4 requires the HTML5 doctype at the beginning of the page, in addition to the language attribute and the correct character set.
<!DOCTYPE html>
<html lang="en">
<head>
<meta charset="utf-8">
</head>
<body>
</body>
</html>
Bootstrap uses jQuery and Popper.js for JavaScript components such as modals, tooltips, popovers etc. In order for those features to work, you need to include their libraries.
Because Bootstrap is mobile first, you need to include the following meta tag in your code
<meta name="viewport" content="width=device-width, initial-scale=1">
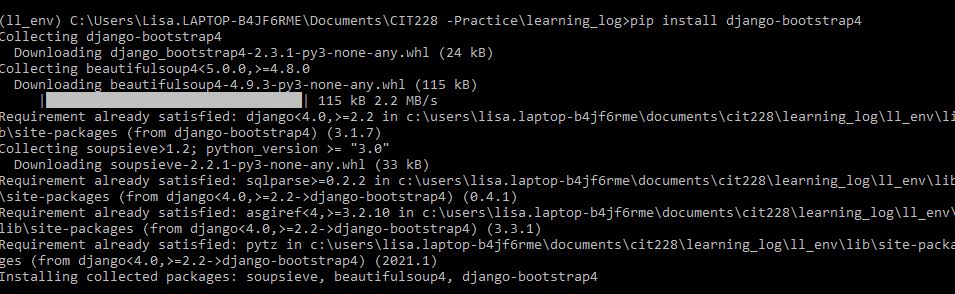
To use Bootstrap in your templates, you need to install the django-bootstrap4 app using pip
a. Open the command prompt
b. Navigate to you app and activate your virtual environment
c. Enter the following command:
pip install django-bootstrap4
d. After installing the bootstrap4 app, you need to go into VSCode and modify your settings.py file. You need to add 'bootstrap4' to the INSTALLED_APPS section:
INSTALLED_APPS = [
# My apps.
'learning_logs',
'users',
# Third party apps.
'bootstrap4',
# Default django apps.
'django.contrib.admin',
e. In your base.html template, you need to pull in the bootstrap 4 library using {% load bootstrap4 %} at the top of the page.
f. Between the <head> and </head>
tags, you need to pull in bootstraps css and the jquery library {% bootstrap_css %} and {% bootstrap_javascript jquery='full' %}
base.html example of the top of the file:
{% load bootstrap4 %}
<!doctype html>
<html lang="en">
<head>
<meta charset="utf-8">
<meta name="viewport" content="width=device-width, initial-scale=1, shrink-to-fit=no">
<title>Learning Log</title>
{% bootstrap_css %}
{% bootstrap_javascript jquery='full' %}
</head>
Since all template files use the base file, we can use Bootstrap classes in all pages.
To add Bootstrap to a web page, you need to pull in the following libraries: Bootstrap css, JQuery, Popper js and Bootstrap. You can do this by downloading files from getbootstrap.com OR by inserting a <script> tag and referring to a CDN (Content Delivery Network).
Example using a CDN:
<!DOCTYPE html>
<html lang="en">
<head>
<meta charset="utf-8">
<meta name="viewport" content="width=device-width, initial-scale=1, shrink-to-fit=no">
<title>My Awesome Site</title>
<!-- Latest compiled and minified CSS -->
<link rel="stylesheet" href="https://maxcdn.bootstrapcdn.com/bootstrap/4.5.2/css/bootstrap.min.css">
<!-- jQuery library -->
<script src="https://ajax.googleapis.com/ajax/libs/jquery/3.5.1/jquery.min.js"> </script>
<!-- Popper JS -->
<script src="https://cdnjs.cloudflare.com/ajax/libs/popper.js/1.16.0/umd/popper.min.js"> </script>
<!-- Latest compiled JavaScript -->
<script src="https://maxcdn.bootstrapcdn.com/bootstrap/4.5.2/js/bootstrap.min.js"> </script>
</head>
After you pull in the libraries, you can use Bootstrap's classes to style your page.
To see a video demonstration, watch: https://youtu.be/3CKpO0szDOU
1. Open the command prompt, navigate to the learning_log directory and activate your virtual environment (ll_env)
2. From the learning_log directory, install django-bootstrap4
pip install django-bootstrap4
3. Go ahead and run your app (you will be able to view the bootstrap changes in your pages as you make the modifications :)
4. Open VS Code and open learning_log/settings.py. Add the boostrap app as shown on page 438
5. Save your changes
Bootstrap requires that you wrap site contents in a "container".
There are 2 container classes:
.container = fixed width container
To see a live, interactive example, view: https://www.w3schools.com/bootstrap4/tryit.asp?filename=trybs_gs_container&stacked=h
.container-fluid = full-width container spanning the entire width of the screen (or viewport).
To see a live interactive example, view: https://www.w3schools.com/bootstrap4/tryit.asp?filename=trybs_gs_container-fluid&stacked=h
You use the container or container-fluid classes to identify the main content of the page.
The main content of the page is divided into rows. Within each row, you can have up to 12 columns. In Bootstrap, a layout with rows and columns is referred to as the Grid System (it is similar to Grid View in CSS).
A navigation bar is a navigation header located at the top of the page with links to different action methods wtihin the application.
Navigation bars are normally at the top of every page in the app. the can extend or collapse depending on the screen size. When it is collapsed, a hamburger (3 lines) will display and when selected, the menu will display vertically.
A standard navigation bar is created with the .navbar class followed by a responsive collapsing class which can be .navbar-expand-sm, .navbar-expand-md, .navbar-expand-lg, or .navbar-expand-xl. The responsive collapsing class is what makes the navigation bar horizontal.
Menu items and links are added using unordered list tags <ul> and line item tags <li>
<nav> tags should contain class="navbar navbar-expand-size" Where size is sm, md, lg or xl
<ul> tags should contain class="navbar-nav"
<li> tags should contain class="nav-item"
links need to include class="nav-link"
Code Example:
<h2>CIT Courses</h2>
<nav class="navbar navbar-expand-sm bg-light" >
<ul class="navbar-nav">
<li class="nav-item">
<a class="nav-link" href="https://lisabalbach.com/CIT180">Web Development</a>
</li>
<li class="nav-item">
<a class="nav-link" href="https://lisabalbach.com/CIT190">JavaScript Programming</a>
</li>
<li class="nav-item">
<a class="nav-link" href="https://lisabalbach.com/CIT228">Advanced Database Systems</a>
</li>
</ul>
</nav>
How it looks live:
To create a vertical navigation bar, remove .navbar-expand-sm/md/lg/xl
If you would like regular text to the left of the menu, you need to include .navbar-brand in an anchor tag with a dummy link. This should be placed below the opening <nav> tag and above the opening <ul> tag.
Code Example displaying text for the brand (you could also include a graphic in place of the text):
<nav class="navbar navbar-expand-sm bg-dark" >
<a class="navbar-brand" href="#">CIT Courses</a>
<ul class="navbar-nav">
<li class="nav-item">
<a class="nav-link" href="https://lisabalbach.com/CIT180">Web Development</a>
</li>
<li class="nav-item">
<a class="nav-link" href="https://lisabalbach.com/CIT190">JavaScript Programming</a>
</li>
<li class="nav-item">
<a class="nav-link" href="https://lisabalbach.com/CIT228">Advanced Database Systems</a>
</li>
</ul>
</nav>
How it looks live:
To display the hamburger on mobile devices when the navigation bar is collapsed involves creating a button with the toggle icon (which is the hamburger). After the button is created, an ID is used to connect the menu items you want to hide with the button. In the button, the data-target attribute connects the ID. The data-toggle attribute is also used and it is set to collapse
Syntax for the button and hambuger:
<button class="navbar-toggler" type="button" data-toggle="collapse" data-target="#collapsibleNavbar">
<span class="navbar-toggler-icon"></span>
</button>
The <span> tag with the navbar-toggler-icon class creates the hamburger icon
data-target="#collapsibleNavbar" is used to connect the button to the section that should collapse. You need to add a <div> tag above the <ul> tag and a </div> tag below the </ul> tag
Syntax for the section that needs to collapse:
<div class="collapse navbar-collapse" id="collapsibleNavbar">
<ul>
...
</ul>
</div>
How this looks in our base.html template
For more on navbars, see: https://www.w3schools.com/bootstrap4/bootstrap_navbar.asp
The Bootstrap grid system is comprised of rows and columns.
There are five column classes:
The classes above can be combined to create more dynamic and flexible layouts.
You can specify widths of varying sizes for columns (just like grid-view css)
If you wanted a layout for a medium sized device with 1/3 of the width in one block and 2/3 in the other, you would create a layout something like the example shown below:
<div class="container-fluid">
<div class="row">
<div class="col-md-4" style="background-color:peachpuff;">.col-sm-4</div>
<div class="col-md-8" style="background-color:orangered;">.col-sm-8</div>
</div>
</div>
Here's the example live:
The numbers need to add up to 12 just like Grid View.
NOTE: If you set up columns for a medium device and someone views the page with a smaller device, Bootstrap will automatically adjust to use the next size down.
To try it live, see: https://www.w3schools.com/bootstrap4/tryit.asp?filename=trybs_grid_ex3&stacked=h
If you wanted all columns to have the same width, you would code it using the col class without the size and column count
Example:
<div class="row">
<div class="col" style="background-color:red;">Column 1 using .col</div>
<div class="col" style="background-color:white; outline:1px solid black;">Column 2 using .col</div>
<div class="col" style="background-color:blue;">Column 3 using .col</div>
</div>
Here's how it looks live:
In our Django app, the container class will go into our base.html template below the navigation bar. Inside the container class we will display the content from the different templates.
Bootstrap recognizes h1 through h6 tags
It also recognizes display headings.
Display headings are designed to stand out more than normal headings (they have a larger font-size).
There are 4 classes to choose from:
.display-1, .display-2, .display-3 and .display-4
To try it live, see: https://www.w3schools.com/bootstrap4/tryit.asp?filename=trybs_txt_display&stacked=h
Instead of applying inline CSS for margins and padding, you can use Bootstrap classes
mt-size - top margin (size values can be 0 through 5 and can contain decimal places)
mr-size - right margin (size values can be 0 through 5 and can contain decimal places)
mb-size - bottom margin (size values can be 0 through 5 and can contain decimal places)
ml-size - left margin (size values can be 0 through 5 and can contain decimal places)
m-size - all margins (size values can be 0 through 5 and can contain decimal places)
NOTE: By default, sizes correspond to rem (root element) unit values. 1 represents the current size, .75 is approx 25% less than the current size, and 2 is double the current size.
pt-size - top padding (size values can be 0 through 5 and can contain decimal places)
pr-size - right padding (size values can be 0 through 5 and can contain decimal places)
pb-size - bottom padding (size values can be 0 through 5 and can contain decimal places)
pl-size - left padding (size values can be 0 through 5 and can contain decimal places)
p-size - all 4-sides padding (size values can be 0 through 5 and can contain decimal places)
NOTE: Sizes correspond to rem unit values and work the same was as sizing for margins
Bootstrap includes classes for text formatting and alignment. Some of the more popular classes include:
The class names are pretty self-explanatory except for text-capitalize which will capitalize the first letter of every word in the element.
To see a video demonstration, watch: https://youtu.be/TPS5V75Uzb0
1. Replace the code in base.html as directed on page 439, 440, 441 and 442
2. Save your changes.
Bootstrap has contextual color classes that are designed to provide meaning through use of color.
The same colors are used for text, link and backgrounds. Text and link colors are prefixed with text- and background colors are prefixed with bg-
The table below shows the text/link classes along with the background classes and the contextual meaning assigned to the colors:
| Text and Link Classes | Background Class | Example (Contextual Meaning ) |
|---|---|---|
| .text-muted | Muted is not as important and is faded gray class="text-muted" |
|
| .text-primary | .bg-primary | Primary is important and is displayed in blue class="text-primary" |
| .text-success | .bg-success | Success is displayed in green class="text-success" |
| .text-info | .bg-info | General information is important, but not as much as primary, so it is a lighter blue. class="text-info" |
| .text-warning | .bg-warning | Warning is displayed in yellow class="text-warning" |
| .text-danger | .bg-danger | Danger is displayed in red class="text-danger" |
| .text-secondary | .bg-secondary | Secondary is not as important as primary or info and is displayed in gray class="text-secondary" |
| .text-white | .bg-light | White is used against a dark background for contrast class="text-white bg-dark" |
| .text-dark | .bg-dark | Dark text stands out as a contrast color to a light background class="text-dark" |
| .text-body (default body color/often black) |
Black text is normally used in the "body" of a page class="text-body" |
|
| .text-light | Light gray can be used as a contrasting color to a darker background class="text-light bg-dark" |
A jumbotron class creates a large box designed to bring attention to content or information. It is displayed as a grey box with rounded corners and enlarged text.
You should use a <div> element with the jumbotron class. Inside the <div>, you can place any valid HTML element including other Bootstrap elements/classes.
You can add a btn class to your html buttons for styling purposes. Make sure you set class="btn btn-style" where style is one of the styles you want to use (see list below)
There are other button styles you can use:
The buttons display as shown below:
Example from a Django template:
{% buttons %}
<button name="submit" class="btn btn-primary">Log in</button>
{% endbuttons %}
To see a video demonstration, watch: https://youtu.be/w-UIcItBsaM
1. Modify index.html as directed on page 443
2. Save your changes and view the home page in the running app (you should see the boostrap styling)
Bootstrap includes classes for laying out forms and for working with the labels and controls in a form.
There are 3 form layouts:
Labels and controls are stacked on top of each other.
<form action="#" class="form">
How it looks live:
Labels display to the left of the controls with multiple labels and controls on a line
<form action="#" class="form-inline">
Here's how it looks live:
Use the Bootstrap grid to align form labels and controls
Sample code:
<form action="#" class="form container-fluid">
<div class="row">
<div class="form-group col6">
<label for="email">Email:</label>
<input type="email" class="form-control" id="email3" placeholder="Enter email" name="email">
</div>
<div class="form-group col6">
<label for="pwd">Password:</label>
<input type="password" class="form-control" id="pwd3" placeholder="Enter password" name="pwd">
</div>
</div>
Here's how it looks online:
Standard conventions for controls in the form and form-inline layouts include:
If you specify <div class="form-group"> and you do NOT specify a layout, you will get the stacked layout
NOTE: The form-horizontal class is no longer used in Bootstrap.
Bootstrap supports all the HTML5 input types: text, password, datetime, datetime-local, date, month, time, week, number, email, url, search, tel, and color.
Bootstrap also supports the following form controls:
To take advantage of Bootstrap features, make sure you identify the type of form control you are creating
Different form elements use different types of controls:
<Input> Example:
<div class="form-group">
<label for="usr" class="form-label">Name:</label>
<input type="text" class="form-control" id="usr" name="username">
</div>
<div class="form-group">
<label for="pwd" class="form-label">Password:</label>
<input type="password" class="form-control" id="pwd" name="password">
</div>
<select> Example:
<div class="form-group">
<label for="sel1" class="form-label">Select list:</label>
<select class="form-control" id="sel1">
<option>1</option>
<option>2</option>
<option>3</option>
<option>4</option>
</select>
</div>
<textarea> Example:
<div class="form-group">
<label for="comment" class="form-label">Comment:</label>
<textarea class="form-control" rows="5" id="comment" name="text"></textarea>
</div>
<input type="checkbox" > Example:
<div class="form-check">
<label class="form-check-label" for="check1">
<input type="checkbox" class="form-check-input" id="check1" name="option1" value="something" checked>Option 1
</label>
</div>
<div class="form-check">
<label class="form-check-label" for="check2">
<input type="checkbox" class="form-check-input" id="check2" name="option2" value="something">Option 2
</label>
</div>
<div class="form-check">
<label class="form-check-label">
<input type="checkbox" class="form-check-input" disabled>Option 3
</label>
</div>
NOTE: For inline, the only thing that changes is the initial class <div class="form-check-inline"> Everything else stays the same.
<input type="radio"> Example
<div class="form-check">
<label class="form-check-label" for="radio1">
<input type="radio" class="form-check-input" id="radio1" name="optradio" value="option1" checked>Option 1
</label>
</div>
<div class="form-check">
<label class="form-check-label" for="radio2">
<input type="radio" class="form-check-input" id="radio2" name="optradio" value="option2">Option 2
</label>
</div>
<div class="form-check">
<label class="form-check-label">
<input type="radio" class="form-check-input" disabled>Option 3
</label>
</div>
NOTE: For inline, the only thing that changes is the class in the first line of code: <div class="form-check-inline">
To see a video demonstration, watch: https://youtu.be/5skM5wnLDKs
1. Modify login.html as directed on page 444
2. Save your changes and view the login page in the running app
A card in Bootstrap 4 is a bordered box with some padding around its content. It includes options for headers, footers, content, colors, etc.
Example of a basic card:
<div class="container">
<h3>CIT228 Card</h2>
<div class="card">
<div class="card-body">I love programming!</div>
</div>
</div>
Here's how it looks live:
Example of a card with headers and footers:
<h3>CIT228 Card</h2>
<div class="card">
<div class="card-header bg-success text-white">NMC</div>
<div class="card-body">I love programming!</div>
<div class="card-footer bg-success">©2021</div>
</div>
</div>
Here's how it looks live:
To see a video explanation, watch: https://youtu.be/GJKeWS3VvDM
1. Modify topics.html as directed on page 445
2. Modify topic.html as directed on page 446
3. Save your changes to both pages and view them in the running app
To see a video explanation, watch: https://youtu.be/cE1ZhGWfqMg
1. Complete Try-It-Yourself 20-1 and add bootstrap styling to new_topic, new_entry, edit_entry, and register.
2. Save your changes and view them in the running app.
3. At this point, you may want to make a backup copy of your project, just in case you have deployment issues
There are a couple options for deployment that are FREE. We are going to deploy to Heroku. NOTE: Heroku’s free tier has limits to the number of apps you can deploy and the number of people who can visit your app. These limits are generous enough to give you practice deploying your apps at no cost.
1. Create an account at https://heroku.com/
2. Download and install the Heroku CLI (command line interface) from https://devcenter.heroku.com/articles/heroku-cli/
3. Install 3 packages using the command prompt (you will need your virtual environment active and the directory should be your main project directory)
Example:
(ll_env)learning_log$ pip install psycopg2-binary
(ll_env)learning_log$ pip install django-heroku
(ll_env)learning_log$ pip install gunicorn
4. Create a requirements file to tell Heroku which packages our project depends on. At the command prompt, run the following command to create the requirements.txt file
(ll_env)learning_log$ pip freeze > requirements.txt
NOTE: You can open the requirements.txt file to see the packages and version numbers installed into your project
When the app is deployed, Heroku will install all the packages listed in the requirements.txt file, so the environment on the server should be the same as our local environment.
5. Make sure Heroku is using the same version of Python as you.
Run the following command:
python --version
6. In VSCode (or a text editor) create a new file called runtime.txt and save it to the directory containing manage.py (this should be your main directory) Enter the following code into the file:
python-version#
where version# is the number you saw after running the command
Example:
python-3.9.1
7. In VSCode, modify settings.py for Heroku - add the folloiwng code to the bottom of the file:
# Heroku settings.
import django_heroku
django_heroku.settings(locals())
The code imports the django_heroku module and calls the settings function which modifies settings needed for the Heroku environment.
8. Create a Procfile that tells Heroku to use gunicorn as a server and to use the settings in learning_log/wsgi.py to launch the app). The log-file tells heroku which events to log. The file has no extension and begins with a capital P It should be saved in the same directory as your manage.py file
web: gunicorn learning_log.wsgi --log-file -
To see a video demonstration, watch: https://youtu.be/6EUHD7sRTQM NOTE: Even though we are pushing the project to Git and deploying to Heroku from Git, you won't be able to see the files in GitHub itself.
1. Create a free account at https://heroku.com/
2. Download and install the Heroku CLI (command line interface) https://devcenter.heroku.com/articles/heroku-cli/ (there are directions for different platforms at the site). I installed using the default settings which is what I recommend that you do too.
3. From the command prompt, navigate to your app and activate the virtual environment. Install the following packages (page 448) NOTE: There has been a modification to the first command because the one in the book no longer works:
(ll_env)learning_log$ pip install psycopg2-binary

(ll_env)learning_log$ pip install django-heroku
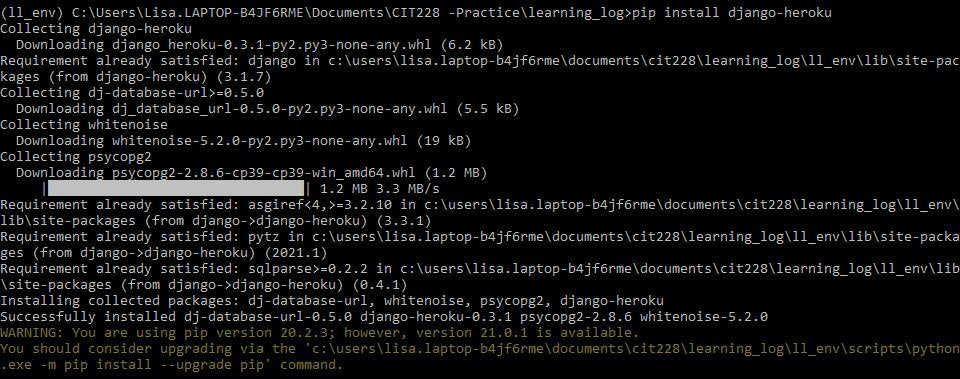
(ll_env)learning_log$ pip install gunicorn

4. Create the requirements.txt file (page 448) Just execute the command pip freeze > requirements.txt at the command prompt

NOTE: The command prompt will display when it is done, but you won't see any additional output. If you go into VSCode, you can open and view the text file It should be in the main directory below manage.py
Example:

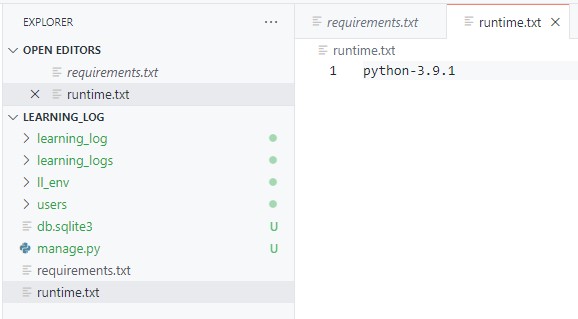
5. Determine your Python version and create the runtime.txt file as directed on page 449 (this can be done in VSCode, just save the file to the main directory where manage.py is and make sure you save it as a text file) NOTE: To determine the python version learning_logs is using, enter python --version at the command prompt in your virtual environment (the example below shows Python 3.9.1 which is what I I entered into my runtime.txt file)

Text file added using VSCode:
6. Modify the settings.py file as directed on page 450 (the new code should go at the bottom of the file)
# Heroku settings.
import django_heroku
django_heroku.settings(locals())
7. Create a new file named Procfile (with no file extension). In VSCode, when you go into file and save as, click the save as type list arrow and select No Extension. It should be in the same directory as manage.py and should contain the following code (see page 450):
web: gunicorn learning_log.wsgi --log-file -
Make sure everything in your app is running properly before you complete hands on 8 and 9!
To see a video demonstration, watch: https://youtu.be/07O06dI2r0E
The process of uploading to GitHub and deploying to Heroku are integrated (you will be using the command prompt for both). You will also be using the command prompt to perform migrations on your database to deploy it to Heroku. Make sure you have created a Heroku account and that you have downloaded and installed the Heroku CLI
1. Using the command prompt, follow the steps on page 451 to configure GitHub
2. Using VSCode, create a .gitignore file and save it to the main directory where manage.py is located (the filename begins with a dot and there is no extension) See page 451
ll_env/
__pycache__/
*.sqlite3
NOTE: We are telling GitHub to ignore what is in the ll_env/ directory, the __pycache__/ directory and anything that ends in sqlite3 The ll_env directory can be recreated at anytime and doesn't need to be on GitHub, the __pycache__/ directory is something Django creates when running .py files. We don't want our test database deployed, so we do not want it uploaded to Git.
3. Make sure you have hidden files on your system displayed (see steps for various OS on pages 451-452). NOTE: On Windows 11, click the View list arrow, select Show and make sure a check is next to Hidden Files.
4. Run the commands to add and commit the project to GitHub (see page 452)
a) Initialize the repository, add all files that aren't being ignored and commit the changes to GitHub (the -am flag in the commit statement tells Git to include all changed files and to record a log message)

b) Check the status to make sure you are on the master branch and that the working tree is clean (anytime you want to push to Heroku, this is the status you need to see)

You will be directing Heroku to retrieve the files from GitHub to create your app on it's server
1. Push the files to Heroku as directed on page 452
a) After typing heroku login, you will be directed to the browser where you login. After you login, you can close the browser and return to the command prompt. you will see something like the example below. You will notice the green logged in text above the command prompt AND the login command that was executed below the command prompt (which is a little weird).

b) Continue with the Heroku commands: heroku create followed by git push heroku master (NOTE: I had to type over output when I gave the git push command, don't worry about that, just type from wherever the command prompt is located).
The heroku create command builds the empty project.
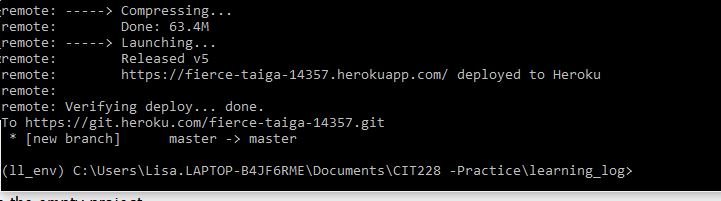
The git push heroku master command pushes the project to Heroku which in turn builds the project on the servers At the bottom of the output, you will see a URL you can use to access the live project (in the example below, the URL is https://fierce-taiga-14357.herokuapp.com/
2. Run the heroku ps command to make sure the server process started correctly (see page 453)

The ps command also shows how much time the project can be active within the month (Heroku allows 550 hours of active time per month. If you exceed the limit, you will get a server error page. 550 hours is about 22 days, which is enough time for our assignment and term projects.
Below the usage information, it is telling us that the Procfile we created has been started.
3. Open the app in the browser using the heroku open command (see page 453). At this point, your files are online, but your database isn't set up yet (don't try to add anything to your site until the database is there!)
1. Run the heroku migration command as directed on page 454.
When you first execute the command, you should see something similar to the example below:

When the command is done, you should see something similar to the output below:
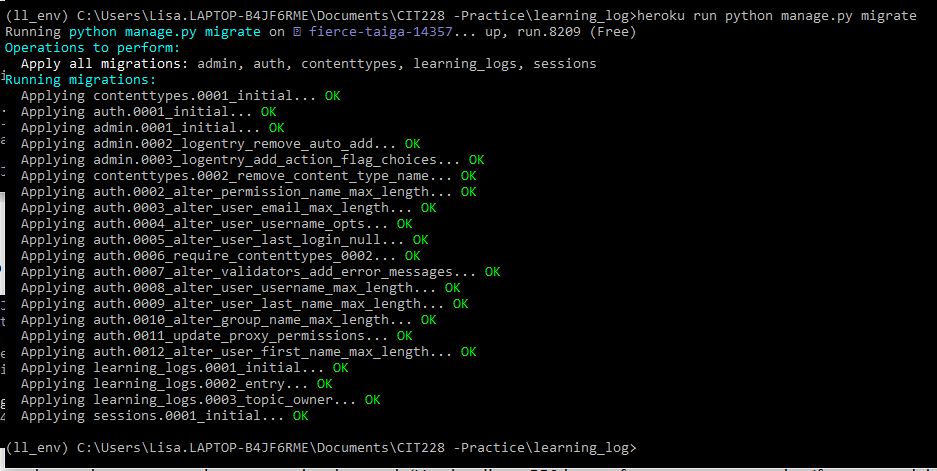
At this point, when you visit the app, you should be able to use it like the one you had locally. The only difference is you won't have any data to work with because that doesn't get copied over.
If there is a problem in one of your deployed pages, you can fix the page (make sure you test it locally). Then, you can execute the following commands in the command prompt to push the change to heroku:
1. Navigate to learning logs and activate the virtual environment.
C:\Users\Lisa.LAPTOP-B4JF6RME>cd documents/CIT228-Spring22/learning_log/ll_env/Scripts
C:\Users\Lisa.LAPTOP-B4JF6RME\Documents\CIT228-Spring22\learning_log\ll_env\Scripts>activate
(ll_env) C:\Users\Lisa.LAPTOP-B4JF6RME\Documents\CIT228-Spring22\learning_log\ll_env\Scripts>cd ../../
2. Login to GitHub with your username and email
(ll_env) C:\Users\Lisa.LAPTOP-B4JF6RME\Documents\CIT228-Spring22\learning_log>git config --global user.name "your git username"
(ll_env) C:\Users\Lisa.LAPTOP-B4JF6RME\Documents\CIT228-Spring22\learning_log>git config --global user.email "your git email address"
3. Use the git add . command to add your changes (only needed if you added new pages)
(ll_env) C:\Users\Lisa.LAPTOP-B4JF6RME\Documents\CIT228-Spring22\learning_log>git add .
4. Use the git commit command with a comment about what you changed
(ll_env) C:\Users\Lisa.LAPTOP-B4JF6RME\Documents\CIT228-Spring22\learning_log>git commit -am "Fixed formatting in logout page and topics page"
5. Check the status of the update using git status
(ll_env) C:\Users\Lisa.LAPTOP-B4JF6RME\Documents\CIT228-Spring22\learning_log>git status
6. Login to heroku
(ll_env) C:\Users\Lisa.LAPTOP-B4JF6RME\Documents\CIT228-Spring22\learning_log>heroku login
7. Push the change to heroku
(ll_env) C:\Users\Lisa.LAPTOP-B4JF6RME\Documents\CIT228-Spring22\learning_log>git push heroku master
8. Run the command to check Heroku's server processes (if the app isn't already running)
(ll_env) C:\Users\Lisa.LAPTOP-B4JF6RME\Documents\CIT228-Spring22\learning_log>heroku ps
9. Run the command to open the app (if the app isn't already open)
(ll_env) C:\Users\Lisa.LAPTOP-B4JF6RME\Documents\CIT228-Spring22\learning_log>heroku open
10. If you have made any changes to the models, you will need to run the migrations command again. If you haven't changed the models, then do not run the command
(ll_env) C:\Users\Lisa.LAPTOP-B4JF6RME\Documents\CIT228-Spring22\learning_log>heroku run python manage.py migrate
Example: In the example below, I was already logged into git and heroku. I only changed a couple of the HTML pages, so I didn't need to run migrations.

To remove the app, you can execute the following command from the command line:
heroku apps:destroy --app appname
appname is whatever you renamed the app to (if you didn't rename the app, it is the default name Heroku assigned to your app)
You can create a superuser account on heroku similar to the way you created one for your app. The main difference is that we will be opening a Bash terminal (which is part of the Linux Operating system). As long as we are connected to Heroku, we can use the Bash terminal to interact with the server.
1. Create a superuser account from our virtual environment and main directory by running the following command to get into Bash:
(ll_env)learning_log$ heroku run bash
2. Execute the following Linux command to view files and directories:
ls
NOTE: When you are using Bash, you need to use Linux commands instead of Windows commands
3. To create the superuser after we have bash running, enter:
python manage.py createsuperuser
Answer the questions at the prompt the same way you did before (although if you used admin for a username, you should pick something more secure)
4. Type exit when you are done
The URL assigned to your app will probably not be user-friendly. You can rename it using the following command in the command prompt:
(ll_env)learning_log$ heroku apps:rename learning-log
NOTE: You will need to select a unique name for your app; otherwise, renaming won't work.
Once your app is renamed, the original URL is destroyed. The apps:rename command completely moves the project to the new URL
By default debugging information is displayed in the local app because we need it to problem solve;however, we don't want that to display in the live app.
To turn off debugging when the app is running in a production environment, we are going to edit the settings.py file
The current code in the settings.py file is shown below:
We are going to modify the code to the following:
import os
if os.environ.get('DEBUG') == 'TRUE':
DEBUG = True
elif os.environ.get('DEBUG') == 'FALSE':
DEBUG = False
Once you modify the code and push it to GIT and Heroku, we can use the command prompt to set the DEBUG variable to FALSE. Once we do that, it will run through the code we have added and set the variable to False on the server. If there is a problem and we need to turn it on again, we can do so through the command prompt.
The problem with the error messages is they are the same for pages that don't exist (404 errors) and internal server errors ( 500 errors, which are coding errors). We can customize the 404 and 500 error messages using templates that match our apps appearance.
Steps to create custom error messages:
1. Create a templates directory inside your main directory (ie. learning_log/templates)
2. Create a 404.html file and a 500.html file inside the template directory.
a) The files should extend the base.html template
b) The error message should go in the page_header
Example of a 404.html page:
{% extends "learning_logs/base.html" %}
{% block page_header %}
<h2>The item you requested is not available. (404)</h2>
{% endblock page_header %}
Example of a 500.html page:
{% extends "learning_logs/base.html" %}
{% block page_header %}
<h2>There has been an internal error. (500)</h2>
{% endblock page_header %}
3. Modify the settings.py file to include the new templates - you will add the code to the existing DIRS:[] command in the TEMPLATES list:
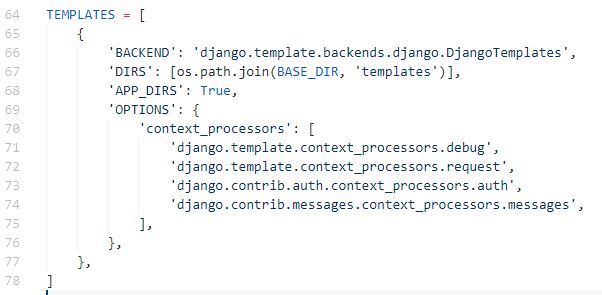
Also in the settings.py file, temporarily modify DEBUG and set it to False so you can see the changes before pushing them to the Heroku server

4. Run the local server and test the error pages by running the following commands, one should generate a 500 error and the other should generate a 404 error
http://localhost:8000/letmein/

http://localhost:8000/topics/999/
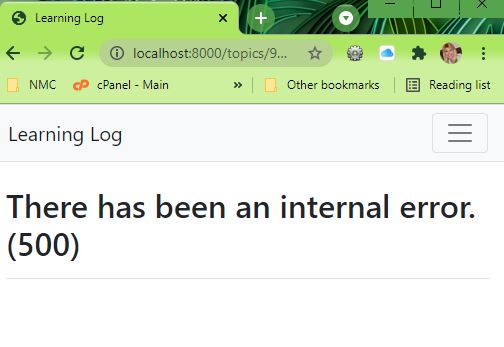
5. Adjust the code in settings.py and set DEBUG back to True
6. Push the changes you made to Heroku by adding and committing them to GitHub and then pushing them from git to Heroku
git add .
git commit -am "Added customer 404 and 500 error pages"
git push heroku master
NOTE: using git add . tells GitHub we are adding new files and they need to be tracked
To see a video demonstration, watch https://youtu.be/-e8gOmJquv8
1. Create the superuser account on Heroku as directed on pages 454-455. Since this is a live site, make sure you select secure usernames and passwords (admin is not a good username) IMPORTANT: You cannot press backspace to remove characters you don't want. YOU CAN PRESS CTL + X while pressing the backspace key to remove characters (that will work :) NOTE: You can create more than 1 superuser account if you can't remember the first one or if you have problems. The usernames need to be unique


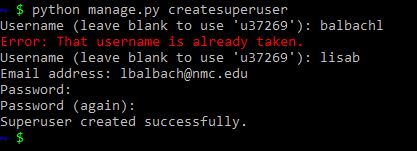
2. Once the superuser has been created, type exit to get out of bash (you should see the normal learning_log prompt once you have exited bash)
3. Go into the browser and add /admin/ to the end of your app's URL to get to the admin login screen (this is the same screen we used locally). As an administrator you have full rights to all data added by all users. You will be able to add, edit and delete data.
1. Rename the app as directed on page 455. The name should be unique, so you may want to modify the name a little.

NOTE: Since the URL is different now, you will need to run the heroku open command again.
URL of live site: https://livetolearn-log.herokuapp.com/
URL of live site #2: https://healthyhabit-log.herokuapp.com/
1. Edit the settings.py file and scroll to the bottom of the file where the Heroku settings are locatead. Insert the import os and if/elif statement as shown on page 456
2. Since you modified a file, we need to commit it to Git and push the modified file. Follow the instructions on page 457 to commit and push your changes to Git.

3. If you have a clean working tree in Git, push your updates to Heroku as directed on page 457

4. After you push the updated settings to Heroku, you can configure the DEBUG environment variable in the command prompt and set it to FALSE. See page 458

NOTE: When you change an environment variable, Heroku automatically restarts your project to implement the change.
5. To see the effect of the change, go to your live page and enter /letmein/ at the end of the URL. Then, launch the test server (your localhost) using a new command prompt and try the same thing - you should notice a difference in the error messages displayed.
The change we made will display the message below on the live server if you enter an invalid URL:

You will get the following message on the local (test) sever if you execute the same invalid URL:

1. Using VSCode create a templates folder inside the main learning_log directory where manage.py is located.
2. Inside the templates folder, create a 404.html error page as directed on page 458
3. Inside the templates folder, create a 500.html error page as directed on page 459
4. Modify settings.py to tell it about the new template folder as directed on page 459.
WARNING: You will need to add import os to the top of the settings.py file; otherwise, you will get an error when you try to push the page to Heroku
5. Change the local DEBUG environment variable to False as directed on page 459 (this is near the top of the settings.py file)
6. Test the changes on your locally using localhost. Just enter the following commands (the first will display the 404 error and the second will display the 500 error):
http://localhost:8000/letmein/
http://localhost:8000/topics/999/
7. Change the DEBUG environment variable back to True in your settings.py file
8. Follow the directions on page 460 to add the changes to Git and push them to Heroku

1. When users make an entry like 999 for an existing topic, they should route to a 404 error instead of a 500 error (there isn't a problem with the code, the problem is the entry they are trying to display doesn't exist).
To fix this, we will modify the learning_log/learning_logs/views.py file and direct the user to the correct error template. See the directions on page 460
NOTE: You are changing the database call from
to
The new code will either retrieve the database topic OR it will display the 404 error
Make sure you modify the import statement at the top of the views.py file (you need to pull in the get_object_or_404 function so we can use it!
2. Make sure you save your changes. To test this locally, enter http://localhost:8000/topics/99999/ You should see the detailed error message display, but it will be a 404 error instead of a 500 error.
3. Since we did not add any new pages, we only need to run the commands to commit the changes and push them to Heroku
Example:
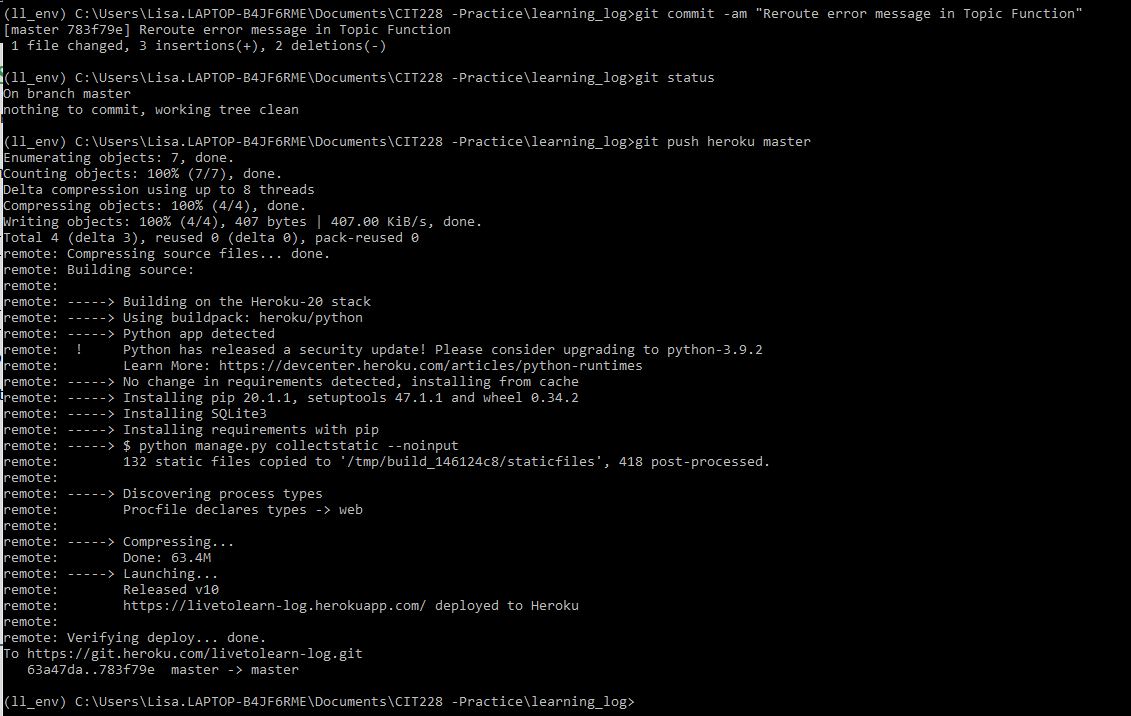
There are no additional exercises this week because you will be working on your last project.
For this assignment, you will need to add a link to your deployed app AND you will need to zip your learning_log files and upload them to the dropbox (in case I need to look at them) Since you already deployed the app and used GitHub, I am not going to make you add the files to your CIT228 repository, unless you want to (if you would prefer to do that, you can just put a link to the files in the dropbox)
| Exercise | Points |
|---|---|
Link to Running app |
25 |
Upload zipped project file to dropbox |
5 |
| Total Points | 30 |