
By the end of this assignment, you will be able to:
Create your own page using the traditional box model
Create your own page using the flexbox box model
For information on design principles and concepts, read through: basic-design-theory.htm As you become more comfortable creating pages using the box models and other techniques we will be covering, you should incorporate the design principles and color theory into pages you create.
To see a video explanation of what you need to do, view: https://youtu.be/Ye0qxLmOaGI
You will be creating two pages. One will be done using the traditional box model. The second will be created using the flexbox model. Both pages will use the same content - you will just use the two different CSS box models for styling.
This is similar to what we did with the farm file.
1. Create a page using the traditional box model. Name the page traditionalBox.html (the html file should be saved to your Lesson6 folder)
Your html should be similar to the example below. You need to put relevant content into the page - do not use default text such as Text heading or Enter your page title here. You need to generate content and the content can be whatever you want.
<!DOCTYPE html>
<html lang="en">
<head>
<title>Enter your title here</title>
<meta
charset="utf-8">
<link rel="stylesheet"
href="css/traditionalBox.css">
</head>
<body >
<header>
<h1>Enter your page
title here</h1>
<aside>
<h3>enter aside text</h3>
</aside>
</header>
<main>
<article>
<section>
<h2>Text heading</h2>
<p>text or link</p>
</section>
<section>
<h2>Text heading</h2>
<p>text or link</p>
</section>
<section>
<h2>Text heading</h2>
<p>text or link</p>
</section>
<section>
<h2>Text heading</h2>
<p>text or link</p>
</section>
<section>
<h2>Text heading</h2>
<p>text or link</p>
</section>
</article>
</main>
<footer><p>© NMC, Lisa Balbach</p></footer>
</body>
</html>
To see an example, view: traditionalBox.html (To see the source code, right click and select View Source Code)
2. Create css for the page. Name the css file traditionalBox.css and save the file into your Lesson6/css folder.
The css for the boxes should use the following properties: width, height, float, padding, margin, border. You should include css for headings, links and paragraphs. Structural elements like sections, body, header and footer should also have css styling.
To view the css used in the traditionalBox.html page, see: traditionalBox.css Your CSS should look similar. If you want to copy/paste the sample code and use it as a starting point, that is OK - just make sure you customize it for your own page!
1. Open traditionalBox.html and save it as flexboxModel.html. Modify the css link at the top of the code to the following:
<link rel="stylesheet" href="css/flexboxModel.css">
2. Open the traditionalBox.css file (it should be in your Lesson6/css folder). Save the file as flexboxModel.css
3. Modify the properties and values in the flexboxModel.css file to remove the traditional box styling and insert the flexbox styling. To customize flexboxModel.css, do the following:
a) Create a parent container.
In the code above, boxes are defined by the section selector. The section selectors are inside the article element, so article can serve as the parent container. If you didn't have an existing element that worked as a container, you could just create an id or class like some of the examples in the lecture and book.
For this assignment, you can simply use the article element as the parent.
You need to add css similar to the example below:
article{
display: flex;
height:500px;
overflow:auto;
flex-wrap:wrap;
align-items:center;
}
b) Identify which selector(s) are child or item selectors and make sure they are inside the parent container.
Any element inside the parent is considered to be a child. In the example, the section elements are inside article and are considered to be children or items.
Another reason we would want to use the section as a child or item is because it is the element producing the boxes. The code should be modified to remove the float property and insert the flex property. It should look something like this:
section{
flex:1;
background-color:white;
border:10px green groove;
margin:10px;
padding:20px;
text-align:center;
overflow:auto;
min-width:150px;
min-height:200px;
}
c) If you have any other css code that uses float, it should be removed and adjusted. In our assignment file, there shouldn't be any other float properties.
To see the revised html file, view: flexboxModel.html
To see the revised css, view: flexboxModel.css
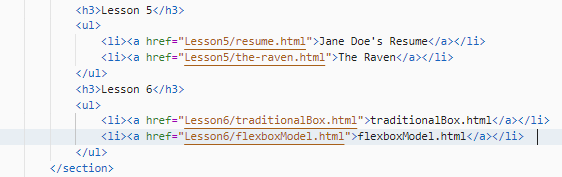
1. Add the Lesson 6 heading and the textbook assignment links to the textbook section of the page (see below)
Here's how the code should look:
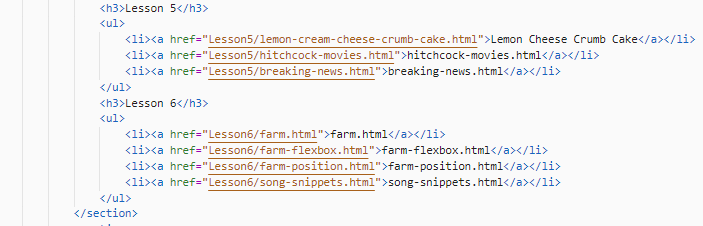
2. Add the Lesson 6 heading and lab assignment links to the Lab Assignment section of the page (see below)

Here's how the code should look:
3. Transfer the assignments.html file to the CIT180 folder. Be careful when you drag the file - you don't want to place it inside any of the lesson folders
4. Open the Lesson 6 folder on the server and on your computer. Transfer the tradtionalBox.html and the flexboxModel.html files from your Lesson6 folder to the server's Lesson6 folder
5. Open the Lesson6/css folder on your computer and on the server. Transfer the tradtionalBox.css and the flexboxModel.css files from your Lesson6/css folder to the server's Lesson6/css folder.
6. To transfer your images, open the Lesson6/media folder on your computer and on the server. Transfer any new images from your Lesson6/media folder to the server's Lesson6/media folder.
To see a video demonstration showing how to transfer files for the textbook
exercises and lab exercises, view:
https://youtu.be/xSFdCN7Lupk
| traditionalBox.html and traditionalBox.css | 10 points |
| flexboxModel.html and flexboxModel.css | 15 points |
| Updates to textbook and lab links in assignment page | 5 points |
| Total | 30 points |